
A fast bowlers grip forms the foundation of a good bowling action! Being technically sound in this area is what allows the bowler to release the ball in the best way possible. If we want the ball to do dangerous things after it leaves our hand, such as swing in the air or seam/deviate off the pitch, then we must make sure that we have our grip and release spot on! So, the question is, how exactly should a fast bowler be holding the ball?
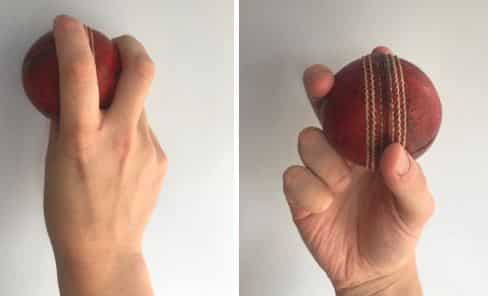
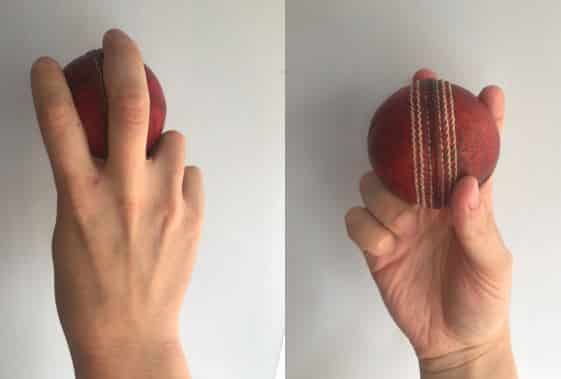
The conventional fast bowling grip is incredibly simple. The index and middle fingers of your bowling hand should be placed alongside, and parallel with the seam. They should also be a comfortable width apart. The thumb is used to provide support underneath the ball, and should be resting either close to, or on the seam. The ring finger and little finger are usually bent slightly and used to support their side of the ball. Lastly, it’s important to ensure the grip is not too tight! You should try to maintain a small gap between the base of the thumb and the ball. If you do not have this gap, it is likely that you are holding the ball too deep in your hand. This makes the release of the ball a lot more difficult and restricts our ability to use our wrist effectively during the release phase of our action.
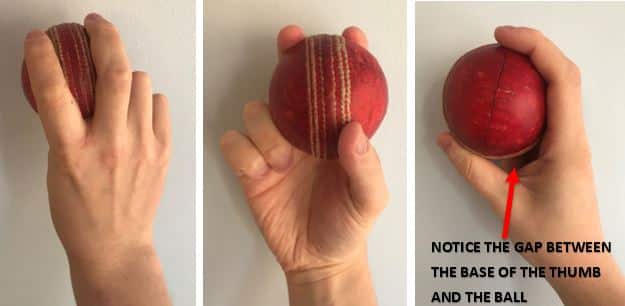
I have included a few photos of the grip above so you can really see what the things I listed above look like in reality! Obviously, there will be bowlers who make tiny changes to this grip because there is something that feels slightly more comfortable to them. Things such as having their index and middle fingers slightly wider than usual, or gripping the ball a little tighter than I have recommended! At the end of the day, a cricketer should always do what feels most comfortable to them, but I’d recommend sticking closely to the technical points I mentioned above!
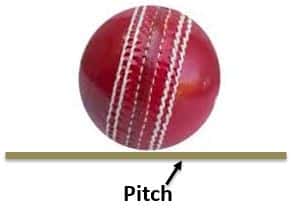
A bowler who uses this conventional grip for the majority of their deliveries is classed as a ‘seam bowler’. A seam bowler is a fast bowler who tries to get the ball to deviate when it hits the pitch by landing it on the seam. The reason that this deviation occurs is because the seam is the most pronounced part of a cricket ball, it has a slightly raised profile! Therefore, if it travels through the air with a nice vertical seam position and hits the pitch at a slight angle (an example is shown in the picture below), the ball can potentially bounce off the wicket at strange angles. A perfect seam bowling dismissal would be one where the ball pitches outside the batsman’s off stump, hits the seam and then angles in towards the batsman before hitting the wickets! This is just one of the things seam bowlers will aim to achieve!
The best seam bowlers will get the ball to travel through the air with that vertical seam position regularly. If they can do this, it means that the ball is more likely to land in the position shown above, which will lead to them getting seam movement from the pitch. Having the correct grip is just one of the aspects that contributes towards getting the ball to land like this! The other main contributor is the wrist position! And that is what I will be covering in the following section…
What Is The Correct Wrist Position For Fast Bowlers?
Fast bowlers should mostly always be aiming to get their wrist in a solid position directly behind the ball when they are bowling. There are numerous advantages to this! Let’s go through some of them:
- The wrist position during release has a massive impact on how the ball will behave during its flight. Having it in the correct position means there is more chance you will get the ball travelling through the air with a nice vertical seam position. This is true for both seam and swing bowlers!
- Having the wrist directly behind the ball during release helps us to bowl faster because the momentum we generated during our run up is being transferred directly into the ball, helping propel it in the direction of the batsman.
- A consistent wrist position also helps our bowling accuracy! Having a weak wrist that you cannot keep control of means that the point the ball is being released from will likely be different for every delivery. It is likely that this will lead to your deliveries being a bit more scattered.
It’s probably about time that I showed you what a good wrist position for a bowler looks like! In the photos below you can see the good wrist position on the left, with the less desirable one on the right!
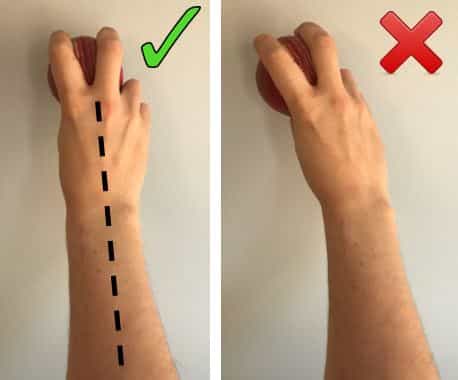
I like to imagine that I’m trying to show the batsman the palm of my hand as I’m bowling. To show the batsman my palm, my wrist must be locked in a central position, which is ideal! If I allow my wrist to move off centre, like in the photo above on the right, then I will no longer be pointing my palm directly towards the batsman. Another way to imagine it is that you have a rod running directly through your arm, from your elbow to the tip of your middle finger. This rod keeps your whole forearm as well as your wrist and your hand perfectly lined up throughout your bowling action. Use this imaginary tool and thought process to keep your wrist locked in that central position!
I have a few other things that I liked do to practice and rehearse my wrist position. These are so simple but they really did make a difference to my game! Here they are:
- One of the first steps is to try to find out how good your current wrist position is! If you have access to a high-quality camera, get someone to film you bowling. Get them to stand close to the point from which you will release the ball, and make sure you bowl as you usually would. Looking at this footage and slowing it down should help you see the position your wrist is in! You can get someone to hold the camera, or if you have a tripod to mount the camera on that would be even better! This is a great way to analyse all aspects of your bowling action and I honestly can’t recommend it enough! If you don’t have access to any of these things, get a coach to watch you bowl and ask for them to focus specifically on your wrist position.
- Some bowlers choose to have their arms and hands flopping around all over the place as they are running in to bowl. Instead, I used the run up phase of my action as a sort of ‘rehearsal’ for what was about to happen when I released the ball. Throughout my entire run up, I would have my wrist locked in that desired central position. I would still move my bowling arm back and forwards as I was running in, but the wrist would be totally stationary. I always felt like this helped me to ingrain that central wrist position into my muscle memory, and made it easier for me to keep my wrist like that as I released the ball.
- Practice throwing the ball up in the air and making the ball spin with the perfect vertical seam position. You can do this by first holding the ball in the conventional grip with your palm facing the sky. From here, bend your wrist and bring your hand up towards you, letting the ball roll off the end of your index and middle fingers. If your wrist remains in the central position you should be able to get the seam of the ball rotating vertically. If your wrist isn’t in the correct position, you will probably see the seam rotating in a more scrambled way.
Other Types Of Grip That Fast Bowlers May Use
In the section above, I outlined the basic grip that all fast bowlers should learn first before they move on to anything else! As we discussed, this grip is excellent for bowlers who are aiming to get the ball to seam and deviate when it hits the pitch. However, there are certain times where bowlers may choose to adjust the conventional grip a little in order to bowl a slightly different type of delivery. For example, if a fast bowler wants to bowl an inswinger, or an outswinger, or any of the many different types of slower ball that exist in the game of cricket, the conventional grip has to be altered! In this section I’ll take you through those adjustments and we’ll look at the different grips required for each type of delivery.
What Is The Correct Grip For The Outswing Delivery?
For a fast bowler who bowls with their right arm, the outswinger will move away from the body of a right handed batsman. Ideally, the bowler will look to start the delivery on an off stump or middle stump line, and get the ball to swing away to the off side whilst it is in flight. The perfect scenario for a bowler is if this results in the batsman getting an outside edge on the ball!
Right arm bowlers can achieve the outswing grip by following these two steps:
- Hold the ball in the conventional grip that I outlined in the first section of this post, the seam should be pointing forwards with the index and middle fingers running alongside it.
- Now, rotate the ball about 20 degrees to the left, so that the seam is pointing roughly towards where first slip would be if a right handed batsman was on strike. Keep your fingers where they were originally, it is only the ball that should be rotated. Your index and middle fingers should now be laying across the top of the seam.
If you follow these steps correctly the ball should be in the position that I’m demonstrating in the pictures below!

The outswinger bowled by left arm fast bowlers will swing in the opposite direction. So, the ball will swing away from the body of a left handed batsman, but in towards a right hander! The grip is exactly the same, except for the fact that the ball is held in the left hand and it must be rotated 20 degrees to the right instead of the left!
One of my older posts on this blog was specifically dedicated to what it takes to get the ball to swing, and obviously one of the main things that I covered was outswing! If you were interested in the outswing grip then you’ll probably find a few more interesting bits of info in that post! It also covers inswing too, so click here if you want to learn more!
What Is The Correct Grip For The Inswing Delivery?
You may already know this, but the inswinger is the opposite of the outswinger. So, for a right arm fast bowler, the inswinger will swing in towards the body of a right handed batsman, and away from a left handed batsman. Inswing bowling was always something that came more naturally to me! I’d usually try to bowl the delivery on a 5th stump line and hope that it would swing back in towards the off stump of a right hander!
If you’re a right arm bowler, follow these simple steps to get the hang of the inswing grip:
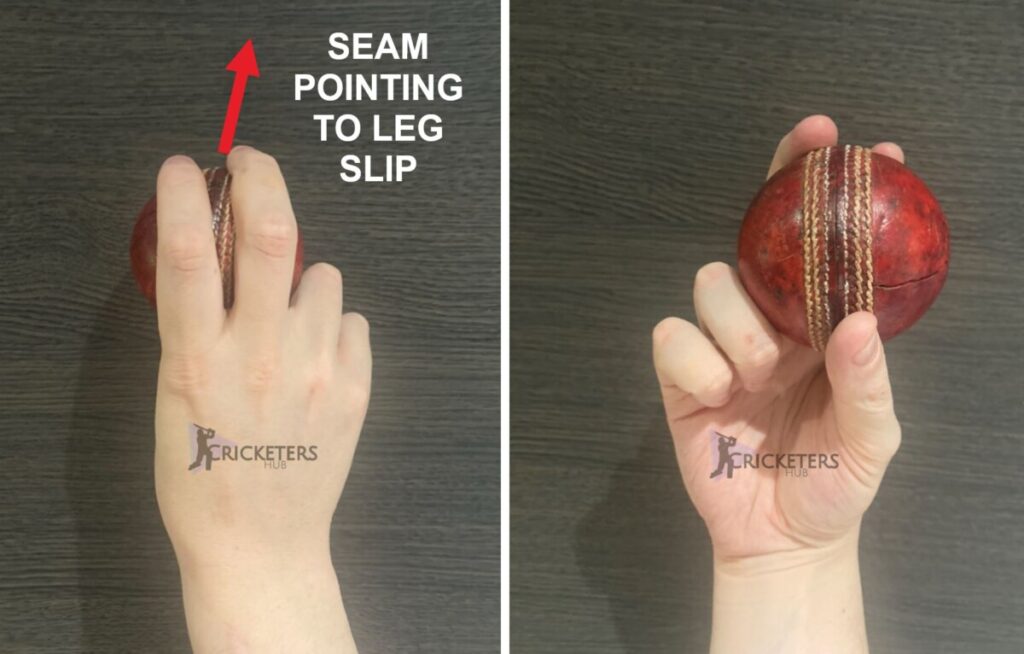
- Hold the ball in the conventional grip that I outlined in the first section of this post, the seam should be pointing forwards with the index and middle fingers running alongside it.
- This time, rotate the ball approximately 20 degrees to the right! If you’re bowling to a right handed batsman, the seam should now be pointing towards the direction of where a leg slip fielder would be. If you have positioned the ball correctly, your index and middle fingers should now be laid across the top of the seam as I have shown in the pictures below!
Inswing deliveries bowled by a left arm bowler will move the opposite way in the air. They will swing in towards a left handed batsman, and away from a right handed batsman. The grip is achieved by following the steps above, except here you will be holding the ball with your left hand and turning the seam 20 degrees to the left.
What Is The Correct Grip For The Cross Seam Delivery?
The cross seam delivery is bowled primarily by fast bowlers when they are struggling to get the ball to swing. This forces them to try other methods to confuse the batsman!
The grip needed for the cross seam delivery is shown below. It’s incredibly simple to master because the only thing that makes this delivery different from normal is the way you grip the ball!

Don’t worry about changing the way you release the ball, or adjusting your wrist position, just keep everything as normal. Due to these reasons, you don’t even really need to practice it! However, I would always recommend familiarising yourself with it a little before you start using it in a match situation!
So, why do bowlers choose to bowl the cross seam delivery? Basically, they bowl it because it might make something unusual happen! When bowlers release the ball in the normal way, the seam will usually be hitting the pitch in a vertical position. When they release the ball with the cross seam grip, it might be the polished side of the ball that makes contact with the pitch, causing the ball to skid on a little more. Alternatively, it could land on the seam horizontally, which may cause it to ‘stop’ in the wicket a little. This would wreak havoc with a batsman’s timing! I remember Stuart Broad using this delivery a lot! As I said, it is mainly a weapon that is used when the bowler can’t get the ball to swing in the air. You should always keep it in reserve just in case you need it!
What Is The Correct Grip For The Off Cutter?
An off cutter is a slower ball that requires a slightly different grip to normal. It also requires the bowler to apply a slight bit of off spin to the ball as they release it. Applying this rotation as you release the ball causes it to be delivered at a lot slower pace. For right arm bowlers, the off cutter will be spinning in a clockwise direction, whereas left arm bowlers will spin the off cutter in an anti-clockwise direction. I have covered all the steps you will need to follow to bowl the off cutter in one of my other posts! If you haven’t seen it, it basically includes all the different kinds of slower balls you are likely to encounter in cricket, as well as teaching you how to bowl them! So if you want the full details of how to bowl the off cutter, click the link here!
For now though, I will show you what the off cutter grip looks like! It is largely the same as the conventional grip, except your middle finger should be removed from the top of the ball and placed at the side of it instead. You can see this in the photo I have included below.
As you can see from the photo, I am a right arm bowler! But the off cutter grip is the same for left arm bowlers too. Just take your middle finger off the ball and place it lower down on the same side of the ball!
What Is The Correct Grip For The Leg Cutter?
The leg cutter is another form of slower ball that requires a slightly different grip! This time, the fast bowler will be looking to apply a tiny bit of leg spin to the ball so that the delivery comes out a lot slower than usual. For right arm bowlers, the leg cutter will rotate in an anti-clockwise direction. For left arm bowlers, the ball will rotate in a clockwise direction. The leg cutter is covered in greater detail in my post covering all of the slower balls in cricket! So again, if you want to learn how to bowl it properly, I’d check that post by clicking here!
Whether you are a right or left arm bowler, the leg cutter grip requires you to remove your index finger from the top of the ball, leaving your middle finger straddling the seam by itself. The index finger is placed down the side of the ball. I have included the photo below as an example!
What Is The Correct Grip For The Split Finger Delivery?
If you’re not sure what the split finger delivery is, I can assure you that a big clue lies in its name! The split finger delivery is a slower ball that is made possible because the index and middle fingers have been split away from each other to an unusually large degree. The grip you should be adopting to bowl this ball looks something like this:

The way the fingers are split mean that we are not getting much of our hand behind the ball in order to propel it quickly towards the batsman. The ball sort of falls out of the top of the hand through the large gap in the fingers. Because we aren’t propelling the ball with as much force, the split finger delivery comes out a lot slower than your usual pace! Aside from the change in grip, this ball is bowled exactly the same as a normal delivery. The main advantage is the change of pace!
To Conclude…
Hopefully this post has helped to solve all of your fast bowling grip related questions. If it hasn’t helped you, or you feel I’ve missed something out, feel free to take me to task in the comments!
Like I said at the start of this post, the grip forms the foundation of a good bowling action. I often think that bowling fast is like a checklist, where you have to tick off many different items in order to be successful. The grip is probably the first one you should look to tick! Beyond that there are many other areas you should look to perfect; the run up, the delivery phase, and your speed and accuracy are just a few! If you want to take the next step on your journey to becoming a skilled fast bowler, click here to read one of my other posts that includes 11 incredibly useful tips!
Recent Posts
Where Should You Place Your Best Fielder In A Cricket Match?
When a limited overs cricket match reaches a critical point, you’ll often hear coaches, players and commentators talking about how important it is to ‘have your best fielders in important...
The sport of cricket has successfully rebranded itself in the last half century in order to appeal to wider audiences. Now, instead of just having test cricket as the sole international format of the...