
There are a lot of different moving parts to a cricketer’s bowling action. For newcomers to the game, putting all of these moving parts together in order to create your own bowling action can seem like a complicated task! Especially when you first start trying to bowl, the whole movement can feel really unnatural and strange. Trust me, I’ve been there! But over time you will settle on a technique that works and feels right for you. Hopefully, this post will be able to provide you with some helpful tips on what you should be doing to get comfortable with bowling.
If you want to learn how to bowl in cricket then you should focus on the following things:
- Gripping The Ball Correctly
- Breaking
Down The Bowling Action Into Smaller Parts:
- The Run Up
- The Gather Phase
- The Coil Phase
- The Release Phase
- The Follow Through
- Keep Your Hips & Shoulders Aligned
- Focus On The Point On The Pitch Where You Want The Ball To Land
- Align Your Front Arm With The Target
- Don’t Overstep
I’ll now explore these in more detail for you…
Grip The Ball Correctly
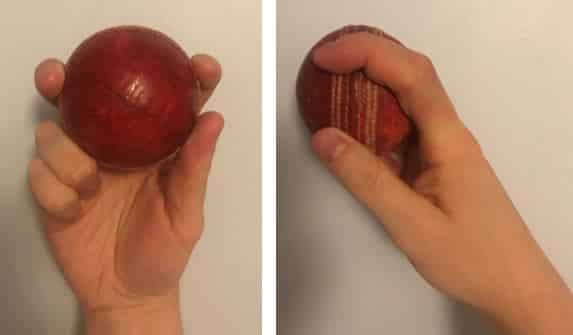
The first step to learning how to bowl is to learn how to hold the ball correctly. This is really easy to get right. If you’re a fast bowler then you should put your index and middle fingers on top of the ball with the seam running in between them, like I’m showing in the photo below. Your ring finger and little finger should be positioned alongside the ball to provide support, and your thumb should be underneath the ball close to or on the seam. Make sure the ball isn’t pressed too far back into the palm of your hand, as this can have a negative impact on the way you release the ball. Try to make sure there’s a small gap between your palm and the ball.

If you want to be a spin bowler, then the grip is quite similar as the one I’ve just showed you. The main difference is that your index finger and your middle finger should be spread a bit wider apart, and the ball should be rotated so that the seam runs across your fingers rather than parallel to them. I’m demonstrating this in the picture below so feel free to copy that! Again, you should make sure to leave a small gap in between your palm and the ball as you grip it. You want your grip to be nice and relaxed so the ball can be released smoothly!
If you’re a young cricketer or you’re the parent of a young cricketer, then you/your child may not be able to hold the ball in the way I’ve explained above because their hands are too small. If this is the case, the ball should be held in the palm of the hand normally without focusing on getting 2 fingers on top of the ball. I’m demonstrating this type of grip in the photo below! This grip is a good substitute for the ones I showed above whilst younger cricketers are maturing and getting big enough to bowl with full size cricket balls. Once their hands have grown to an appropriate size, the proper grip should be used!

Break Down The Bowling Action Into Smaller Parts
A ‘bowling action’ is the term that cricketers use for the movement of the bowler from the start of their run up to the point at which they release the ball towards the batsman. As I mentioned at the start of this post, there are a lot of different parts of a bowling action which require co-ordination if you’re going to become a successful bowler! These movements are tough to get the hang of when you’re just starting to play cricket, and that is why I prefer to think about them individually at first before joining them together at the end. Let’s go through each part of the action in more detail…
Run Up
For cricketers that are just starting to bowl, the main focus of the run up should be to build up a little bit of speed before you reach the crease. The run up does not need to be particularly long. Most players that are just beginning to experiment with bowling won’t be bowling extremely fast, so I’d start with a run up that is about 5 paces long! Keep it nice and simple to start with. Once you become more comfortable with the movements required to bowl, you can increase the length of the run up to allow you to bowl faster.
The pace of your run up should be something like a light jog, and make sure you are running in a straight line. This is a good base to build one once you get more confident. When you’re just beginning your bowling journey, the most important thing is that the run up feels nice and comfortable, so find something that feels natural to you and don’t over-complicate it at this stage!
As bowlers gain more experience, they will begin to realise that the run up is a hugely important part of bowling, especially for fast bowlers. If you want to be able to bowl really fast then most of your speed is likely to be generated by your run up. The ideal run up is long enough to allow you to build up a good speed, but you don’t want it to be too long! No one wants to feel like they’ve run a marathon by the time they reach the crease! Also, you don’t want to be running in too fast. Ideally your run up speed will be something like a brisk jog, getting slightly faster as you get closer to delivering the ball.
Also, as I mentioned earlier, I think you should aim to keep your run up nice and straight, with all of your energy going directly towards the batsman. You don’t want to have an unnecessarily curved run up with your arms flailing in different directions. This can harm your ability to bowl fast, and wastes energy. If you want more details on how to measure your run up, as well as how fast you want to be approaching the crease, then click here to read my post that will tell you all you need to know!
The ideal run up for a spinner is usually just a few paces long. The run up will often begin at walking pace, and quicken a little as the spinner is about to deliver the ball. Because spinners bowl a lot slower than fast bowlers, the run up is not as critical! If you’re a spinner, just do whatever is comfortable for you. Spinners run ups are rarely any longer than 5 paces so use that as a benchmark!
The Gather Phase
The ‘gather phase’ is the part of the bowling action that allows you to transition between the main part of your run up and the release of the ball. The gather phase takes place at the same time as the coil phase! Let’s see what it involves:
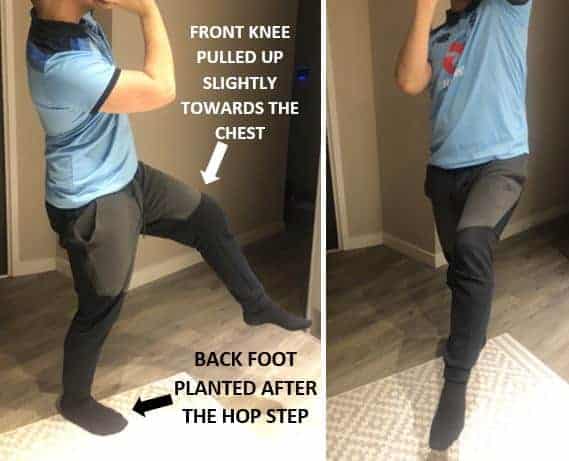
- The gather phase begins a couple of paces before you release the ball, and starts the process of getting you in position to bowl. If you’re a right arm bowler, once you get about two paces from the crease you should take off from your left foot and do a hop step on to your right foot.
- Immediately after you hop on to your right foot, bring your left knee up towards your chest a little, and then lean backwards slightly, getting yourself ready to release the ball.
For left arm fast bowlers, you should be doing the exact same thing with the opposite feet! So, if you’re a left arm fast bowler, perform your run up and once you get roughly two paces from the crease you should take off from your right foot and do a hop step on to your left foot. As you do that, bring your right knee up a little towards your chest and lean backwards slightly, getting yourself ready to release the ball.
At the end of the gather phase you should be roughly one stride length away from the popping crease, and your body should be in a position similar to the one shown in the photos below!
The Coil Phase
As I mentioned above, the coil phase takes place at almost exactly the same time as the gather phase of the bowling action. The coil phase refers more to the movement of your upper body, rather than the lower body. Here’s what you have to do during the coil phase of your action:
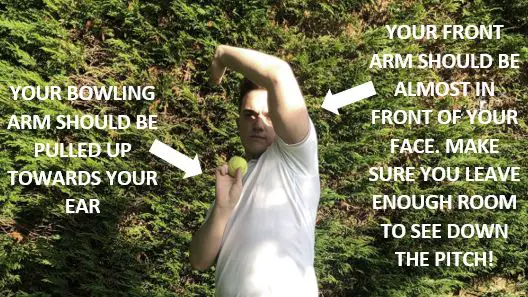
- Let’s start by looking at right arm fast bowlers first. As you are about to do the little hop step from your left foot to your right foot as I just mentioned during the gather phase, you should be bringing your bowling arm up to your right ear at the same time.
- Immediately after your bowling arm is next to your ear, bring your left arm up in front of your face, pointing your elbow in the direction that you want to bowl the ball.
For left arm bowlers, your bowling arm should be brought up somewhere close to your left ear just as you’re about to hop from your left foot to your right foot. Immediately after putting your left arm to your ear, your right arm should be brought up in front of your face with your elbow pointing towards where you want to bowl.
At the end of the coil phase, your arms should be in a position similar to the one I’m showing below, ready to rotate and release the ball in the next phase.
The Release Phase
This is where things get fun! All you have to do now is perform one final stride and send the ball travelling towards the batsman. So, how do you move from the coil phase/gather phase to releasing the ball? Let’s go through it.
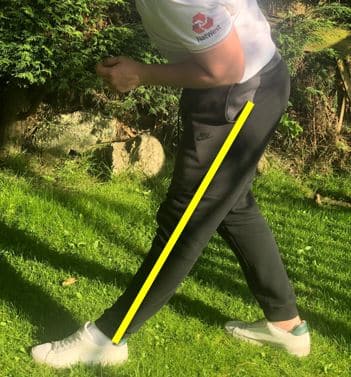
- Let’s look at the lower body first. After the gather phase right arm bowlers should have their right foot on the floor and their left knee pulled up slightly towards their chest. Left arm bowlers should have their left foot planted, with their right knee pulled up towards their chest. From here, your leg movement is simple. All you need to do is slam your foot that is up in the air down on to the floor in front of you, leaning forwards slightly as you do it. This final stride is likely to be longer than your other strides because all of the momentum you’d built up during your run up is being slowed down very quickly when your front foot lands! Your leg position should now look something like the photo below. Oh, and I should probably mention at this point that keeping your front leg braced, or straight at this point in your action like I’m demonstrating below can help you to bowl faster. Click here if you’d like to read more about that!
- The arm movement is also quite simple. At the same time as you’re slamming your front foot on the ground, you should be pulling your front arm downwards forcefully. Once you pull your front arm down, your bowling arm should rotate all the way around, eventually releasing the ball just after your arm reaches its highest point. The more forcefully you pull down your front arm, the quicker your bowling arm will rotate over the top, allowing you to bowl faster. Also, you should remember to keep your bowling arm straight when you release the ball. Bowling with a bent arm is not allowed in the game of cricket and the umpire will probably call a no ball!
The Follow Through
When bowling, it’s important to have a ‘follow through’. This means that rather than standing still after you have released the ball, you should continue your motion and run 3 or 4 steps down the wicket towards the batsman. A follow through is important as it helps to take stress off your body, and also allows you to get more of your momentum behind the ball as you push through the crease. If you have no follow through and your motion just stops on the line of the crease, you cannot get any of this extra momentum behind your delivery!
One thing I should mention is that you shouldn’t run directly down the middle of the pitch when you are following through after you’ve bowled. The middle of the cricket pitch is a protected area that is not allowed to be purposely damaged or scuffed up by the fielding side or the batting side. Therefore, if you follow through down the middle of the pitch the umpire will give you a warning. Enough of these warnings could result in the umpire suspending you from bowling! To avoid this, you should follow through in a way that takes you away from the middle of the pitch and towards the side of the pitch instead.
Keep Your Hips & Shoulders Aligned
Keeping your hips and shoulders in line as you deliver the ball is hugely important, and will make your cricket career go much more smoothly.
Fast bowlers can broadly be inserted into 3 different categories when it comes to their bowling actions. The first of these are ‘front-on bowlers’. Being a front-on bowler refers to the fact that when they bowl, both of their shoulders will be in a forwards-facing position, allowing their chest to be pointing directly towards the batsman. Therefore, if the shoulders are facing forwards, the hips should always be in the same position. The second type are ‘side-on bowlers’. These bowlers only have their front shoulder pointing towards the batsman, with their chests pointing sideways at a 90-degree angle. Bowlers like this should make sure that their hips are also aligned sideways in a similar way.
Problems start to occur when a bowler has their shoulders facing sideways but their hips facing forwards towards the batsman, or also when a bowler collapses sideways during their delivery like you can see in the photo below. This is what is known as a ‘mixed action’. Actions like this can lead to severe injury problems, and it’s something you should always try to avoid. If you’ve joined a cricket club and you’re just beginning to learn how to bowl fast, speak to one of your coaches and ask them to evaluate your action to make sure you’re not bowling with a mixed action! These problems are much easier to fix when you’re earlier in your career.
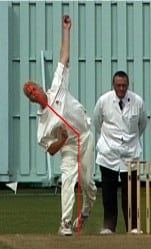
It’s important to find a bowling action that works for you, but you’ve got to make sure it keeps your body as healthy as possible. Make sure your hips and your shoulders are in line to achieve this.
Focus On The Point On The Pitch Where You Want The Ball To Land
Fast bowlers are always looking for ways to improve their accuracy, and this is one that has worked wonders for me! If you can get into the habit of doing it early in your career then I think you’ll be able to bowl a lot more accurately once you get used to your bowling action.
The theory behind this is simple, we can hit a target more accurately if we have our eyes focused on the target. It’s much harder to score a goal in football if you’re not looking at the goal itself! Also, bringing it back to cricket for a second, it’s much harder to hit the ball when you’re batting in cricket if you don’t keep your eye on it!
When you’re about to start your run up, think about what kind of delivery you want to bowl. Then, hold your eyes on that spot as you approach the crease. Keep your eyes there until the ball has left your hand. If you do that regularly and pair it with my next accuracy tip then you will definitely be able to bowl better lines and lengths!
Align Your Front Arm With The Target
This is my second tip that will help you with your accuracy, and this is another one that helped me out a lot with my bowling. This tip doesn’t really help you get the length of your delivery right, but it definitely helps you to bowl the right line!
We’ve already discussed that pulling your front arm down forcefully is one of the keys to bowling fast, but I find that if you point your front elbow in the direction you want to bowl, you can deliver the ball a lot more accurately. The basic idea is that if we pull our front arm down on the same line that we want to bowl, our bowling arm will also follow that line, allowing us to release the ball from a more consistent position. Releasing the ball in a consistent way can help our accuracy.
I’d recommend trying this in practice once you get comfortable with your bowling action. Try to make sure that when you’re in the coil phase of your action, you align your front arm with where you are wanting the ball to go! Once you get used to doing this, you won’t have to think about it as much!
Don’t Overstep
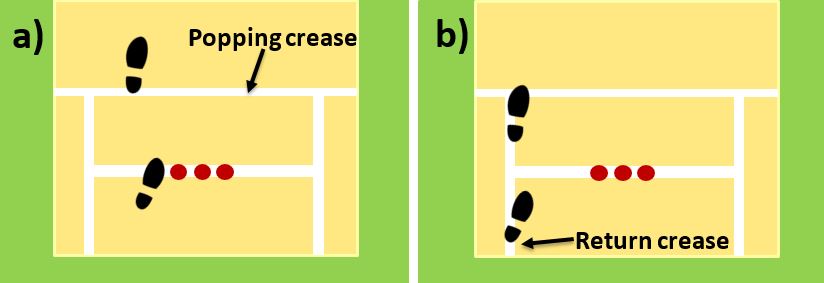
I’m guessing a lot of you may already know this, but when it comes to playing in a real cricket match you need to make sure that you get some part of your front foot behind the line of the popping crease! The popping crease is the line that runs across the pitch which the batsmen stand behind! If you fail to keep some part of your front foot behind this line, the umpire will declare a no ball – awarding one run to the other team and making you bowl the delivery again. Your run up should be measured out in a way that helps you avoid overstepping on the crease, but for more detailed information on that you can check my post here. You don’t want to be worried about overstepping the popping crease while you’re running in to bowl, because this can disrupt your rhythm! This will cause you to bowl slower and less accurately.
In addition to overstepping on the popping crease, no balls can also be awarded by the umpire if you land part of your foot outside the return crease! The diagram below should help to explain the two types of overstepping that I’m talking about.
When you first start experimenting with bowling you need to take time to get comfortable with your run up and the movements that are required. Therefore, at first, don’t think too much about overstepping and bowling no balls. But keep in mind that when it comes to playing in a real cricket match this is something that you’re going to have to get right! No-one wants to be giving free runs to the opposition team, so being aware of this is important.
Conclusion
To conclude this post, I should probably mention that it’s incredibly important to bowl in a way that feels comfortable for you. Every bowler has a slightly different bowling action, and that’s totally fine. This post was intending to give you a framework to build your bowling action from, and to tell you the sorts of things you should be trying to avoid like mixed actions. If you keep these things in mind you should be able to construct an effective action. I’d definitely recommend checking out some of my other fast bowling posts if you want more specific bowling tips!
Recent Posts
Where Should You Place Your Best Fielder In A Cricket Match?
When a limited overs cricket match reaches a critical point, you’ll often hear coaches, players and commentators talking about how important it is to ‘have your best fielders in important...
The sport of cricket has successfully rebranded itself in the last half century in order to appeal to wider audiences. Now, instead of just having test cricket as the sole international format of the...