When bowled correctly, the outswing delivery is one of the most beautiful sights in cricket. It is also one of a fast bowlers most dangerous weapons! No matter what level of cricket you play or how old you are, it’s possible for you to learn how to bowl outswing deliveries too, and that is the knowledge that I aim to pass on to you in this post today!
Over the many years I’ve been watching cricket, two of my favourite bowlers to watch have been Jimmy Anderson & Dale Steyn. They both regularly tormented batsmen with barrages of quick, outswinging deliveries, and took more than a thousand combined test wickets while doing so! The accuracy they possessed, combined with their ability to swing the ball away late at good pace were the main reasons that top batsmen found them so hard to deal with. Bowlers like this were the reason that I made it one of my goals to be able to bowl outswing too.
There are a few basic things you’ll need to master if you want to learn how to bowl outswing. Here they are:
- The outswing grip
- Getting the ball in the right condition for swing bowling
- Releasing the ball in the correct way
In this post, I’ll show you exactly what you need to do to get these things right! In addition to that, I’ll also give you some drills you can use to practice your outswing, as well sharing some tips about where you should be aiming to pitch the ball and how you can use the different angles of the crease to your advantage!
Before we begin though, we should probably discuss what ‘outswing’ actually is!
What Is Outswing In Cricket?
Swing is the term used in cricket to describe lateral movement in the air after the ball has been bowled by the bowler. Therefore, an outswing delivery is a delivery that moves away from a batsman in the air. It is the opposite of an inswing delivery, which would see the ball moving in towards the batsman’s body as it travelled towards them.
Let’s use a right handed batsman as an example. In the diagram below, you can see that as the ball gets closer to the batsman, the ball is moving further towards the off side. It is swinging out!
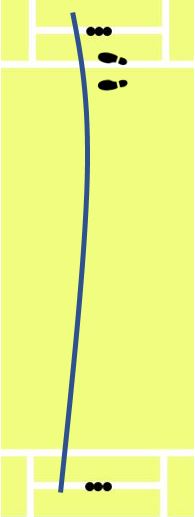
However, now you’ve seen what an outswing delivery looks like to a right handed batsman, let’s think about what the same type of ball would be called if it were bowled at a left handed batsman instead. In the diagram below you can see the same type of swinging delivery being bowled to a left hander. In this case, the swing is bringing the ball in towards the batsman’s pads, technically making it an inswing delivery! To sum this up, an outswing delivery bowled to a right handed batsman, would be an inswing delivery if it were bowled to a left handed batsman, and this is because of the different way each batsman faces when they’re at the crease.
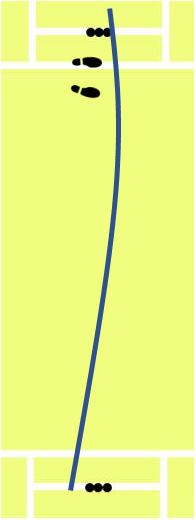
As you’ll be aware by now, the purpose of this post is to show you how to bowl outswing. Therefore, in this post I will be teaching right arm fast bowlers how to swing the ball away from right handed batsmen, and left arm bowlers how to swing the ball away from left handed batsmen. If you’re wanting to learn how to bowl inswing, then look out for a future post of mine where I’ll be covering that in just as much detail!
What Is The Grip Required To Bowl Outswing?
The grip is the first technical aspect you need to get right if you’re going to bowl consistently good outswing deliveries. Luckily it’s very simple to copy!
If you’re trying to use the grip for the first time, follow these steps:
- Hold the ball in the conventional fast bowling grip shown below. Your two fingers should be running parallel with the seam, and the thumb should be on the seam underneath the ball. Your ring finger and little finger should be supporting the ball at the side.
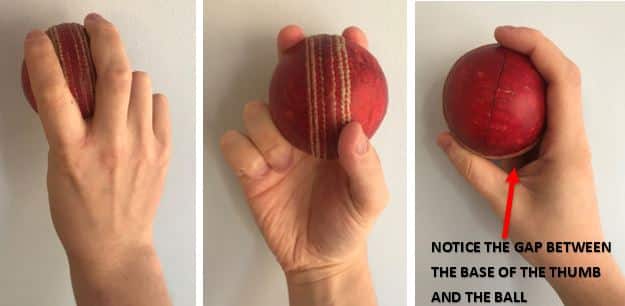
- Early in the innings, the ball will always swing towards the dull/rough side of the ball. So, if you’re a right arm bowler, place the dull side of the ball on the left, and the shiny side on the right. If you’re a left arm bowler, the dull/rough side of the ball should be on the right, with the shiny side on the left. If you’re bowling with a new ball that has two sides that are equally shiny, then you can ignore step 2 altogether!
- Once you are holding the ball in the conventional grip, right arm bowlers should turn the ball anti-clockwise slightly in their hand so that the seam is pointing towards where the slips would be for a right handed batsman. Left arm bowlers should turn the ball clockwise slightly so that the seam ends up pointing towards where the slips would be for a left handed batsman. The pictures below show what the grip should look like for a right arm bowler. As I just mentioned, left arm bowlers should be turning the seam the opposite way in a north east direction.
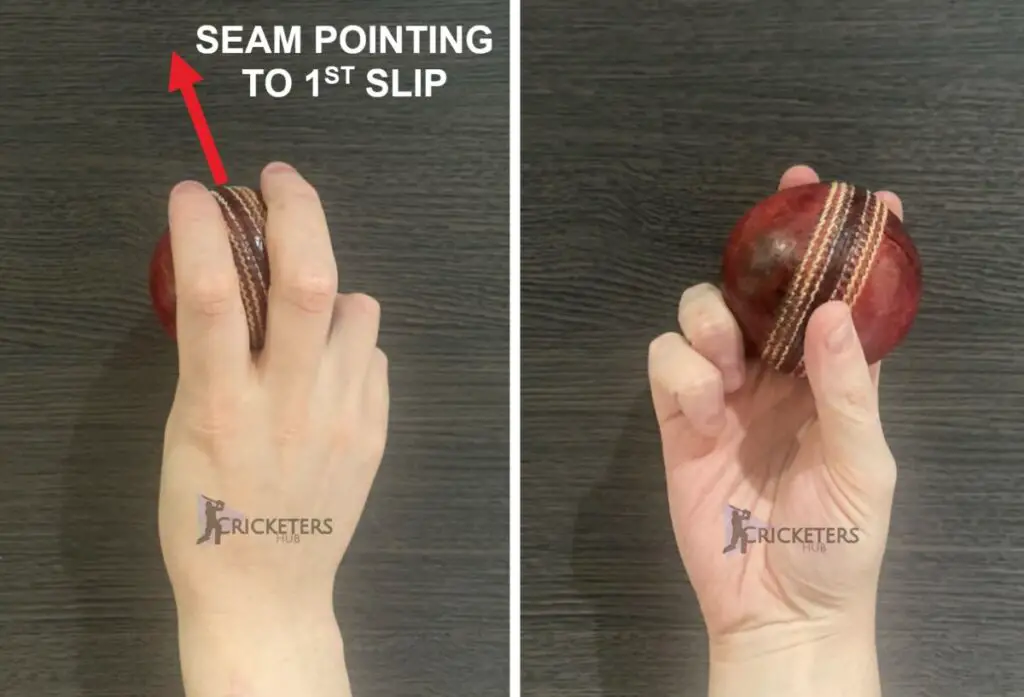
- As you can see from the photos above, when I use the outswing grip I like to have my index finger positioned just on the inside of the seam, with the middle finger going over the top of the seam onto the shiny side of the ball.
- Lastly, I prefer not to have the ball positioned too far back in my hand. Instead, I like to leave a nice little gap between the palm of my hand and the face of the ball. I feel that this helps me to release the ball more smoothly.
How To Get The Ball In The Correct Condition For Outswing
If you want to be able to bowl outswing, then you’re going to have to make sure that the cricket ball is in a suitable condition!
As a cricket ball gets older, you need one side of the ball to be shiny and one side to be dull and scuffed up if it is going to swing. Right from the beginning of the game, the fielding team should nominate a side of the ball that they’re going to shine, and make sure that they do this in between each delivery. While they shine one side of the ball, the other side should be allowed to get roughed up and become damaged.
The reason the cricket ball moves laterally in the air when one side is shiny and one side is scuffed up is because the scuffed side travels through the air slightly slower than the smoother, shinier side. The shiny side is nice and streamlined due to the all of the polishing that the fielding team have done, so it travels through the air nice and quickly. Because the scuffed up side travels through the air more slowly, the ball is pulled in this direction and swings towards the scuffed side.
When the ball is new (in the first 5 – 10 overs) it doesn’t require one side to be shiny and one side to be scuffed in order to swing. During this period, the swing occurs because the seam on the ball is a lot thicker and disrupts the flow of air around the ball. It acts like a rudder on a boat, causing the ball to move laterally in a certain direction. When the ball gets older, the seam loses its thickness and becomes flatter, meaning it doesn’t disrupt the air as much. Hopefully by the time this happens the fielding side will have been busy shining one side of the ball so that it will continue to swing even when the seam gets flatter!
If you want to get the ball in a good condition for outswing, I’d recommend following these steps:
- Once a ball has been bowled. Return it to the fielder who has been nominated to shine the ball. Most teams will nominate a specific fielder so that it is their responsibility.
- The fielder should apply a small amount of saliva to their fingers, and then rub the saliva into the shiny side of the ball. The goal is to get rid of any imperfections from the shiny side of the ball! Once the saliva has been applied, the fielder should take the shiny side of the ball and rub it with some form of material. Most players will rub the ball up against the front or the back of their trouser leg! This helps to dry the ball and helps it to develop a nice shine.
- Make sure to keep the ball as dry as possible while it is handled apart from the small amount of saliva that is being applied. Excess moisture soaking into the ball may mean it doesn’t swing!
How To Release The Ball When Bowling Outswing
Another very important part of bowling outswing is how the ball is released from your hand. Ideally, the perfect outswing delivery will feature the seam rotating nicely along its axis without wobbling and becoming scrambled in flight. If the ball is gripped and released properly, you will achieve this more often than not! The ball should be rotating similarly to the way shown in the diagram below.
In order to release the ball in the correct way you should be focusing on two main things; Getting your wrist in the correct position & making sure you use your fingers in the right way as the ball leaves your hand. Let’s look at the wrist position first…
Wrist Position During Release
To bowl outswing, it helps if your wrist is ‘cocked’ as you are about to release the ball. To show you what I mean, have a look at the photo below.
You can see in the photo above that I’ve flexed my wrist slightly so that my hand is tilted back towards my body. This is the perfect ‘cocked’ position for a right arm bowler (for left arm bowlers the wrist is cocked the opposite way), and it helps you to release the ball in a way that is more favourable for outswing. Try to keep your wrist in this position for as long as possible until you release the ball.
Sometimes it helps to use some mental imagery as well as some physical tools to teach you how to bowl with your wrist in this position. I had a couple of coaches when I was younger that told me to imagine that there was a pole halfway between me and the batsman that I was trying to get the ball to swing around. I’ve included a diagram of what this would look like below! If you were to try and get your delivery to swing around a pole that was in this position, it helps to have your wrist cocked in the way I showed above.
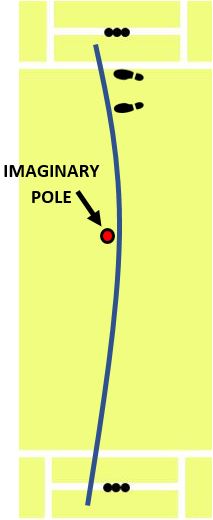
It takes a while to get this wrist position right. If you’re really wanting to perfect it, I’d recommend recording yourself bowling so you can watch how you’re releasing the ball. Set up a camera behind the point where you deliver the ball, and aim it towards where your hand will be. Alternatively, you can just ask a partner to record you. If you watch the video back and see that you’re failing to get your wrist in the right position, then you’ll know you need to change things.
Lastly, I must stress that you don’t need to get your wrist in this position in order to bowl outswing. It’s not mandatory. Plenty of bowlers bowl with a normal wrist position and can still get the ball to swing away from batsmen, but the cocked wrist position is something that can definitely help. Plus, bowlers like James Anderson use this technique, so you may want to copy them!
How To Use Your Fingers During The Release Phase
Using your fingers in the correct way can also help you to get the ball to swing, and it’s pretty easy to learn how to get this right!
Basically, when you’re bowling outswing, you should always make sure that the last finger that touches the ball as you release it is your index finger. So, instead of letting the ball come off both your index finger and middle finger at the same time, you need to let your index finger remain on the ball a split second longer. This split-second change can make all the difference.
A good way to practice this is by holding the ball in the outswing grip and throwing it up in the air. This really helps you get comfortable with the feeling of releasing the ball off your index finger. I like to start with the ball in the outswing grip with the back of my hand pointing upwards. Then I’ll lift up my arm and release the ball, dragging my fingers down the back of it as if I was bowling a real delivery. As you do this, pay particular attention to leaving your index finger on the ball slightly longer than usual. Try to get the seam of the ball rotating as uniformly as possible, with no scrambled seam. Also, bear in mind that the seam should be tilted towards the slips! You can repeat this drill as many times as you want due to it being incredibly simple to do, but once you’ve got a good feel for the new release, you should be good to go. I’ve included a couple of diagrams below that should help to illustrate this little drill!
So, why is releasing the ball off your index finger important? And why does it help? The first reason why this is important is because it helps to get the seam rotating in the correct direction for an outswing delivery as I showed earlier in the post. The seam is a lot more likely to be tilted towards first slip and to be rotating properly if the ball is released off your index finger.
Secondly, if you make sure that the index finger is the last one to touch the ball as it leaves your hand, this will cause you to push the ball in towards the batsman slightly. I’ve used the diagrams below to illustrate this. By pushing the ball in towards the batsman, this means there is more chance of them misreading the read the line of the ball and assuming you’ve bowled a straight delivery. Then, when the ball swings away late past their off stump, this can tie the batsman in knots as their feet will not be in a good position to play the ball on the off side. They’ll be more likely to be in a position to hit the ball down the ground or through the leg side, which is not a great place to be if the ball is swinging away to the off side!
Where To Bowl An Outswing Delivery
When bowling outswing, you should always be aiming to bring the batsman forward to drive the ball. This means that you should be aiming to get the ball to land on a good length, which is about 3-5 metres away from the feet of the batsman depending on the height and speed of the bowler. Basically, you should be trying to land the ball on a length that leads to it being just below knee height when it gets to the batsman. This should encourage them to come forwards on to the front foot.
In terms of the line of the ball, you should start by aiming for the off stump. If the ball swings a small amount it will end up on a testing line for the batsman to deal with just outside the off stump. If you see that the ball is swinging a lot, you may want to aim for middle stump so that the ball will be just outside the off stump when it gets to the batsman.
If you can get the ball in the areas I mentioned above, then the batsman is likely to drive at the ball more often than not. This is the most dangerous type of shot to play against a ball that is swinging away, because it’s incredibly easy to get an edge through to the keeper or the slips. Sometimes the batsman may connect with a drive and hit you for 4, but if the ball is swinging don’t be disheartened! Bowl another similar ball – it will be incredibly hard for the batsman to hit every outswing delivery for 4.
Other Tips For Bowling Outswing Deliveries
Now let’s get into some other tips that will help you to improve your outswingers and make them more effective!
Use The Angles Of The Crease To Your Advantage
As fast bowlers we can make life much harder for batsmen by changing our position on the crease when we bowl. This is especially true when bowling outswing!
An outswing delivery that is bowled from close to the stumps may be easier for some batsmen to line up because the ball is being released from directly in front of them. If the same delivery was bowled from wider on the crease, like I’m showing with the red line in the diagram below, then some batsmen can struggle with this new angle and may end up playing at deliveries they would have normally left alone. Bowling from wider on the crease can make the batsman feel like the ball is coming in towards them due to the new angle, and if we can get a delivery like this to swing away from them, this will be an incredibly hard ball to face.
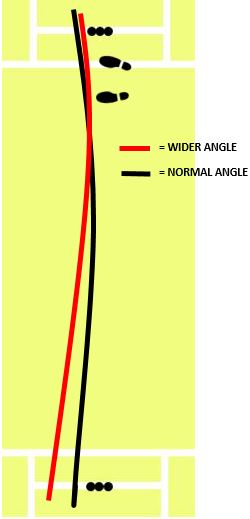
When I’m bowling outswing, I try not to go wide on the crease too often. I prefer to use it as a variation that I will bowl once every 2-3 overs. By bowling it infrequently like this, the batsman will not have the opportunity to adjust to the new angle and become comfortable dealing with those deliveries.
If I see the batsman is leaving the ball particularly well outside the off stump, I’ll decide to bowl the outswing delivery from wide on the crease to see if I can tempt them into a shot. As bowlers we should always be trying to mess with the batsman’s judgement, and changing your position on the crease is an excellent way to do it.
Practice Bowling Outswing Deliveries Using Targets
A great way to practice your fast bowling is by using target practice drills, and there are a couple of simple ones you can use in order to improve your ability to bowl outswing accurately.
The first type of target practice helps you to improve your ability to land the ball in a specific place. Here’s how you do it:
- Make sure you have enough room to run up and bowl
- Get yourself something you can use as a target. For this I usually use something like a cone, or a bunch of coins. There are loads of things that will be suitable!
- Place your target (a cone or a coin or whatever you’ve chosen) in the area that you will be trying to land the ball
- Go through your usual fast bowling run up as usual, keeping your eyes on your target as you approach the crease.
- Bowl the outswing delivery, and try and get the ball to land on your target.
This drill helps you to control the swing that you get through the air, which will be vital when you’re bowling to actual batsmen!
The second type of target practice helps you to work on the line of your outswing delivery. Here’s how it works:
- Make sure you have enough room to run up and bowl
- Buy yourself a set of cricket stumps. These are what you’ll be bowling at! You can find a great set here on amazon if you haven’t got any already!
- The next thing you’ll need is a single cricket stump. Again, you can find a great one here on amazon! Both of the stumps I’ve linked are usable on any surface so they’re great for practicing at home with.
- Set up the two sets of stumps as shown in the diagram below. Place the single stump slightly away from the main set of stumps, with a small gap in between.
- Now go through your usual fast bowling run up as usual, and focus on getting the ball to swing and hit the single stump.
I like this drill because it helps you target the area just outside a batsman’s off stump, and lets you experiment with the amount of swing you get. I would recommend that after bowling at the single stump on one side, you change its position and put it at the other side of the main set of stumps, so that you can imagine bowling the outswing delivery to both right and left handed batsmen.
Practice Practice Practice!
There’s no better way to improve your ability to bowl outswing than by practicing it as often as possible. If you’re an up and coming fast bowler, then in my opinion you the absolute minimum you should be practicing is 1 hour per week. But anyone that wants to become an excellent fast bowler should probably be looking to practice more than this and getting in excess of 5 hours of bowling practice per week.
Outswing is a difficult skill to master. The complexity of the way the ball is released, and then the difficulty of controlling the direction of the ball makes it a tough task! Therefore, you’ll need to devote plenty of practice time to it. Over time you’ll find that it becomes much easier, and you’ll also realise that you don’t have to think about the small technical details like releasing the ball off your middle finger as much. These things will come much more naturally to you!
Outswing is a deadly weapon for a fast bowler, so if you can put the hours in on the practice pitch with your club and practice at home as much as possible too, you’ll be bowling devastating outswing deliveries to batsmen in real cricket matches in no time!
Thanks For Reading!
I hope this post has addressed all of the main concerns any of you have in relation to bowling outswing! If this post has got you interested in some of the finer details of fast bowling, then make sure you check out my bowling tips page where you’ll find loads more useful tips that will help you to improve your game!
