
Serious cricketers will always be looking for opportunities to practice, whether that be in the nets with your team mates or at home on your own or with family. Practicing your batting in the nets with your cricket club is easy because you’re more likely to have quality cricket equipment available to you, as well as plenty of other players to bowl at you. Batting during these club practices will definitely help you improve, however, if you really want to take your batting skills to the next level, you should be practicing at home as often as possible! This is the part a lot of players find difficult. Sometimes you’ll have no one to bowl to you, and many of you won’t have the right equipment.
In this post I’m going to solve help you solve those problems by sharing my favourite drills that you can use to practice your batting at home. You’ll be able to do some of these without a partner, but I’ll also include some that will require someone to throw the ball towards you. Also, at the end of the article I’ll recommend my favourite items of cricket equipment that will significantly improve the quality of your batting practice. Let’s get into it…
Here are my methods that you can use to practice your batting at home:
- Shadow Batting & Visualisation
- Wall Bounce Drill
- Short Ball Drills
- The Stump & Ball Drill
- Footwork Cone Drills
- Throw Down Sessions
- Power Hitting Drills
- Buy Yourself a Bowling Machine
- Advance Down The Wicket Drills
- Strength Building Exercises
Shadow Batting & Visualisation
What you will need for this drill: Nothing!
Optional items: A set of cricket stumps, a cricket bat
This is one of the simplest forms of practice you can possibly do, and I’ve found it to be quite beneficial to my technique. It’s also great because you don’t need any equipment in order to do it! Shadow batting and visualisation can allow you to really think about your batting and develop game plans and methods of attack that you will employ during a game. I think this is a vital aspect of taking your game to the next level. Instead of going out to bat with no plan and just hoping for the best, you’ll be striding out to the middle with some sort of plan that you can follow. This really helps to de-clutter your mind and loosen you up!
At this point you may be asking yourself, ‘what is shadow batting?’ or ‘how do I use visualisation to my benefit?’. Allow me to explain!
Shadow batting is basically what you will see most batsmen doing before they begin their innings. They will practice the motion of a particular shot without actually having a ball to hit. So for example, when shadow batting a cover drive, the batsman should move their front foot forwards, bend their front knee, and bring the bat through in an arc with the face angles towards the cover region. These kinds of movements help to get you comfortable with what it feels like to play certain shots, so that you are able to execute them much more fluidly in a game!
It often helps to shadow bat in front of a mirror, or with someone watching you. By doing this, you can examine your body position to ensure that you are in the technically correct position for a certain shot. For example, when practicing the forward defensive shot, your head should be leaned forwards over your bent front knee, and the bat should be tucked nice and closely up to your front pad. Getting these technical details right whilst shadow batting really helps you to eliminate errors during matches!
You can use shadow batting to practice any type of cricket shot. I find it particularly useful for unorthodox shots like the sweep or the reverse sweep, as these are shots that require a lot of time to become comfortable with. I practiced these shots alone so many times before I tried them out in the nets, and it took a lot of practice against net bowlers before I felt confident enough to use them in a game.
Visualisation is similar to shadow batting because it prepares you for your upcoming innings, but it helps you out more mentally rather than technically. It allows you to develop your game plan, and to visualise yourself putting it into effect once you reach the crease.
When visualising, I like to get in my batting stance like I would during a proper innings, and imagine the whole process from the bowler running in towards me, watching the ball, seeing the ball being delivered, and playing the appropriate shot. I try to think about what types of shots I will play against certain deliveries, and whether I will leave the ball if it is way outside my off-stump. If I get a short ball early in my innings, I like to visualise my response to that kind of delivery. Some days I may want to duck under the ball, and on others I may wish to attack and try to score runs straight away.
Visualisation helps to organise your brain. I know it may sound to some of you like it could never have a positive impact on your batting, but give it a try before you doubt me. Plenty of professional players use this technique, and I think they know what works and what doesn’t! Use it to plan out the approach you’re going to take during the first 10 balls of your innings and see where it gets you.
Wall Bounce Drill
What you will need for this drill:
- A cricket bat
- A flat wall that you can bounce the ball off
- A relatively flat surface to bat on
- A ball (tennis ball or wind ball)
Optional items:
- A set of cricket stumps
- A partner
This is a drill I used all the time when I was younger, partly because I rarely had anyone to help me practice my batting and partly to cure my boredom! This drill can be done with or without a partner, and all you require is a bat and a ball. The ball should probably either be a tennis ball or a wind ball, depending on what kind of wall you’re going to be bouncing it against.
If you’re doing this drill alone, you should follow these steps:
- Select a flat wall and stand opposite it, roughly around 2-3 metres away.
- Now get into your batting stance. Hold your bat with your top hand (left hand for right handed batsmen, right hand for left handers), and hold the ball you are using in your other hand.
- Once you’re in this position, prepare to throw the ball forcefully at the wall. This can be an underarm or an overarm throw.
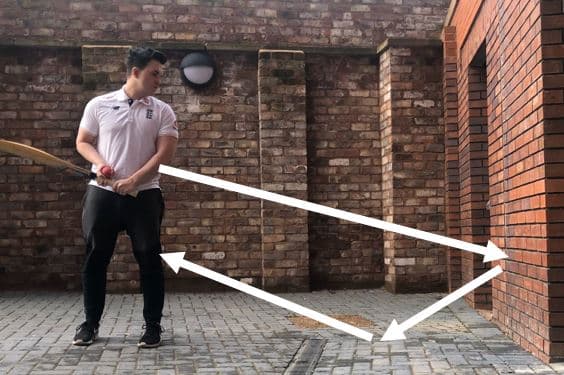
- By bouncing the ball off the wall in specific places, you’ll be able to test yourself against different kinds of deliveries. For example, throwing the ball underarm and aiming high up the wall will cause the ball to bounce up towards your upper body. You can use this type of throw to mimic a bouncer, and play the correct shot in response. You can also hit positions lower down on the wall, which will cause the ball to bounce somewhere in front of you. This will allow you to launch into a front foot shot like a straight drive!
- As soon as you have thrown the ball with your bottom hand, place it on your bat and play your shot. There should be enough time before the ball reaches you to achieve this!
If you’re doing this drill with a partner, this makes it a little easier for you! This time, you can get in your batting stance while your partner stands behind you. As well as being behind you, they should also be standing slightly to the left or right of you so that there is enough room to throw the ball past you and hit the wall. Now, you can fully focus on playing your shots instead of worrying about throwing the ball.
I would practice like this for hours when I was a teenager. I would often turn it into a little game where I imagined I was playing a proper innings and trying to score runs in different areas! The more fun and challenging you can make it, the better!
Short Ball Drills
What you will need for this drill:
- A cricket bat
- A set of appropriate balls (tennis balls, wind balls or real cricket balls)
- A partner to throw the ball towards you
Optional items:
- A set of cricket stumps
- A helmet (if you’re using a hard ball)
- A pair of cricket batting gloves (if you’re using a hard ball)
- A batting net
This is something that all batsmen should work on from time to time, and if you’ve got a partner that’s willing to throw the ball to you then you’re in the perfect position to do so! This drill helps you get comfortable with getting out of the way of the short ball, and also allows you to practice your hook and pull shots if that’s what you choose to do.
To perform the drill, follow these steps:
- Get into your batting stance and prepare to watch the ball and react to it
- Ask your partner to kneel down about 5 metres in front of you.
- Once they are in position, ask them to throw the ball underarm towards your upper body
- Your task is to react to the ball that is thrown towards you. You can duck underneath it, sway out of the way, or play an aggressive shot.
- You can face as many deliveries as you like until you feel comfortable reacting to the ball. If you’re just starting with this drill, ask your partner to throw the ball nice and slowly at the beginning. As you progress you can ask them to throw the ball towards you with more pace to mimic a fast bowler!
The Stump & Ball Drill
What you will need for this drill:
- A ball (wind ball or tennis ball)
- A single cricket stump that will be used as a bat (or a cricket technique bat which is a thinner version of a normal bat)
Optional items:
- A partner to throw the ball to you
- A flat wall that you can bounce the ball off
- A set of cricket stumps
This drill helps you to work on your hand-eye co-ordination, which is probably the most vital skill when it comes to batting. The drill is actually based on an activity that Sir Donald Bradman did regularly when he was a developing cricketer! A lot of cricket experts say that this type of practice may have contributed heavily towards Bradman’s excellent batting abilities, so it’s definitely worth trying! Bradman would hold a cricket stump in one hand and hold a golf ball in the other, before bouncing the golf ball off a wall similar to the way I described in the wall bounce drill earlier! When the golf ball bounced back towards him he would try to hit it with the stump. If you want to watch a video of a young Don Bradman doing this, have a look at the video below!
Due to the stump being so thin and the golf ball being so small, it takes an incredible level of hand-eye co-ordination to hit the ball regularly! This is how this practice helps you to improve your skills in this area.
If you’re practicing without a partner, you can use a stump or a cricket technique bat to do the drill exactly like Bradman did! If you have a partner that’s willing to help you, you can get them to throw or bowl the ball towards you while you try to hit it with the stump or cricket technique bat.
AB de Villiers is one of my favourite batsmen of the modern era, and I know that he regularly practices using a cricket stump to hit the ball during his net sessions. If you can get comfortable hitting the ball with a stump or a thin cricket bat, you’ll find it much easier to play with your full-sized bat during matches!
Footwork Cone Drills
What you will need for this drill:
- A cricket bat
- A set of small cones. Click here to see the type of cones that will be required!
- A set of balls (tennis balls or wind balls would probably be more suitable)
Optional items:
- A partner to field the ball
This drill is incredibly simple, and you can use it to ensure that you’re getting into the technically correct positions when playing front foot shots like the drive.
When setting up this drill you should lay out your cones in a specific way. You can see an example of this in my diagram below. Each cone should have a ball positioned on top of it. Ideally, you’ll have one cone positioned where you can step forwards and play a cover drive, one that allows you to play a straight drive, and one that allows you to play an on drive.
Once the balls are in position, you should get in your batting stance before stepping forwards and playing a technically correct shot. As the bat comes through, you should strike one of the balls, knocking it off the top of the cone. You should then do the same thing to the next cone. You can repeat this as many times as you like until you have become comfortable with what it feels like to play these strokes.
Remember the key principles of the drive as you play your shot. Your front foot should move forwards and get as close to where the ball is as possible. It’s important to remember not to overstretch though! Get as close as you can whilst remaining comfortable and balanced! I like to remind players to get their foot ‘alongside’ the ball if they can. This gives you plenty of room to bring the bat through and strike the ball. If you get your foot right in line with the pitch of the ball, you’ll have to bring the bat around your front pad to strike it! Your front leg should be slightly bent and your head should be leaned over the top of that front knee.
Throw Down Sessions
What you will need for this drill:
- A cricket bat
- A set of balls (tennis balls, wind balls or real cricket balls)
- A partner to throw the ball to you
- A flat, open space. Roughly the same size as a cricket batting pitch.
Optional items:
- Protective equipment (if you’re using a hard ball)
- A set of cricket stumps
- A sidearm thrower
- A batting net
If you’re not sure what ‘throw downs’ are, then I can tell you that the clue is in the name! This is a type of practice where you will get a partner to throw the ball to you, rather than bowling it at you. The advantage of this type of practice is that your partner does not need to be a skilled cricketer in order to deliver the ball towards you, and they can throw it to you at varying speeds. If you’re not comfortable hitting fast deliveries, they can start off slow by throwing the ball towards you underarm. Once you’re happy facing those deliveries, ask them to start throwing the ball overarm to add a bit of pace and bounce! If you’re really wanting to test yourself, they can use products like the sidearm thrower (linked here) to propel the ball towards you at even higher speeds!
The goal of throw down sessions are simple. You should be aiming to work on different aspects of your batting technique. When I’m having throw downs, I’ll ask my partner to throw me full balls to start with so I can work on my front foot shots. Then, I’ll ask them to throw me some short balls to work on my back foot technique! To finish, I’ll ask them to mix up the deliveries so that I can focus on reacting to each individual ball without knowing in advance where it is going to be bowled. This replicates a match situation more accurately.
By purchasing products like a set of cricket stumps and a batting net you can make your throw down sessions more efficient, fun and productive! By adding the stumps, you can introduce the challenge of your partner trying to get you out while you try to protect your wicket. This makes it a little more fun for both of you! The batting net is necessary because it forms a cage around you and stops you having to go and field the ball every time it goes past you or every time you strike it!
Power Hitting Drills
What you will need for this drill:
- A cricket bat
- A set of balls (tennis balls are probably better if you’re practicing alone)
- A flat surface to bat on
Optional items:
- A partner who can throw the ball to you
- A batting net
Modern cricket puts much more pressure on batsmen to score quickly. As a result, batsmen have had to teach themselves how to hit the ball harder so they can get the ball over the heads of the fielders more regularly! International batsmen like Jos Buttler and Glenn Maxwell have perfected the art of boundary hitting by working extremely hard on their power shots during practice. In fact, this method of practice has now become common for all players who play the shorter forms of cricket. The good news is that you can replicate this type of practice at home quite easily.
If you want to practice your power hitting at home when you don’t have a partner to help you, follow these steps:
- Find yourself a nice flat, open area, and arm yourself with a cricket bat and a few balls.
- Get your feet in your usual batting stance position. Hold your bat with your top hand (left hand for right handed batsmen, right hand for left handed batsmen) and hold one of the balls in your other hand.
- Throw the ball up in the air so that it bounces a few feet away from you. You should throw the ball underarm, ensuring that it doesn’t go too high.
- As the ball leaves your hand, quickly move that hand back to your bat and grip the handle. Get ready to strike the ball.
- Watch the ball all the way down to the ground and wait for it to bounce. Once it bounces, step forwards with your front foot towards the pitch of the ball.
- Now all you have to do is hit the ball powerfully. You can play any type of shot that you like; lofted flicks over the leg side, lofted straight drives, slog sweeps, or even forceful shots that are played along the ground.
If you’re practicing with a partner, get them to throw the ball towards you while you try to hit the ball as hard as possible. You can start off by asking them to throw the ball underarm. The slower pace and lower bounce will make it easier for you to come forwards and hit the ball powerfully. Once you get comfortable with this you could ask your partner to throw the ball overarm, which will simulate a faster, bouncier style of bowling.
Buying a batting net can really help make this type of practice more efficient. Practicing inside a batting net means that when you hit the ball very hard, there is a large chance it will stay inside the net. This makes the ball much easier to retrieve. If you are doing this power hitting practice on an open field, then you’ll have to do a lot of fielding after you’ve played a few big shots!
If you want more tips on how to hit the ball more powerfully, check out one of my other posts here!
Buy Yourself A Bowling Machine
What you will need for this practice:
- A cricket bat
- All of the correct protective equipment for batting
- A bowling machine
- A power supply for the bowling machine
- A large, flat surface – bowling machines use large stands for stability, so you’ll need a relatively large flat area on which to place the machine. As well as a flat area where the ball is going to be delivered. A standard cricket pitch is around 20 metres long, so you should have that much space available if you want to use a bowling machine at home.
- Appropriate balls for your machine
Optional items:
- A set of cricket stumps
- A batting net
- A partner to feed the balls into the bowling machine
If you have the money available to buy yourself or your children a bowling machine, then they can be a fantastic aid for practicing batting while at home. Bowling machines simulate the speed and bounce of a fast bowler without any of the hard work, and can be positioned to target certain aspects of our technique. If a batsman wants to work on their technique against good length deliveries, the bowling machine can be positioned so it consistently bowls full length balls. Likewise, if a batsman wants to work on their technique against the short ball, we can set the bowling machine to hammer the ball in short!
Most of the time you will need a partner to feed the balls into the machine, however, some bowling machines have automatic feeders that allow balls to be fed into the machine periodically – removing the need for the involvement of a partner! This makes this type of bowling machine perfect for practicing alone at home.
If you want to see which type of bowling machine I’d recommend buying if you’re wanting to use it at home, check out the bottom of this post for my recommended equipment section!
Advance Down The Wicket Drills
What you will need for this drill:
- A cricket bat
- A set of appropriate balls (tennis balls may be better for this drill as they bounce more)
- A flat surface to bat on
- A partner that will assist you with the drill
I really enjoy doing this drill. It’s a great one for kids and most amateur players because they may not be as comfortable with advancing down the wicket towards spinners or fast bowlers. This drill will help you to become accustomed to the movements required to do so! If you want to do this drill…follow these steps:
- Get in your normal batting stance and stay light on your feet, ready to quickly move yourself down the pitch and play a shot.
- Get your partner to stand 2-4 metres away from you. They should have a tennis ball in their hand with their arm outstretched.
- On the count of 3, your partner should drop the ball before moving off to the side where they cannot be hit.
- When the ball begins to drop, your task is to advance quickly towards the ball and play an appropriate shot once the ball has bounced.
- As you move forwards remember to keep your head and eyes level, watching the ball the whole time.
- Your feet should move in a sort of ‘skipping’ movement. Your front foot should extend towards the ball first, then your back foot should move forwards towards your front foot, bringing them both together. Your front foot should then extend forwards again, repeating the process.
Once you’re comfortable advancing down the wicket when your partner is dropping a ball, you should move on and try the same thing when they are either bowling the ball at full speed or giving you throw downs! When you become skilled at doing that, you know you’re well equipped to advance down the wicket during a match.
Strength Building Exercises
Many cricketers will convince themselves that the only way they can work on their fitness or their strength is by going to a gym and lifting weights. However, there are many simple little exercises that you can do at home that will build strength and help you to build power. Here are just a few of these:
- Press-ups
- Tricep Dips
- Squats
- Jump Squats
- Lunges
- Planks
- Side Planks
If you want to know more about any of these, feel free to google them or find a youtube video of them to see how exactly they are performed! A good basic level of fitness and strength will make it easier for you to maintain your power throughout the course of an innings.
My Recommended Items For Practicing Your Batting At Home
Throughout this post I’ve mentioned a lot of pieces of equipment that I think you should consider buying to make your practice sessions more effective. In this section I’m going to give you recommendations on my favourite products!
A Set Of Cricket Stumps
When practicing your batting, a set of cricket stumps can up the stakes a little bit. If the bowler hits your stumps, you know you’re going to have to up your game. I will often set myself the challenge of not letting the ball hit my stumps for an entire practice session as this gives me another little goal to achieve as well as practicing my shots.
If you’d like to view my favourite set of cricket stumps on amazon, click here!
Bowling Machine
I’ve said this many times on this blog, but it’s worth repeating again. If you have the money and the space available, it’s 100% worth investing in a bowling machine. Some bowling machines are incredibly expensive, but there are some that are available online which are much more affordable!
If you’d like to view my favourite bowling machine that is available on amazon at a decent price, click here! This one also has the automatic ball feeder installed on it, so you can use it without a partner having to put the balls into the machine. It feeds 1 ball approximately every 10 seconds, and you can load a maximum of 12 balls into the machine at one time.
A Sidearm Thrower
A sidearm thrower is basically a long rod that someone can use to fire the ball towards a batsman at high speeds. The ball is placed inside a cup on the end of the rod, and the person throwing the ball should aim it towards the batsman. This device can significantly increase the level of difficulty of your practice sessions, and that is the reason that they’re so widely used by professional players!
If you’d like to view my favourite sidearm thrower on amazon, click here.
Cricket Technique Bat
I’ve owned a couple of these over the years, and they’re honestly one of the best tools for practicing your hand-eye co-ordination. If you can learn to hit the ball regularly using a much thinner bat like this one, then you should find it much easier to play with a full-size bat.
Click here if you’d like to check out a great value cricket technique bat on amazon! This bat is available in 3 different sizes – SH, 6 & 4.
Batting Net
Batting nets will be perfect for you to buy if you have plenty of space available at home, but they will cost you a bit of extra money if you want to buy a full size one. A batting net is designed to surround the batsman so that when the ball is hit, there is a high chance the ball will be stopped by the net. As I’ve previously mentioned, this makes fielding the ball much easier.
Cones
Cones have a variety of uses for batting practices, but I really like the ones that you can position balls on top of in order to work on your footwork. They’re pretty cheap too which is a bonus!
Click here if you’re interested in buying a set of cones from amazon!
Conclusion
Thanks for reading! I hope this post has given you some fresh ideas as to how you can practice your batting at home. Also, if you have any interesting ways of practicing that you think I’ve missed, feel free to add a comment below and I can add it to my list!
Start planning some weekly home-based practice sessions. Do these for a full cricket season and see how many improvements you can make. Remember, the more you bat, the better prepared you will be. Good luck!
Recent Posts
Where Should You Place Your Best Fielder In A Cricket Match?
When a limited overs cricket match reaches a critical point, you’ll often hear coaches, players and commentators talking about how important it is to ‘have your best fielders in important...
The sport of cricket has successfully rebranded itself in the last half century in order to appeal to wider audiences. Now, instead of just having test cricket as the sole international format of the...