
When I first played senior cricket I was about 14 years old. I was playing for my club’s third team, so the standard of cricket wasn’t excellent, but it was a big challenge for me due to my age. I remember being nervous to bat and bowl against players who were a lot bigger and stronger than me, but another thing I was nervous about was the fielding! Playing on bigger pitches would mean that I had to throw the ball a lot further in order to get it to the wicket keeper, and throwing the ball long distances wasn’t a particularly strong part of my game! It was at that moment that I decided to start to work on my throwing strength, and today I’m going to share what I’ve learnt with you guys!
In this post I’ll share my favourite technical tips that will help you throw a cricket ball further, and I’ll also share a few simple drills that you can use to practice it! I’ll draw on some of my own experience, as well as some research I’ve done into baseball throwing techniques – I hope you find it interesting!
Here are my 9 tips that will help you to throw a cricket ball further:
- Stretch Properly Before Practice & Matches
- Get Comfortable With The Proper Throwing Motion
- Keep Your Feet, Hips & Shoulders In Line & Directed Towards The Target
- Engage In Some Strength Training On Important Muscle Groups
- Practice Throwing With Slightly Heavier Balls
- Do Simple Throw & Catch Drills With Partner(s)
- Practice Throwing With Medicine Balls To Build Strength
- Perform The ‘Crow Hop’ Before You Release The Ball
- Point Your Fingers Towards The Target As You Release
I’ll now take you through each of these individually so you can see exactly what changes you need to be making to your technique and practice sessions!
Stretch Properly Before Practice & Matches
Like with most cricketing activities, stretching before you begin trying to throw long distances is important. Stretching properly helps to keep your muscles strong and flexible, and by increasing our muscular flexibility we can increase our range of motion when performing actions like throwing. If you don’t stretch beforehand, your muscles will be shorter, tighter, and as a result – weaker! This obviously makes it much harder to launch the ball long distances!
If you want to know what stretches you should be doing, then I’d recommend checking out this great tutorial on youtube by clicking here! Although it’s a video made for baseball, the stretches included within that tutorial are perfectly applicable to cricket as the throwing motion is exactly the same in both sports. I actually think there’s a lot that us cricketers can learn from the sport of baseball when it comes to fielding!
If you perform these stretches before you go out to field, or before you do some throwing drills during practice, you will really feel the difference. If you don’t do them, your shoulder will often be left feeling sore and stiff. The movements feel much easier when your throwing shoulder is properly loosened up – trust me! Also, this is especially important as you start to get older!
Get Comfortable With The Proper Throwing Motion
For some of you that are reading this it may be helpful for me to walk you through the basics of the movements that are required to throw the ball. Once you fully understand each phase, including why it is required and what you have to do, you can combine all of the phases into one full, technically correct throwing motion. Getting these basics right should help you to throw the ball further! Let’s start at the beginning…
Preparation Phase
This is the phase of the throw where you go from a normal standing position into a slightly coiled position that is ready to begin generating momentum to throw the ball.
Imagine that you have just picked the ball up off the ground, and you need to throw the ball to the wicketkeeper. You are already standing in a side-on position in relation to the keeper, so what do you do next? Do you keep your feet perfectly still, and throw the ball from that position? You could choose to do this, but it would not be wise! This isn’t a very powerful movement that will allow you to throw the ball far.
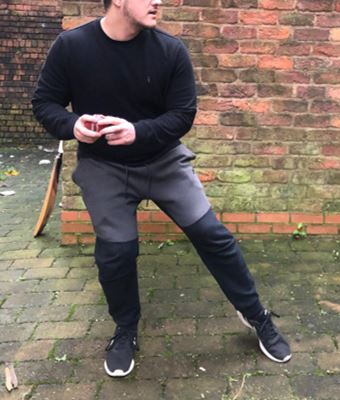
Instead, during this phase you should rock backwards slightly onto your back foot, so that 60-70% of your weight is on your back leg. This is why this phase is sometimes known as the ‘wind-up’ phase! Some players like to rock back a long way so that their front knee comes up towards their chest, but you might only choose to lift your front leg up slightly if you need to get a quick throw in! If you need a more powerful throw, you may want to rock back a little further!
During the preparation phase, your body should be in a position similar to the one shown below. Note how my hand which is holding the ball is in a central position, close to my chest – this will be important as we move to the next phase!
Extension Phase
This phase of the throw is quite simple, and it refers to the explosive movement of the legs and the throwing arm just before the arm begins to come forwards to release the ball.
Just before this phase you should have got yourself into the prepared position I showed in the previous section. Ideally, your hands will be in a central position, close to your chest, and your weight should be on your back foot. How much of your weight you shift onto your back foot is up to you!
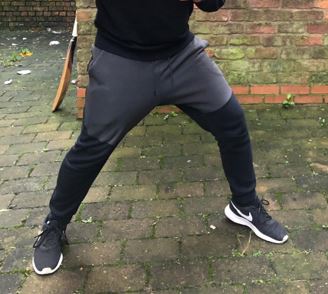
Now, to move into the extension phase you have to do two things. The first is push forcefully off your back foot and extend your front foot out in front of you, landing it on the ground. You want to push it out far enough to get yourself into a nice stretched position as this will help you to get more momentum into your throw. Although, it’s important not to stretch out too far! Being balanced during the throwing motion is key, and by extending your front foot out too far you can unbalance yourself!
As you make this movement with your front foot, remember that if you move it with more force, you’re more likely to get more momentum behind your throw. If you move your front foot forwards slowly and delicately, you will generate less momentum and will have to do more work with your throwing arm as a result. If you’re wanting to throw the ball really far, you’ll need to move your front foot quickly into a position similar to the one I’m showing below! As you can see, in this phase my weight is no longer positioned over my back foot – most of it is now supported by my front leg instead.
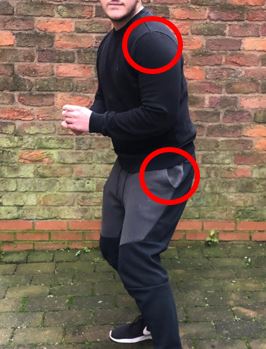
The second part of the extension phase is the arm movement! During this phase of the throwing motion you should be extending your throwing arm backwards until it is in a position similar to the one I’m showing below. Most cricketers will usually have their arm slightly bent at this point, ready to be moved forwards quickly to throw the ball in the next phase. The position of the leading arm isn’t as critical as the throwing arm, but most players will usually hold it somewhere close to their mid-section!

Release Phase
During the release phase you will move your throwing arm forwards rapidly before releasing the ball. As you do this, you will also transfer your weight even more so that the majority of your weight is over your front leg. I’m demonstrating the final position you should be in after the release phase in the photo below!
During the previous phase, your throwing arm was bent slightly as you extended it behind you. Now, as it moves forward to release the ball it should straighten in a sort of flicking motion, with your forearm rotating over the top of your upper arm! Again, I’m demonstrating this below! Once your arm has straightened completely you should release the ball – allowing it to travel towards the target!
Keep Your Feet, Hips & Shoulders In Line & Directed Towards The Target
When throwing the ball, it’s a good idea to try and get your body into a fully side-on position, with your front shoulder pointing towards where you want to throw the ball. Positioning your body in this way, with your feet, hips and shoulders all aligned towards your target, allows you to get the maximum amount of your energy behind the ball, and it helps to ensure that this energy propels the ball where you want it to go.
To demonstrate exactly what this should look like, I’ve included a diagram below. When looking at these images, try to imagine that the wicketkeeper that I am throwing the ball to is in the direction from which the photo has been taken.
As you can see above, I’ve gotten myself into a perfect side-on position, and as a result of this you can only really see one side of my body. Getting your front shoulder and your front hip pointing towards the target is what you want to be aiming to do, and this will help you direct your throw much better.
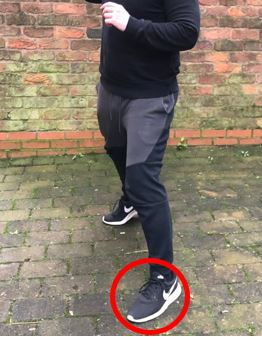
As for your front foot, I prefer to have it turned at a 45-degree angle like I’m showing below. If you keep it pointing forwards, in the same direction your chest is facing, then it will be very hard for your body to rotate as you throw. If you point the foot in the direction you want to throw the ball, this is likely to be very uncomfortable. Therefore, I believe the 45-degree angle is the most appropriate option.
It’s worth mentioning that if you’re a left handed thrower, then your body position will be the opposite to what I’m showing in the photo above. Instead, it will be your right shoulder and right hip which leads towards your target.
If you want to practice getting into this nicely aligned, side-on position, then it’s useful to mark a straight line on the ground to remind you where your feet need to go. To do this properly, you will need to identify where you’re going to throw the ball first. Once you’ve done that, you will need to mark yourself a line (about a metre long) that points directly towards your target. If you’re on grass, you can scratch the line into the grass with your shoe. If you’re on a harder surface like concrete, find some other way to mark out your line.
With this complete, stand in your side on position with both feet placed on the line you have marked. Now, rock sideways onto your back foot and go through your throwing motion as usual. As you bring your front foot down onto the ground, make sure it lands on the line you have drawn at the 45-degree angle we discussed previously.
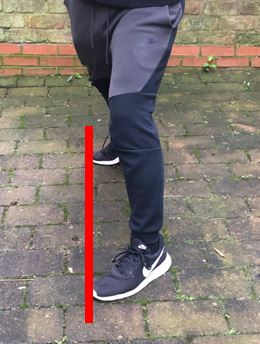
If you step too wide of the line so that the line is on the inside of your foot, this can cause your arm to lag behind you a little, causing you to push the ball away from your body. If you step inside the line so that the line is on the outside of your foot, it will be much harder to get the full range of motion on your throwing arm due to the fact that you’ll be throwing across your body. Stepping directly on to the line gives you the best chance to perform an accurate throw!
Engage In Some Strength Training On Important Muscle Groups
If you want to learn to throw the ball further, it’s probably worth trying to build some strength in some of the vital muscle groups! If you attend a gym, then you’ll be perfectly set up to start working on your strength. If you don’t go to a gym though, don’t worry! There are still plenty of things you can do at home too.
Strength exercises help to stabilise your body during the process of the throw. It’s particularly vital to strengthen the shoulder area, as this is the area of the body that will be under the most stress during the throwing motion. Many cricketers will suffer shoulder pain during their careers, but proper training and stretching is a way to guard against this. I like to engage in strength training at least three times a week, but some of you may prefer to do it slightly less or more. It depends on what results you want to achieve and what your current level of fitness is! If you’re a complete beginner, then start off slowly and try to build your strength slowly over a decent time period.
So, which areas of the body should you be looking to strengthen if you want to improve your ability to throw the ball? The main ones I like to work on are as follows:
- Shoulders
- Arms
- Core
- Legs or lower body in general
Let’s go through each one of these in detail and look at some exercises that will help you!
Shoulders
There are plenty of shoulder exercises you can do at home, especially if you own a resistance band! If you want some ideas of different exercises you can try with resistance bands I’d recommend checking out the youtube video below!
Arms
You can get a decent arm workout by doing some basic body weight exercises like press ups or tricep dips. If you have some dumbbells or similar weights available then this increases your options. With these you can perform the shoulder press, tricep press and bicep curls amongst others!
Core
For core strength, I like to use conventional planks and side planks, as well as some more conventional ab exercises like V-sits and L-twists! Click here if you would like to read a great guide on how to perform those – with some extras mixed in!
Legs/Lower Body
Having good lower body strength helps to provide a good solid foundation from which you can launch the ball.
To build a strong lower body, squats are always a good place to start! These can be performed just by using your own body weight, or using extra weight in the form of barbells or dumbbells. Incorporating lunges and deadlifts into your lower body training sessions is also a good idea!
Practice Throwing With Slightly Heavier Balls
If you use slightly heavier balls while throwing in practice, and get comfortable throwing them longer distances, then you will find it much easier to throw a normal cricket ball during a real match.
This way of practicing applies the fitness principle of ‘overload’ to cricket. In order to make improvements in any aspect of physical fitness, you have to overload your body slightly, or put it under slightly more stress than it is comfortable with. For example, if you are a regular in the gym and you have become incredibly comfortable bicep curling 15kg weights, it makes sense to increase the weight if you want to see improvements in your bicep strength. So, by working with a heavier ball during our throwing practice, we can increase our throwing strength a little quicker than usual.
If you’re interested in buying a heavier ball – I’d start by clicking this link to check out a great one I found on amazon! Yes, this is a baseball, but this doesn’t matter if you’re just wanting to improve your ability to throw the ball. A normal cricket ball weighs about 5.75 ounces, and this ball weighs 10 ounces! This means it’s perfect for building the extra bit of strength that will allow you to throw the ball much further.
Once you have bought your slightly heavier ball, all you have to do is use it in some simple throwing drills like the ones I will share in the next section. After some time doing this, you will become more comfortable throwing this heavier ball over longer distances. This will then enhance your ability to throw the normal cricket ball further! Do this regularly and you should see improvements in no time!
Do Simple Throw & Catch Drills With Partner(s)
There are a few drills that I’ve used regularly during my cricket career to work on my throwing power and accuracy. They’re incredibly simple and easy to do which is always a bonus – plus, you don’t need any equipment other than a cricket ball and a set of stumps/target!
The Increasing Distance Drill
This drill only requires three things: a ball (preferably a cricket ball), a partner and a decent amount of space so you can spread out.
To perform the drill, you and your partner must first stand about 20 metres apart and face each other. When you’re in position, one of you should take the ball and throw it to your partner. Once they gather the ball, they should then throw it back to you. Make sure you maintain the good throwing techniques that I’ve outlined elsewhere in this post, and try to get the ball to reach your partner at chest height.
Once you have completed ten good throws each, you should both move a little further away from each other, extending the distance between you to around 30 or 40 metres. Because of the increased distance, the throw will become a little more challenging, requiring more effort and accuracy to complete. Complete ten throws at this distance, and then increase it again.
Keep going like this until one of you reaches your maximum throwing range. By practicing throwing at your maximum range you can really work on adding that bit of extra throwing strength to your game – this is where the real improvements are made!
Remember, if your throwing skills aren’t as developed you can start closer together, and if you already have a good amount of strength on your throws you can start a little further apart than 20 metres! Tailoring the drill to your current skill level will make it more effective.
The 4 Corners Drill
To perform the 4 corners drill, you will need 4 people (including yourself) and a cricket ball. A wide open space is probably necessary too so you can spread out far enough!
Once you have those, it’s simple! You and the 3 other people taking part in the drill should spread yourself wide into a square formation like the one shown in the diagram below. Then, player 1 should throw the ball to player 2, player 2 throws it to player 3, player 3 to player 4, and then back to player 1. If you get bored of that pattern, you could reverse the direction so player 4 starts with the ball and throws to player 3, or you can just mix it up totally and throw the ball to whoever you like!

When starting this drill, I’d try to ensure that you’re at least 20 metres apart from each other, then beyond that you can move wider if you need to!
Target Drills
It’s also useful to practice throwing at a target like the stumps, as this is something you will have to do many times during the course of a season. For this you’ll need a set of stumps and a ball, and perhaps something to stop the ball travelling past the stumps if you miss them! For this a good thing to use is a fielding net, which you can find here on amazon!
During drills like this, all you need to do is stand a decent distance away from the stumps and throw the ball towards them – trying to hit them. Then repeat! It’s often useful to have a few balls when you’re doing this drill, so you can throw a few consecutively before you have to retrieve them!
Also, if you have a few people to practice with, you can make a slight change to the 4 corners drill I just showed you. This time, you can add some stumps into the middle of the square so each of you can practice throwing the ball at the stumps. This method is good because if you miss the stumps, the person on the opposite corner of the square can retrieve the ball easily!
Practice Throwing With Medicine Balls To Build Strength
If you’re not sure what a medicine ball is, they’re large, heavy balls that usually weigh in excess of 2kg. At this point you may be thinking ‘I couldn’t possibly throw a medicine ball like a cricket ball!’ – and if you’re thinking that then you’re probably correct! The aim of this bit of practice isn’t to learn to throw a medicine ball over long distances, it’s to throw the medicine ball in a way that helps us build power in important muscle groups. These muscle groups that will be vital when you’re trying to launch the ball from the boundary back to the keeper!
Medicine ball throws are great because the muscle groups used to throw a medicine ball are actually quite similar to the ones used for throwing a cricket ball. Medicine ball throwing is also great for building rotational power, which is what is required during throwing!
If you want to do these yourself, the first thing you’ll need to do is get yourself a medicine ball! These are available all over the internet, and they come in a variety of different weights. You should pick the weight depending on the level of strength that you possess, but I’d say a good weight to start at would be about 3kg. Click here if you’d like to see the price of a great medicine ball I found on amazon!
If you can’t buy your own medicine ball, check to see if any of your friends or family have one. Also, if you go to a gym, they will often have a selection of medicine balls for you to use – so keep that in mind next time you visit!
If you want some ideas of what exercises to do with your medicine ball, downwards slam throws and split-stance scoop throws are two of my favourites! If you want more info on both of those exercises, as well of plenty more throws you can do with medicine balls, click here!
Perform The ‘Crow Hop’ Before You Release The Ball
It’s a lot easier to throw the ball further if you bring some momentum with you into the throw. The ‘crow hop’ is something that will help you to build that momentum!
To illustrate why momentum is important when throwing, there are a couple of things you should try! First, get down onto your knees and try to throw the ball as far as you can. Secondly, stand up but keep your feet totally still and try to throw the ball as far as possible. Both of these are quite hard to do, and this should show you how important your legs are when you’re throwing the ball!
Now imagine that you could do a small run up before you throw the ball. This time, you will have built up some momentum that can be transferred into the ball as it leaves your hand. This is the same way fast bowling works! If a fast bowler wasn’t allowed to run up prior to releasing the ball, they wouldn’t be able to bowl the ball anywhere near as fast. The run up allows them to build speed which is used to propel the ball towards the batsman. The crow hop works in exactly the same way! It is essentially a small run up just before the ball leaves your hand. Many cricketers will perform the crow hop instinctively, but just in case you’re not sure what to do, I’ll take you through it below.
To perform the crow hop before you throw, follow these steps:
- First get in the correct stance. You should be holding the ball in your throwing hand and you should be in the side on position I showed earlier – with your leading shoulder pointing towards your target. At this point your feet should be shoulder width apart
- Now, push off your back foot, propelling your body forwards in the direction of the target. As you do this, you should land on your front foot and lift your back foot up slightly in the air.
- With your front foot planted, your back foot should now move towards your front foot so that they are quite close together. In this stage, I like to plant my back foot just behind my front foot.
- With your back foot planted and both feet now close together, stretch your front foot out towards the target once again and throw the ball as I explained earlier in the post.
- The whole process of the crow hop should be performed quickly, and it should look like a fast skipping motion. The speed of the movement helps us to build adequate momentum that we can transfer into the throw. Ideally, all of the motion contained within the crow hop will be aligned with the direction that you want to throw the ball.
Point Your Fingers Towards The Target As You Release
As you finish the throwing motion, pointing the fingers on your throwing hand towards your target can help you to make a more accurate throw. By doing this you are ensuring that all of the power and momentum you produced during your throwing motion has been directed towards where you want the ball to go.
When I see some young cricketers throw the ball, their hand will come wildly across their body as they complete the throwing motion. This is a combination of not having the correct technique and trying to throw the ball too hard. When this happens, it opens up bigger opportunities for an inaccurate throw due to the fact that a lot of the energy and momentum that you’re putting behind the ball is being directed towards the wrong place!
Whenever you work on throwing during practice, and whenever you throw the ball during a game, try to keep this tip in the back of your mind. If you work on doing this enough in practice it will become second nature to you and you will no longer have to think about it as much! Trust me, your throwing accuracy will benefit from it!
Conclusion
Thanks for reading this post! I hope I’ve given you some food for thought and some new ideas that you can use to practice your throwing. As I mentioned at the start of this post, a quick, accurate throw can make all the difference to the success of your team. Good bits of fielding will often decide the outcome of matches, and I personally feel that a well-executed run out is just as satisfying as any other wicket! If you can add some of these tips into your practice sessions, you should be making a serious difference in the field in no time!
If you liked this post, why not check out some of my other fielding related articles? I’ve written a detailed one on the art of slip catching – that you can read by clicking here!
Recent Posts
Where Should You Place Your Best Fielder In A Cricket Match?
When a limited overs cricket match reaches a critical point, you’ll often hear coaches, players and commentators talking about how important it is to ‘have your best fielders in important...
The sport of cricket has successfully rebranded itself in the last half century in order to appeal to wider audiences. Now, instead of just having test cricket as the sole international format of the...