If you want to excel as a batsman in cricket you will need a solid base from which you can build. That base when it comes to batting in cricket is the stance! The batting stance is the position that we get ourselves into as the bowler is running in to bowl, and any movements that occur just before the bowler has released the ball. Ideally the batting stance should be a nice and comfortable, balanced position, from which we can play a variety of shots to any delivery that the bowler sends towards us.
Some batsmen have slightly more ‘orthodox’ stances than others, and some have more unique ones. In this post we’re going to look at several different types of stance and see how they work for each player and in each circumstance. We’ll look at the different positions of the feet, the alignment of the body, the hand positions, the backlift, and we’ll even touch briefly on trigger moves and different guards! Hopefully once you’ve read all of the info I have to share, you can make a more informed position about how you’d like to position yourself on the crease.
Firstly, what is generally considered to be the best batting stance?
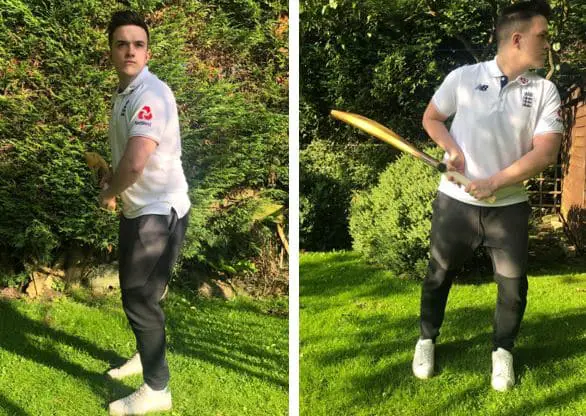
The best batting stance is generally considered to be one in which the batsman has aligned themselves in a side-on position, with their front shoulder pointing towards the bowler. The feet should be about shoulder width apart, and the knees should be slightly bent. The back should also be bent slightly, allowing you to tap your bat on the ground near your feet. The batsman’s chin should be positioned over their front shoulder, with their eyes looking down the pitch watching the bowler as they approach. The hands should be quite close to the body, at about hip height. The bat toe should be pointing backwards towards the wicket keeper or first slip! This is commonly referred to as the orthodox batting stance.
You can see some photos of me demonstrating this orthodox batting stance below.
So I guess at this point you may be wondering, ‘why is this stance the best and the one most commonly taught by coaches?’ That’s a very good question. Here are the main reasons:
- It is very easy to teach and young players find it easy to replicate. There isn’t too much to think about!
- It’s a nice comfortable position from which the batsman can move forwards or backwards incredibly easily.
- The side-on alignment of the body as well as the angle of the bat allows the bat to swing through in a straight line, which is a better economy of movement than if it comes through in an arc.
- Your weight will be nicely balanced across both of your feet, and because of your bent knees you will be on the balls of your feet slightly, ready to move quickly and play your shot. This is the most explosive position you can get into, and it is vital if you want to react quickly to the ball.
Although this batting stance is the one that is most widely used, it does not mean it will suit all players. Some players may make little changes to just one part of the stance, or they may change it completely! Some of the most successful batsmen in world cricket have had very strange batting stances, and it hasn’t stopped them being able to score shed loads of runs at the highest level of the game. Therefore, if your batting stance looks different to the one I’ve just showed you, don’t worry too much. In this post I’m hoping to guide you and show you the good points and bad points of each stance, then you can pick and choose parts that you like. In the end, you should really stick with the method that feels the most comfortable to you and make sure you practice using that stance every time you’re batting. By the time you’ve been playing cricket a couple of seasons your stance will feel extremely familiar to you.
In the rest of this post we’ll look at some of the alterations that batsmen can make to the orthodox stance, and what these can do for your game. We’ll also examine some real-life examples of professional players who have used these stances.
Changing To A More Open Stance
You may hear some commentators describe a batsman as having an ‘open stance’. If you’ve heard this before and are confused about what they mean, allow me to explain.
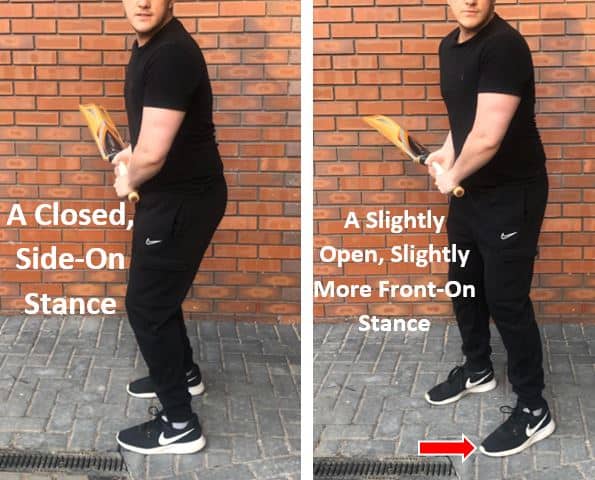
An ‘open stance’ is a body position that shows more of your chest to the bowler. Basically, it makes you a little bit more front-on, as opposed to the side-on orthodox stance we looked at at the beginning of this post. The orthodox stance showed both the front foot and the back foot being pretty much in line with each other. An open stance requires the batsman to move their front foot towards the leg side a little bit, which opens their chest up to the bowler slightly. Now, instead of your front shoulder pointing towards the bowler, it will be pointing somewhere in the mid-on region! If you’re not sure what I mean, the photos below show you what you need to do to transition from the orthodox stance towards a more open stance. It really is as simple as a small foot movement!
Why Are Open Stances Used?
There are a variety of different reasons that a batsman may choose to open up their stance. Some of them may just prefer standing like this and find it more comfortable. However, I feel like most of the time a batsman does it it’s because they are trying to correct a problem with their game. Let’s have a look at some of those problems:
Getting Out LBW
Getting out LBW is a common problem for lots of batsmen, and there is often a simple reason this happens. There is also a relatively simple solution.
The most common reason that batsmen will get out LBW regularly is because they plant their front foot too far across to the off-side too early. Once their foot is planted in this position, it means they will be covering their stumps with the front pad, making this an inviting target for a fast bowler to try and hit! If the fast bowler targets the pad, the batsman will have to bring their bat around the front pad to hit the ball. The pad is obstructing the free flow of the bat. This can lead to a lot of these batsmen missing balls that target their front pad, and because they’ve planted their foot in front of the stumps, they will be given out LBW almost every time.
If this is something you struggle with, opening up your stance a little bit can help you. By moving your front foot slightly to the leg side as you’re in your stance, it makes you less likely to plant your foot early across to the off-side. Therefore, it makes it easier for you to bring the bat through and hit deliveries that are targeting your pads.
Facing A Difficult Bowling Angle
If you’re a right-handed batsman facing a left arm fast bowler bowling over the wicket, this can be a very tough angle to deal with. Similarly, if you’re a left-handed batsman facing a right arm fast bowler bowling over the wicket, this can be just as difficult! The angle is dangerous because the ball is more likely to target the pads. If the ball swings towards the batsman even by just a small amount it can be enough to evade the bat and trap the batsman in front of the stumps. These deliveries are especially dangerous if the batsman plants their foot on the off-side prior to the bowler delivering the ball.
To deal with this angle, a lot of batsmen like to open up their stance. This is something I started doing when I was younger because I hated facing left arm fast bowlers, and it definitely helped me out. By shifting your front foot slightly to the leg side, it allows you to turn your body around a little bit more to face the bowler. This makes it easy to watch the ball from this new angle. It also means that you don’t have to bring the bat around your front pad to strike the ball.
Head Falling Across To The Off-Side
This is a similar problem to the first one, but many batsmen will misjudge straight balls because they’ve allowed their head to ‘fall over’ towards the off side. This occurs when a batsman’s foot placement is inefficient. For example, if their first movement with their front foot is towards the off side, this can cause a lot of their weight to go in that direction. If the ball is then delivered on the pads or down the leg side, the head is nowhere near the line of the ball. It can lead to a lot of batsmen getting in positions like the one shown below, which is a terrible position to be in! Ideally, we should have our head as close to the line of the ball as possible.
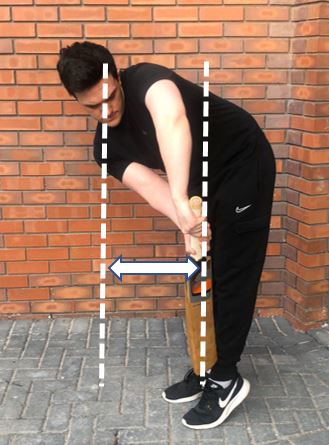
By shifting to an open stance, it can stop us taking that huge step across to the off-side that gets us in a terrible position. This leaves our body in a better position to attack straight/leg-side deliveries.
What Are The Disadvantages Of An Open Stance?
Most changes that we make to our batting technique can open up other errors, and changing to an open stance is no different. Although the open stance may make it easier for us to hit deliveries that are aimed at our pads or going down the leg side, it may lead to us not playing shots through the off-side as well. For example, shifting your foot to the leg side in your stance means you are going to have to move it further towards the ball if you want to play a cover drive. This is something to be aware of if you’re going to make this change to your technique.
Changes To The Width Of Your Stance
As we discussed at the beginning, the orthodox stance requires you to have your feet about shoulder with apart. However, some batsmen adopt stances with their feet wider than this, and some bring them closer together.
In my opinion, you should have your feet shoulder width apart. I find that when I’m batting, if I have my feet any wider than this, it makes me feel too static and it limits my ability to move forwards or backwards very quickly. Think about it, if your feet are already very wide apart, you can’t really take a big step forwards with your front foot because you can’t stretch much further!
One player that did have a very wide stance was Kevin Pietersen, and you can see a picture of that below. My guess is that this stance was just how he felt comfortable standing at the crease, so he just stuck with it. However, he didn’t stay in this position all the way up until the bowler delivered the ball. Just before the bowler released the ball, he would use a ‘trigger movement’ to get himself into a better position to play a shot. I’ll explain the importance of trigger moves later in the post!
It is rare to see a batsman that has a stance where their feet are incredibly close together, and I think this is for a good reason. We feel more stable and secure at the crease when we have a stronger base, and positioning your feet so close together doesn’t provide us with one! If you’re in this position, it is much easier to become unbalanced, and it is not a particularly explosive position. I would generally advise against this type of position, but as always, the final say on your technique comes down to you!
To sum this section up, you should really have your feet as wide as you want. If it feels better for you to have them wider, then go with that. If it feels better to bring them a bit closer together, then you should take that route. However, I personally feel that having them shoulder width apart is the best possible starting position for your stance. Make sure you get a lot of batting practice and see what position feels natural to you.
Changes In Grip & Backlift
Your grip refers to how you hold the bat, and your back lift refers to how high the bat comes up behind you before you play your shot. Some players have a very low backlift, and some have a huge backlift where the bat goes above their head. See the picture below for what this may look like!
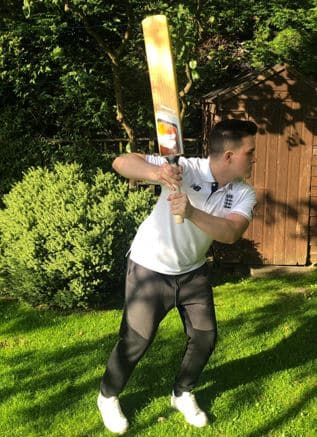
The way we grip the bat and the direction of the backlift are very closely linked. If your bottom hand is your dominant one and you grip the bat tightly with this hand, you’re much more likely to see the toe of your bat angles towards the gully/4th slip area when you pick your bat up. If you have a loose bottom hand and use your top hand in a more dominant way, the toe of the bat is more likely to point back towards the keeper/1st slip when you pick it up!
The orthodox stance I laid out at the beginning of this post featured a loose bottom hand grip with the top hand providing the guidance. In that stance, the toe of the bat should be pointing back towards the keeper/1st slip. However, this is a matter of preference. Two of the most successful batsmen the world has ever seen have held the bat very differently, and had very different backlifts. The two players I’m talking about are Don Bradman and Steve Smith. These guys use what I like to refer to as the Bradman grip, which requires you to turn your bottom hand around underneath the bat and let the bat run across your palm. This twisting of the bottom hand will cause the bat to naturally point towards the 4th slip/gully region as you’re in your stance. If you’re confused by that explanation, click here to head to my post where I cover all different kinds of batting grips (including the Bradman grip) in great detail!
Holding the bat in this way allows you to play shots through the leg side much more freely, and it also causes you to roll your wrists naturally as you play cross-batted shots, which helps you keep the ball on the ground. It does make playing shots through the off-side slightly trickier, but with lots of practice you can find a way to make this work to your advantage.
What I’m trying to say is, the grip you choose to use doesn’t really matter. As long as the grip you choose is comfortable for you, just make sure you’re using the right end of the bat and you should be fine. All sorts of different grips work for different cricketers. The same goes for the backlift. Don’t feel under too much pressure to change this or work on it, especially earlier in your career. I would simply stick with what comes naturally to you.
Changes In The Guard You Take
Which ‘guard’ you take is an important detail when it comes to batting. Taking guard basically refers to where you stand once you get into your batting stance. More specifically, it refers to the line that your feet are on. If you take an off-stump guard, the front of your feet should be in line with the off stump. If you take a leg stump guard, the front of your feet should be in line with the leg stump. The guard is one of the most important aspects of your batting stance, and it allows us to get in good positions from which we can play our shots.
The most orthodox guard to take and the place where most beginners will stand when they begin playing cricket is on a middle stump guard. This means they will have the front of their feet in line with the middle stump. This is a good neutral position to get into, and it gives you a good chance to access the ball evenly on the off side and on the leg side.
Batsmen who take a leg stump guard may choose to do so because they are often getting out LBW. This takes their pads away from the line of the stumps, so there is less chance they will be hit in front. It can also be very beneficial to players who are very strong at hitting shots through the off-side. Taking guard on leg-stump means a slightly higher percentage of deliveries will be on the off-side of your body, presenting you with more opportunities to hit the ball in that region. Unfortunately, this movement also opens up the possibility of you getting bowled due to the fact that you’re covering your stumps less. The bowler will feel they have a larger target to hit!
Batsmen who take an off stump guard may choose to do so because they struggle playing shots outside the off-stump. Moving to an off-stump guard takes them a little bit closer to the ball, meaning that their footwork does not have to be as accurate to play wide balls. The shift in position also turns deliveries that would originally be just outside the line of off stump into straighter balls, giving the batsman the opportunity to whip the ball into the leg side. A strong leg-side player may choose to adopt an off-stump guard as it increases the number of deliveries that will stray on to their pads, allowing them to be struck through the leg-side. The main disadvantage of an off stump guard is that if you miss a straight ball, you will likely be given out LBW due to the fact that you have positioned yourself directly in front of the stumps. In my opinion, you need a superb level of hand-eye co-ordination to bat on an off stump guard regularly.
As you can see, each type of guard has its own advantages and disadvantages, and which one you choose should be based on the strengths and weaknesses of your batting technique. For younger players and players who don’t want to overcomplicate things too much, I’d recommend taking a middle stump guard as this is a great neutral position to get in to. If you’re interested in reading more about different types of guard and what effect these can have on your game, there’s loads more info in one of my other posts that you can check out by clicking here!
The Impact Of Trigger Movements
If you’re not sure what a trigger move is, it is basically a small movement of the feet that batsmen make just before the bowler bowls the ball. The movement is used so that the batsman can get their feet moving in preparation for a quick delivery. Ideally, the trigger movement should take you from your original stance to a position in which you are well prepared to receive and react to a delivery.
Trigger movements are different for every batsman, and some don’t even use them at all. Sachin Tendulkar was a great example of this. As the bowler was approaching the wicket, he would remain almost perfectly still, watching the ball. He would only begin his foot movement once the ball was released.
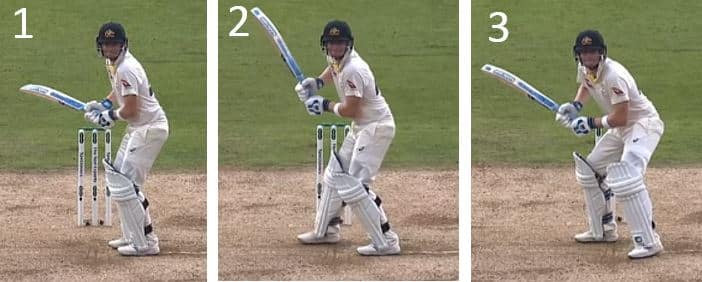
Steve Smith is the complete opposite. His batting stance begins on a leg stump guard, but his trigger movement features a large step across to the off stump with his back foot, just before the bowler delivers the ball! In the photos below you can see the progression from his batting stance in picture 1 and his ball ready position in picture 3. In picture 2 you can see the movement of the back foot across to the off stump while the front foot stays still. In picture 3, there is a small movement of the front foot, bringing the two feet slightly closer together.
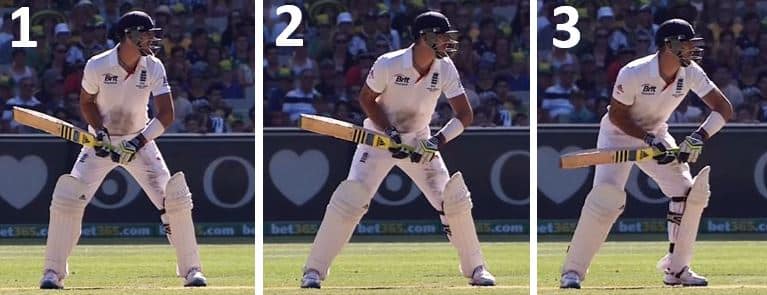
Similarly, in the photos below you can see Kevin Pietersen’s body position before and after his trigger move. Picture 1 shows KP in his batting stance. Picture 2 shows the initial part of his trigger move, where he shifts his back leg back slightly. The front leg remains stationary. In picture 3, the back leg stays still, while the front leg moves back, bringing the two feet closer together. Although KP initially has his legs a large distance apart in his stance, you can see that by the end of his trigger move he has fixed this. He is now in the perfect position to respond to the ball. His weight is 70% over his front leg, and his front foot is nicely positioned so that he can either take another step forward if the ball is full, or push himself back if he receives a short ball.
I hope this section has showed you that no matter what your batting stance is like, a trigger move can get you in to a good position to receive the ball. Trigger moves can’t really be coached. They have to be a natural movement that feels right for you! If you’re a young cricketer or a player who doesn’t regularly face fast bowling then you may not want to think about this too much. It can over complicate things! If you want to add a trigger move to your game, lots of practice is essential. Only through many hours of practice can you become totally comfortable with the movements and get yourself to the point where you don’t even have to think about it anymore! Remember that you should be keeping your head and eyes level as you make the movement, and keep your eyes on the ball at all times.
Conclusion
Thanks for reading. Hopefully this post has given you some more information about different types of cricket batting stances and how they can benefit your game. There are lots of variations in stance and none of them are really right or wrong, but some are definitely better than others! Take this advice on board and try to pick a stance that feels right for you! Also, if you’re in any doubt about how you currently stand at the crease, don’t be afraid to ask a coach for their opinion or another senior player! Anyone with a good level of cricket experience should be able to give you a few pointers!
Until next time, practice hard and good luck!
