
Any player who fancies themselves as a dangerous fast bowler should want to be bowling with the new ball at the beginning of the batting innings. This is arguably the best time to bowl, because the ball is new, shiny and hard, which leads to more swing and seam movement. However, bowling with the new ball is also a role that comes with great responsibility. Fast bowlers will be under pressure to take wickets as well as keeping things tight and stopping the opposition batsmen from getting off to a flying start!
Certain fast bowlers are better at bowling with the new ball than others. But what is it that makes them so good? That is what we’re going to look at in this post! I’ll share x of my favourite tips that should help you to become a vastly better new ball bowler. Some of them are technical tips, and some of them are more focused on the mental/tactical side of bowling – which is often overlooked! Once you’ve read through the tips and put them into practice, you’ll hopefully have all the tools to turn yourself into a top class strike bowler!
Here are my 8 tips for bowling with the new ball:
- Make sure you warm up properly
- Mark out your run up and rehearse it
- Get enough fielders in catching positions
- Make the batsman play at as many deliveries as possible
- Learn to swing the ball with good control
- Learn to control seam position
- Bowl with a new ball during practice sessions
- Keep your hands and the ball as dry as possible
I’ll now go through each of these in more detail so you can see exactly what you should be aiming to do!
Make Sure You Warm Up Properly
To bowl a good spell with the new ball you’ll need to make sure your body is properly ready. To do this, a proper warm up is required! Warming up helps to loosen up your muscles and make them more flexible, which allows you to bowl faster and also to avoid injuries! Injuries are very common for fast bowlers, especially as we get older. And so as we grow in age, the warm up becomes even more important! You’ll never see a fast bowler go out to bowl in an international match without going through a proper warm up first.
So, what exactly do you need to do? I personally divide the warm up into two distinct sections. The first of these is stretching, and the second is cardiovascular. Let’s explore both of these below.
First, stretching. When doing this, it’s hugely important that you target the lower body specifically, as these are the areas that will be under the most stress if you’re a fast bowler. You should mainly be looking to stretch out your hamstrings, your quads, your calves and your groin muscles. Before each bowling innings, you should make sure you stretch these muscles. However, I’d also recommend stretching them on non-cricket playing days if you want to see a big increase in your flexibility! If you want ideas for the types of stretches you can perform, feel free to watch the video below for some inspiration! You don’t have to perform the whole routine, but you can take some individual stretches from it. Trust me, as your flexibility improves, you’ll see an increase in your range of motion which will enhance your ability to bowl fast!
Now, for the cardio aspect of the warm up. Performing a brief period of cardiovascular exercise like a jog or a brisk walk before you begin bowling is important because it can help to raise your body temperature as well as increasing blood flow and oxygen supply to your muscles. All of these things can help you perform at a higher level, and help you avoid injury. I don’t think a cardiovascular warm up is as important for bowling as a stretching warm up is, but you may want to try it regardless!
Mark Out Your Run Up and Rehearse It
If you want to set the tone at the start of the innings and bowl accurately, then you should definitely spend some time measuring and marking out your run up before you bowl your first ball. Preferably, you’ll also do a rehearsal of your run up, to ensure that you’ve measured it correctly!
By measuring and marking out your run up in this way, you’ll know that it is perfectly set up for you to approach the crease without having to think too much about the length of your strides, or whether you’re going to bowl a no ball. Thinking about things like this as you run in to bowl is definitely not a good thing to be doing. Instead, with run up worries out of the way, you can be completely focused on what kind of delivery you’re going to bowl, and how you’re going to get the batsman out.
So, when you get onto the field at the beginning of the innings, start marking out your run up straight away. Ideally, you will already have a run up that you are comfortable with and that you have practiced relentlessly. If you do, you can just measure it out and go from there. Run ups are usually measured in the number of strides it takes you to get to the crease. For example, my run up was 15 paces long. So, at the start of the innings I would stand with my feet on the popping crease and then walk back 15 strides, marking out exactly where I landed with my boot, or by placing a marker on the outfield. By doing this, I knew that if I set off from that marker each time, I would land at the perfect position on the crease.
Once you’ve marked out you run, it’s always a good idea to do a little rehearsal to make sure it feels right. To do this, run up like normal (without a ball in your hand) from the spot you have marked, and see where your front foot lands as you go through your bowling action. If you feel like you’re likely to land your front foot over the popping crease, move your marker back a bit. If you aren’t getting close enough to the popping crease, move your mark forward slightly.
If you haven’t already developed a run up that suits you, or even if you just want to learn more about them – head over to one of my other posts linked here for some additional run up based advice!
Get Enough Fielders In Catching Positions
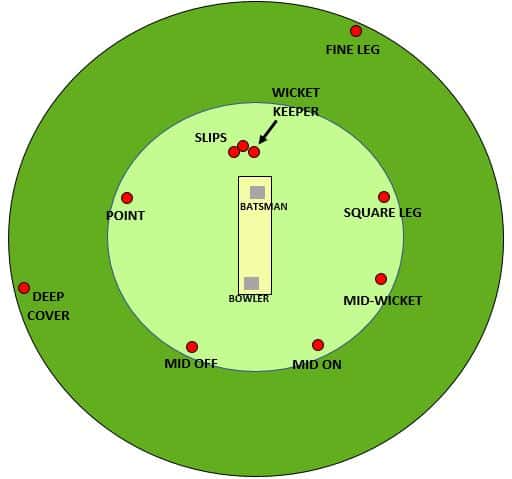
To give yourself the best chance to take wickets with the new ball, you should work with the captain to make sure you have fielders in the most threatening positions. What the most threatening positions actually are will vary depending on what type of bowler you are, and what type of batsmen you are bowling to. However, there are a few positions that you should always be considering no matter what!
When the ball is new and moving in the air and off the seam, you want to have plenty of fielders relatively close to the bat to take advantage of any false shots the batsmen may make. An example of this is slip fielders! These fielders stand quite close to the wicket keeper in a diagonal line and are used to catch any edges that fly wide of the keeper. The ball hitting the edge of the bat is very common in cricket, especially when the ball is new and the batsman is fresh to the crease. Slip fielders help you take advantage of this! In amateur cricket, it’s common to see a couple of slips in place at the start of an innings, as well as any periods when the bowling side is clearly on top. In professional cricket, you can often see 3 or 4 slip fielders waiting for a catch.
For quicker, more hostile bowlers, having a fielder positioned at short leg is another great option. With this fielder in place the new ball bowler will often bowl short deliveries at the batsman, in the hope that they are hit on the gloves or high on the bat, causing the ball to pop up to the short leg fielder. If you are a bowler who can cause batsmen a lot of stress due to your pace, short leg is a good option to consider!
I’ve included a diagram below that shows potential field placings you could use when bowling with the new ball. These field placements are commonly used at the highest levels of the game, and therefore you should probably be considering them too! You’ll notice that the majority of fielders are placed within the inner circle. This makes it harder for batsmen to steal singles early in their innings and get off strike. Ideally, as new ball bowlers we want to ramp up the pressure on one batsman and bowl many consecutive deliveries at them. Having the fielders in close also entices the batsman into playing aggressive shots, because they know they will be rewarded with a boundary if they manage to clear the in-fielders. Of course, this has a benefit to the bowler, because the more aggressive shots the batsman plays when the ball is swinging, the more likely they are to make a mistake!
Make The Batsman Play At As Many Deliveries As Possible
In my opinion this is probably the most important tip that I’ve included in this post. Early in their innings, many opening batsmen will be looking to leave as many deliveries as possible. They aim to do this so that they can get their eye in, get their feet moving and become comfortable with the pace and bounce of the pitch. As a new ball bowler, your main job should be to make the batsmen play shots at as many balls as possible, whether those shots are attacking or defensive shots. If you can force them to play when they haven’t been at the crease long and the ball is moving around a lot, you’ve got a much higher chance of forcing them into a mistake.
So, how do you ‘make the batsman play’? This all comes down to your accuracy. Ideally, you want to be threatening all three main modes of dismissal with every ball that you bowl. The main three modes of dismissal are bowled, LBW and caught behind. To threaten the batsman with all three of these modes of dismissal, you should be aiming to bowl at the off stump or just outside, in what is known as the ‘corridor of uncertainty’. When you bowl on this line, the batsman will not be sure whether they can leave the ball or not, and therefore they are more likely to play a shot. As for the length you should be bowling, you should be aiming to get the ball to hit the top of the off stump. This means that when the ball passes the batsman it will usually be at about knee height. You can see a diagram of the zone that new ball bowlers should be looking to target below!

Bowling the ball consistently in one zone is surprisingly difficult, and it takes a lot of practice to be able to do it. Thankfully, there are multiple ways that you can work on your accuracy, including a combination of drills and technical tweaks. If you’d like to read all of my accuracy tips, head over to one of my other posts linked here!
Learn To Swing The Ball With Good Control
Getting the ball to swing is arguably the new ball bowler’s biggest weapon. If they can combine that swing with a good amount of control and accuracy, then it will be even more lethal!
There are two main styles of swing bowling that new ball bowlers can utilise. These are: inswing and outswing. For many bowlers, their action will lead to them getting the ball to swing a certain way naturally. Take me for example – my bowling action has always led to me getting the ball to swing in towards the right handers. This wasn’t something that I had to really try to develop! However, getting the ball to swing away from the right handers is something that I’ve really had to work on. Any bowler who wants to be able to swing the ball both ways, emulating the truly elite new ball bowlers like Dale Steyn and James Anderson will have to put in a lot of work in the nets!
To learn how to get outswing on the new ball I would recommend following these four main rules:
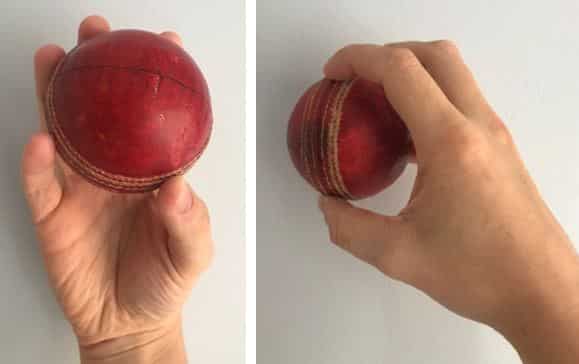
- Hold the ball in the correct outswing grip (shown below)
- Make sure the seam is angled towards the direction of first slip, as shown in the diagram below
- As you release the ball, try to make sure that your index finger is the last finger to make contact with it. This pushes the seam in the required direction for inswing

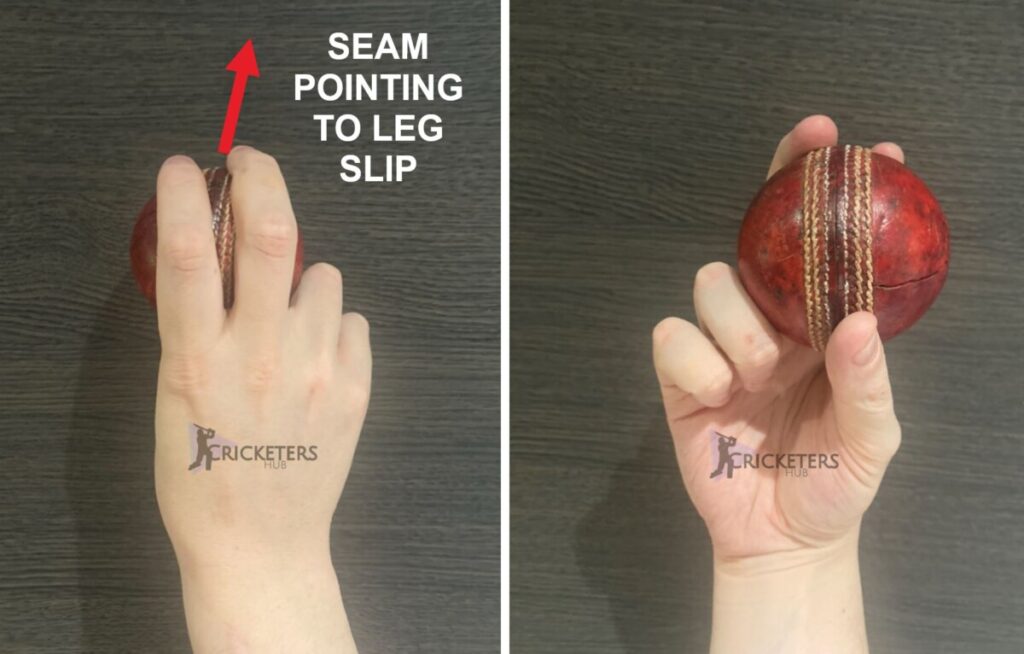
To learn how to get inswing on the new ball I would recommend following these four main rules:
- Hold the ball in the correct grip for the inswinger (shown below)
- Make sure the seam is angled towards leg slip/fine leg, as shown in the diagram below
- As you release the ball, try to make sure that your middle finger is the last finger to make contact with it. This pushes the seam in the required direction for inswing
If you would like to read a much more detailed post about how to bowl inswing and outswing, click here! It should give you all the tools you need to bowl swing effectively.
The only way to control the amount of swing is to practice bowling it – regularly. In my opinion you should be getting at least one hour of bowling practice with a cricket ball per week, and preferably you will get much more than that! As you practice, you’ll learn which lines you have to bowl to make your swing effective. For example, if you’re bowling outswing to a right hander, and the ball is swinging a lot, you should probably aim for middle/leg stump. This way, when the ball swings it will end up outside the off stump. Alternatively, if the ball is only swinging slightly you should aim for the off stump. By doing this, the small amount of swing will take the ball just outside the off stump once it reaches the batsman!
Learn To Control Seam Position
So, we’ve spoken about swing bowling, so now it’s time to talk about seam movement. This is another important weapon in a new ball bowler’s armoury! Moving the ball off the seam is just as dangerous as getting the ball to swing, and it’s much more likely to happen when the ball is new and the seam is harder.
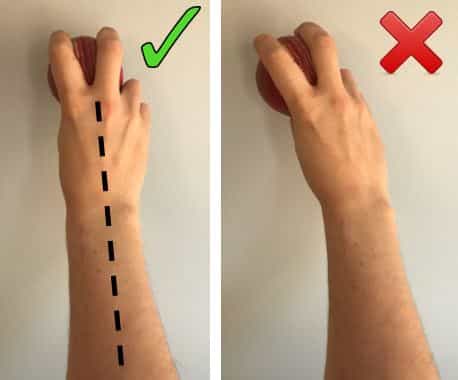
If you’re wondering what it takes to get seam movement to occur, then I can tell you that a large part of it revolves around your wrist and hand position as you release the ball. Ideally, at the point of release your wrist should be locked and your arm should be in a linear position, similar to the picture on the left below. Having your wrist and your hand in this centralised position when the ball leaves your hand helps to keep your wrist directly behind the ball, which makes the line of the delivery easier to control. It also helps to keep the seam upright as the ball travels towards the batsman.
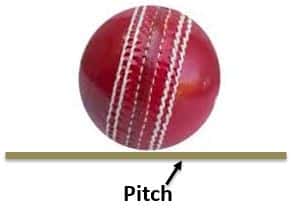
If the seam is upright, it means that the seam is likely to make contact with the pitch when the ball bounces. This is shown in the diagram below! It is this type of contact between the seam and the pitch that leads to seam movement.
If your wrist is loose when you bowl it means your wrist will not be fully behind the ball, making it easier to lose control of the line and seam position during flight. This can lead to the ball coming out with a scrambled seam, which makes seam movement harder to achieve.
If you’d like to read my full guide on how to get the ball to seam around more frequently, head over to the post linked here. There are a few tips in there that I think any new ball bowler would find useful!
Bowl With A New Ball During Practice Sessions
If you’ve read any of my other blog posts before, you’ll know the importance which I place on replicating match conditions during your practice sessions. This should be no different if you’re trying to practice your new ball bowling!
A question for you: If you never bowl with a new ball during practice, why would you expect yourself to bowl consistently well with one during a game?
Fast bowling is largely about ‘feel’, and in my experience, bowling with a new ball can feel slightly different to bowling with an older ball. The newer ball is a lot harder, and the seam is often a lot more pronounced. Therefore, the new ball may feel a little bigger in your hand. Your fingers may not sit across the seam as comfortably. These are all things you need to get used to – and the only time to do that is during your practice sessions! If you always practice with an older ball that you’ve been using in the nets for months, then you’re never going to get comfortable with gripping the new ball. You’re never going to get comfortable with controlling the amount of swing that a new ball can provide. You’re never going to get the feel of what it takes to release the new ball perfectly off your fingers.
So, I would recommend buying a few new balls if you can. The ones you can get in multipacks are probably the best option, where you can get a pack of 6 new balls for a decent price. Have a look at this set on amazon for example! Alternatively, the club you play for may provide new cricket balls for you to practice with.
If you’re aiming to increase your new ball bowling ability, I’d recommend getting at least an hours practice in with the new ball each week. Of course, you can do more if you have the time available! During this practice session you should be working on the things that I’ve outlined in this post. Do this over a long period of time and you’ll see an improvement in your ability to dominate with the new ball.
Keep Your Hands And The Ball As Dry As Possible
There are three main reasons that keeping your hands and the ball as dry as possible can benefit you as a new ball bowler. Here they are:
- The ball will be much less likely to slip out of your hands. As a result, you’ll have more control over your deliveries
- The ball will stay harder for longer. Cricket balls that take on moisture can quickly become soft, meaning that you will get less seam movement
- The ball will be more likely to swing. Cricket balls that get too wet will be harder to swing than ones that are kept dry
If you look at the reasons above, you’ll see why keeping the ball dry is so critical. Accuracy, seam and swing are 3 of a new ball bowler’s biggest weapons, and a dry ball can help you to achieve all of them!
To try and keep the ball dry when the outfield is wet, you should keep a small towel with you and tuck it into your trousers. Or, you could ask one of your teammates in the field to keep a towel and make sure that they dry the ball instead.
Sometimes, the ball becomes wet due to us being careless with how we handle it. For example, if you’re someone who gets really sweaty hands when it gets hot, you shouldn’t be putting your palms anywhere near the surface of the ball. In fact, on really hot days where everyone is sweating, you should agree as a team that no one should put their palm on the surface of the ball unless they absolutely have to. Instead, all members of the fielding side should hold the ball on the seam with their fingertips – like I’m demonstrating below!
If you start working as a team to keep the ball dry, you’ll soon notice that the ball does more for a lot longer!
Conclusion
I hope all of the tips I have shared above have inspired you to become a better new ball bowler, and that you will work on them during your practice sessions! New ball bowlers are immensely important to their team, and teams that have good ones are much more likely to be successful than ones who don’t.
I would recommend watching some footage of the elite new ball bowlers in the international game to get an idea of how disciplined, accurate and dangerous they actually are. Guys like Jimmy Anderson, Mitchell Starc, Dale Steyn and Glenn McGrath have terrorised batsmen for years due to a range of different factors. All of them have different skills which make them a handful! Take inspiration from them, and a bit of guidance from this post and I’m sure you’ll be well on the way to taking more wickets with the new ball!
Recent Posts
Where Should You Place Your Best Fielder In A Cricket Match?
When a limited overs cricket match reaches a critical point, you’ll often hear coaches, players and commentators talking about how important it is to ‘have your best fielders in important...
The sport of cricket has successfully rebranded itself in the last half century in order to appeal to wider audiences. Now, instead of just having test cricket as the sole international format of the...