
If you’re planning to seriously improve your fast bowling skills, you should probably be practicing at home as well as during net sessions with your cricket club. Most cricket clubs will run hourly practice sessions once a week, and unfortunately, bowling for one hour a week probably isn’t enough if you want to become a top level fast bowler. Practicing at home allows you to devote extra time to perfecting and grooving your bowling action, working on your accuracy, and building the skills you’ll need to take wickets.
In this post I’m going to take you through a number of different ways you can practice fast bowling at home. I’ll share plenty of drills that I’ve used in the past, as well as ones I’ve seen other cricketers using! I’ll also give you a few different exercises you can do to build up some bowling strength! Lastly, sometimes it’s necessary to buy certain bits of cricket equipment if we want to improve the quality of our practice, like a set of stumps or a certain type of cricket ball etc. That’s why I’ll also be giving you some recommendations of things you may wish to buy if you’re practicing at home at the end of this post!
Firstly, let’s start with some drills you can do…
Run Up Drill
What will you need for this drill:
- A large, flat, open space. You need enough room to run!
- A way to mark out your run up
- A way to mark out whereabouts you will be bowling from
Optional items:
- A ball. This can be a cricket ball, a wind ball or a tennis ball depending on what type of surface you’re practicing on.
- A set of wickets
How to perform the drill:
It’s really simple to practice your run up while you’re at home. You don’t even need a partner or much equipment in order to do so!
- Firstly, as I mentioned above, make sure you have a large, flat, open space in which you can run without bumping in to anything.
- Once you have that, mark out where you are going to bowl the ball from. You can use anything for this. If you’re practicing on grass, you can make a mark on the grass with your shoe. If you’re practicing on concrete or a harder surface, place an item of clothing or a small cone or something similar close to where you’re going to be bowling from.
- After you’ve marked out where you’re going to bowl from, count out the paces of your run up as you walk back to the start of your run. You should then make another mark at this point, signifying where you will begin your run up from each time you bowl.
- From this point, you can begin practicing your run up. Focus on staying relaxed, moving towards your target, and building your speed as you come to the end of your approach.
- You can repeat this as many times as you like, with or without a cricket ball in your hand.
Practicing your run up using simple drills like this is hugely important if you want to be a great fast bowler. The most dangerous fast bowlers don’t have to think about their run up as they approach the crease because they’ve practiced it so many times. Hours and hours of repetitions in practice has made every movement feel like second nature to them. If you can get the basics right, that gives you a great foundation to add other skills on top of.
If you’re unsure about your run up and you want some help and advice on how to design it, check out one of my other posts here. It should give you all the info you need!
Simple Wrist Position Drill
What will you need for this drill:
A ball. Preferably a real cricket ball with a seam!
How to perform the drill:
Maintaining the right wrist position is really important for fast bowlers. Having your wrist properly behind the ball as you release it can help you to bowl faster, get seam movement once the ball hits the pitch, and get the ball to swing in the air.
There are a few ways to teach yourself to bowl with good wrist position, but this incredibly simple drill is probably my favourite. To try it for yourself, follow these steps:
- Hold the cricket ball in your hand in the correct fast bowling grip, like I’m demonstrating in the photo below.
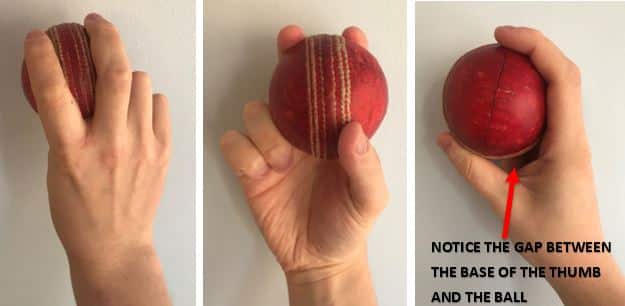
- While holding the ball in place, turn your hand over so that your palm is facing upwards.
- Once your hand is in this position, bring your arm upwards and throw the ball up in the air.
- As the ball leaves your hand, you should make sure that your wrist is in a stable, central position. Also, focus on letting the ball roll off your index finger and your middle finger evenly, allowing them to push the ball up in to the air. This recreates the movement that occurs when your index and middle fingers propel the ball towards the batsman when you’re bowling.
- Once you’ve thrown the ball up in the air, you’ll be able to tell if your wrist was in the correct position or not. If the ball rotates with the seam wobbling from side to side, your wrist wasn’t in the best position. If the ball rotates perfectly along the axis of the seam, without much wobble, then you know your wrist is fully behind the ball!
This simple drill helps you to get comfortable with the feeling of having your wrist behind the ball. You should be aiming to achieve the same thing when you bowl a real delivery in the nets or during a proper match!
Accuracy Drills
Stationary Target Practice
What will you need for this drill:
- A ball. This can be a cricket ball, a wind ball or a tennis ball depending on what surface you’re bowling on.
- Something to use as a target. I find that small cones or coins are good for this!
Optional items:
- A set of wickets
- A batsman!
How to perform this drill:
This drill is very easy to replicate. Follow these steps if you want to try it out:
- Place your target (a cone or a coin or whatever you’ve chosen) in the area that you will be trying to land the ball
- Go through your usual fast bowling run up as usual, keeping your eyes on your target as you approach the crease.
- Release the ball and try to hit your target
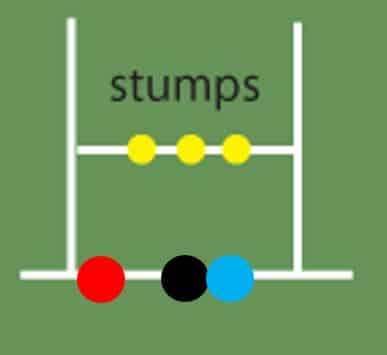
This drill is great for improving your bowling accuracy. I’ve used it so many times during my career so far! You can use it to build your accuracy when bowling different deliveries. For example, if you want to practice bowling yorkers, you could place cones in the positions that I’ve shown in the diagram below. The cone furthest to the left represents a yorker that is wide of the off stump, the middle cone represents a middle stump yorker, while the cone on the right represents a leg-stump yorker. Before each delivery, nominate a cone and try to hit it.
If you want to practice bowling good length deliveries, place a cone or a coin around 4-5 metres away from where the batsman would be, and just outside the line of their off stump. Then, try to land the ball in this area!
Repeating drills like this really helps you to get the feel of what it takes to bowl certain key types of delivery. Over time, you will notice an improvement in your ability to bowl the types of deliveries that you’ve been working on. I like to record my success rates when I do drills like this because it helps me to grade my improvements. For example, if I attempt to bowl 20 yorkers during one of these drills, how many of them did I bowl accurately? If I only hit my target 5/20 times, then I know I need to work on this type of delivery more often!
High quality bowlers like Lasith Malinga and Mitchell Starc are only so good at bowling yorkers because they’ve bowled thousands and thousands of them during practice! These stationary target drills are a great way to start building your accuracy.
Moving Target Practice
What will you need for this drill:
- A large, flat, open space. You need enough room for your run up and then enough room to bowl the ball.
- A ball. This can be a cricket ball, a wind ball or a tennis ball depending on what surface you’re bowling on.
- A moveable target. I like to use a football for this or a ball of similar size
- A partner. You’ll need someone to move the target as you’re about to bowl
Optional items:
- A set of wickets
How to perform this drill:
A partner is vital for this drill as you’re going to need them to provide you with a moving target to bowl at. Here’s what you should do if you want to try this drill yourself:
- Stand at the end of your run up and get your partner to stand close to where the batsman would be, but off to the side of the pitch slightly.
- Begin your run up. As soon as you are a couple of strides away from delivering the ball, your partner should roll the target across the pitch.
- Your job is to follow the movement of the target with your eyes and try to hit it with the ball.
- You can repeat this as many times as you like, and get your partner to swap which side of the wicket they stand on.
This drill is a good way to practice bowling to batsmen that like to move as you’re about to release the ball. Sometimes, they will try to back away to the leg side, or walk across to the off-side to try to distract you. This drill helps you to respond to those movements quickly and adjust the line of your delivery quickly to target their body!
Variation Drills
What will you need for this drill:
- A large, flat, open space. You need enough room for your run up and then enough room to bowl the ball.
- A ball. This can be a cricket ball, a wind ball or a tennis ball depending on what surface you’re bowling on.
Optional items:
- A set of wickets
- A batsman to bowl to
How to perform the drill:
This drill is another very simple one, and you can use it to practice your variation deliveries. In shorter formats of cricket, all bowlers need to be able to bowl an effective slower ball, a yorker, and a good quality bouncer. They also need to be able to bowl each of these deliveries accurately. This drill helps you to work on that, and helps you to plan and construct your overs.
Basically, the drill works like this:
- Before you bowl your first ball, decide what each of your next 6 deliveries are going to be. For example, your first ball may be a normal, good length delivery. Your 2nd, 3rd and 4th balls may be a bouncer, a yorker and then a slower ball. Your 5th and 6th deliveries may be a good length ball and then a bouncer.
- After that, the drill is simple. Try to bowl each delivery as accurately as possible.
- If you’re bowling without a batsman at the other end, try to grade the accuracy of each delivery. If you don’t get one of the deliveries right, keep repeating it until you bowl it where you want to bowl it!
- If you’re bowling to a batsman, try to bowl your deliveries accurately and stop them scoring runs.
This simple drill helps you get used to alternating between your normal deliveries and your variations, which is an essential skill for any fast bowler in the shorter forms of the game.
I have written several posts teaching fast bowlers how they can bowl better variation deliveries. If you’d like to read my post that covers all of the different types of slower balls, click here! If you want some tips that will help you bowl better yorkers, click here to read that post!
Play & Leave Drill
What will you need for this drill:
- A large, flat, open space. You need enough room for your run up and then enough room to bowl the ball.
- A ball. This can be a cricket ball, a wind ball or a tennis ball depending on what surface you’re bowling on.
- A set of wickets
- A batsman
How to perform this drill:
This drill is basically a game that is played between you and the batsman. The batsman is trying to leave as many balls as possible, and you (the bowler) should be aiming to make them play at as many balls as possible. Here are the rules of the drill:
- Approach the crease using your standard run up, and bowl the ball towards the batsman. Your aim should be to force the batsman into playing a shot by targeting the stumps or their body.
- The batsman you are bowling to should be trying to leave the ball if possible. However, if the ball is close to the stumps there is a risk of getting out if they leave it!
- If the batsman leaves the ball and the ball does not hit the stumps, they are awarded 4 points.
- If you force the batsman into playing a shot, you are awarded 1 point.
- If you get the batsman out, you are awarded 4 points.
I really like this drill as it helps to get you into good bowling habits. Threatening the stumps as a fast bowler is often a good thing to aim to do, and the more regularly you can do that the better! We should always be trying to bowl deliveries that force the batsman into playing a shot, and it would be even better if we were threatening the stumps and forcing them to play defensively! Try bowling a few overs at your partner and keep a tally of how many points each of you get.
Front Arm Drill
Optional items:
- A ball. This can be a cricket ball, a wind ball or a tennis ball – whatever you prefer!
How to perform this drill:
This isn’t really a ‘drill’. Instead it’s something to think about and try to be aware of when you’re bowling. Thinking about this and performing this simple movement practice will teach you how your body should be moving just as you release the ball.
Basically, some fast bowlers pull their front arm down much too early as they are about to bowl. This means they cannot bowl as fast as they otherwise may be able to! If you want to read more about this, check out my post on how to bowl faster by clicking here. This little drill gets you comfortable with delaying the pull down of your front arm, and hopefully will help you to add some speed to your bowling.
You can practice the movement while standing still first. Take a step forwards and then get into your usual pre-release position like the one I’m showing below. Then, practice the movement of pulling your front arm down forcefully and allow your bowling arm to rotate over the top of your body as usual. Think about delaying the pull down of your front arm as long as you possibly can, and practice doing this. Once you are comfortable with doing it from a stationary position, practice doing the same thing with your real bowling action.

Fitness Drills
Cardiovascular Activity
If you’re a fast bowler, you’re going to have to work on your endurance. No one wants to be getting tired when they’re halfway through a spell of bowling! I’d recommend getting on the treadmill, or going for a run at least once a week so that you can prepare yourself for those longer spells!
Core Exercises
Core strength is really important for fast bowlers. Firstly, it helps to prevent injury – especially in the lower back which can come under quite a bit of strain when bowling fast. It also helps us to transfer force between our lower body to our upper body, helping us to bowl faster. You definitely don’t need to be a member of a gym to start working on your core strength, it can all be done easily at home – so you’ve got no excuses! Try the following exercises and see how you do:
Planks – Try out several variations of the plank in order to build some solid core strength. These exercises can easily be done at home or in the gym
Floor sliding mountain climbers – These are a great exercise that will help you to build some strength in your hips as well as your core
Rotational Medicine Ball Throws – Rotational power is important for fast bowlers. This exercise will help to build this type of power and can easily be done if you have a medicine ball and a bit of space to do the exercise in!
Lower Body Exercises
Lower body strength is another important physical aspect for fast bowlers to work on. Having a strong lower body helps propel us towards the crease and to be a lot more explosive throughout our bowling action. It also helps us to avoid injury! Here are a couple of exercises you might want to try to improve your lower body strength:
Leg extensions – You’ll always find a leg extension machine in the gym! These are great for targeting your quadriceps
Lunges – these are a decent replacement for leg extensions if you’re not a member of a gym! They also target many of the major muscle groups in your lower body
Squats – This is probably the most effective exercise on this list – it targets pretty much all of your lower body! You can perform this with added weight on a barbell in the gym, or just with your own body weight at home. Try jumping squats for an extra bit of explosiveness!
If the exercises above interest you, I’d recommend googling them to get some more information on how to do them properly and safely!
My Recommended Items For Practicing Fast Bowling At Home
As you may have guessed from reading this post, there are a number of items that will make it a lot easier for you to practice at home. They’ll also help to improve the quality of your practice! I thought I would include a list of my favourites below just in case any of you are interested…
A Ball
If you’re practicing on a grassy surface or some proper matting, you may want to buy yourself a proper cricket ball. Click here if you’d like to view one of the best quality options on Amazon! You can also buy them in sets instead of getting just one. These balls will usually be a little worse quality but still fine for practicing with.
If you’re practicing on harder surfaces like concrete or wood, you’ll have to buy a wind ball or a tennis ball instead,which can also be easily found on sites like Amazon or in sports shops.
A Set of Wickets
If you’re going to be practicing your bowling, you need a set of wickets to aim at! Having a set of wickets to aim at is a great target, and it always gives you a good feeling when you hit them. My favourite sets of wickets are spring loaded ones that can be used on any surface. These are great because you don’t have to reset them when you hit them, and they don’t have to be inserted into the ground. If you want to check the price of a great set of spring loaded wickets, click here!
Cones For Target Practice
Cones can be used for a variety of things when practicing your bowling. They can be used as targets to aim at like I explained above, or they can be used to provide tracks for you to run in to make sure your run up is straight. They’re pretty cheap to buy too, which is always a bonus! Click here if you’d like to see the latest price of a set of simple cones.
Cricket Net
If you’re not practicing with a partner, when you bowl the ball will often travel so much further beyond the wickets, meaning you have to go and retrieve it! Buying yourself a cricket net can help you to avoid this, as every time you bowl the ball it will hit the net behind the wickets and bounce back towards you.
There are two main types of cricket nets:
- Screens – These are usually set up directly behind the wickets, with their face angled towards you. As a result, they will only block the ball if you get it to go past the wickets. If you’re bowling against a batsman and they hit the ball into the off-side or the leg-side the screen will not block the ball. This means you’ll have to do some running to collect it! Screens are great if you’re practicing bowling by yourself with no batsman.
- Full Batting Nets – These are bigger and more expensive than screens. Batting nets go completely around the batsman and the pitch that you’re bowling on. This means that if a batsman hits the ball into the off-side or the leg-side the ball will hit the side of the net, making it easy to retrieve!
As I said, screens are much more suitable for cricketers who don’t want to spend as much and tend to practice alone. Click here if you’d like to check the current price of a fantastic cricket screen from Woodworm! I love their products. It’s good quality, well priced and will definitely make practice a little easier for you. There’s nothing worse than chasing your ball all over the place…
Full batting nets are perfect for you if you have a large garden, or a large open area near your house where you can practice. They also suit cricketers who don’t mind spending a bit of extra money! Click here if you’d like to see the current price of one of my favourite batting nets. As I said, these types of nets are quite expensive but they’re a good investment if you’re serious about practice! Plus, the one that I’ve linked to is on the cheap side when you compare it to the rest that are available. Have a look and see what you think!
Conclusion
If you’ve been reading other posts on my site, you’ll know how often I talk about how important practice is. Practicing at home away from your cricket club can help you massively improve your skills, and that’s why I definitely recommend it. Fast bowling is all about repetition. Bowling plenty of deliveries helps you to get comfortable with your bowling action, improve your accuracy, and build confidence. I hope the advice I’ve given you in this post can help to make your home practices a little more interesting!
Recent Posts
Where Should You Place Your Best Fielder In A Cricket Match?
When a limited overs cricket match reaches a critical point, you’ll often hear coaches, players and commentators talking about how important it is to ‘have your best fielders in important...
The sport of cricket has successfully rebranded itself in the last half century in order to appeal to wider audiences. Now, instead of just having test cricket as the sole international format of the...