
Learning what a yorker is and how to bowl it is one of the most exciting things about being a fast bowler in my opinion. I remember after I first heard and read about it back in 2005, I became obsessed with trying to bowl the perfect yorker. In fact, I think most of the balls I bowled in my first two years playing cricket were attempted yorkers!
I put this post together for those of you who are also wondering what it takes to bowl the perfect yorker. I’ll first explain what a yorker actually is, for those of you who are unsure. Then, we’ll move on to my tips that will help you bowl it properly. I’ll also give you a couple of drills that you can use to practice it!
Here are my tips that will help you bowl the perfect yorker:
- Control Your Eyes
- Adopt A Confident Attitude
- Remember That Practice Makes Perfect
- Take Swing Into Account
- Watch The Batsman & React To Their Movements
- Use Specific Yorker Drills During Practice
I’ll cover all of those in more detail later in the post, but first, let’s cover what the term ‘yorker’ actually means!
What Is A Yorker?
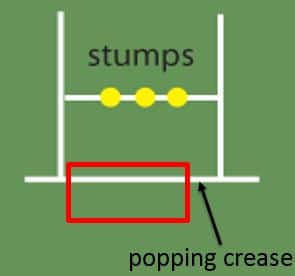
Put simply, the perfect Yorker is a ball that pitches on an extremely full length, usually anywhere around the area where the batsman’s feet are or close to the popping crease. If you look at the picture below, you’ll be able to see the perfect Yorker zone to a right-handed batsman highlighted in the red box. The zone for a left-handed batsman is simply shifted to the right-hand side of the popping crease.
A Yorker is not full enough to allow the batsman to hit it like a full toss, but also not short enough so that it bounces and the batsman can hit it on the half volley. It is an incredibly dangerous and difficult delivery for batsmen to play, especially when bowled at high pace, and can often sneak under the bat and cannon in to the wickets or their pads.
How to Bowl the Yorker
Accurate bowling comes down to extremely fine margins. If the ball leaves your hand a tenth of a second too early or too late then you can end up bowling a ball that was not even close to what you intended! When it comes to yorkers, releasing the ball at the right time is key because as we’ve already discussed above, there’s such a small area within which to land the delivery.
As I already mentioned, there are a few specific things that I think are necessary for a bowler to be able to consistently bowl good yorkers. Let’s have a look at them in detail…
Control Your Eyes
The eyes are a very important part of bowling. Focusing on a specific thing or a certain part of the pitch can help you to bowl more accurately.
When I was running in to bowl, I would stare at the area on the pitch that I wanted to hit, keeping my eyes trained on that point right up until I released the ball. This was something that always seemed to help me with my line and length. When I was bowling a yorker I would run in basically staring at the batsman’s feet, as that was the target that I wanted to hit. Not all bowlers do this though! Mitchell Starc of Australia (one of the deadliest death bowlers in the modern game) said in an interview that his approach to yorkers is to just stare at the stumps as he approaches the crease. If the yorker he bowls is too full, then next time he will move his eyes down the stumps, whereas if he bowls it too short he will move his eyes up the stumps.
Every cricketer is different, and every cricketer should be able to find a technique that works for them. Once you have your technique that works, stick with it and don’t change! The more repeatable your methods and techniques are the more likely you are to be able to bowl accurately.
Adopt a Confident Attitude
A large part of being a good yorker bowler comes down to the bowler’s confidence. If you are free from worrying about other parts of your game such as bowling a no ball, getting hit for 6 or making sure your line and length is absolutely spot on, then you’ll be able to concentrate in getting your maximum effort behind the ball and trying to get the batsman out.
I’ve seen other people suggest slowing down your run up a little bit when you’re thinking of bowling a yorker, to ensure that you get it on target. In my opinion this is bad advice. The yorker is an effort ball, the same way a bouncer is an effort ball! You shouldn’t be holding anything back when you choose to bowl it.
When you’re at the end of your run up, remind yourself that you are the bowler and you are the one who is going to be in control of this situation. The batsman can only react to what you do. He has to play on your terms. Believe in yourself and put all your effort behind the ball. That extra bit of effort when bowling a yorker could give you that extra yard of pace you need to sneak the ball under the bat and get the batsman out!
Remember That Practice Makes Perfect
The only way to become an accurate bowler is through countless hours of practice at home, in the nets or during games. Ideally you should be using a combination of all three!
You’ll hear many professional bowlers talking about the fact that bowling is all about getting into a groove and a rhythm with your action, and achieving perfection through repetition. Don’t expect to be bowling accurately and achieving peak performance if you’ve had 6 months without practice!
Bowling a yorker is all about feel. Once you get used to bowling them you will instinctively know when the ball should leave your hand. There’s no other way to describe it other than saying you just get the ‘feel’ for what it takes to bowl that delivery.
If you’re practicing in the nets with your club, why not spend a full session trying to only bowl yorkers? See how many perfect yorkers you can bowl. Then try to improve on this during your next practice session. There are also a couple of incredibly useful drills that I can share with you, check the bottom of this post to find those. If you want to read about how to practice your fast bowling effectively whilst you’re at home, click here to read my full guide on that!
Being able to bowl this delivery accurately on demand is an incredibly useful skill, and if you put in the time and effort during practice sessions that is required to achieve that, then you’ll begin to see yourself taking a lot more wickets!
Take Swing Into Account
If you’re the type of bowler that is capable of swinging the ball, then you will have to take this into account when bowling yorkers.
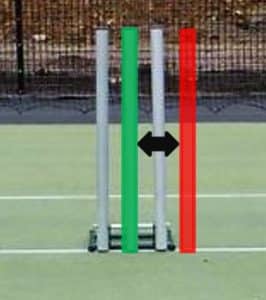
A seam bowler who does not swing the ball can just aim straight at the stumps when they attempt the yorker, as they know the ball will be travelling on a straight line wherever they want it to go. However, a swing bowler who moves the ball from left to right in the air must aim outside the line of the stumps to account for this movement in the air. This is illustrated in the photo below. The red line on the diagram shows the line the bowler should be aiming for originally. This is often called ‘4th stump’, a term to describe a fictional area just outside the line of the stumps. The green line on the diagram shows the line that the ball will hopefully be travelling on after it has swung.
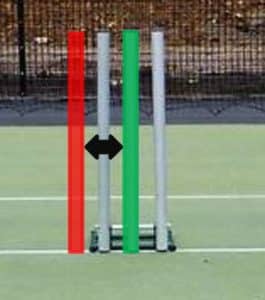
Similarly, a swing bowler who moves the ball from right to left may like to aim just to the right of the set of stumps, so that when swing occurs, the yorker will be roughly pitching in front of the stumps. Again, this can be seen in the photo below.
It’s necessary to take the movement of the ball into account because if we fail to do this, it can lead to us bowling very waywardly. If we start the ball on the wrong line, the ball swings and ends up going down the leg-side, this can cost us runs from wides and also makes the ball a lot easier to clip away by the batsman. He/she only needs to clip the ball lightly and it will shoot away behind square on the leg side, probably for a boundary! Contrast this to a ball that swings onto the line of the stumps. The batsman has to be much more concerned with protecting their wicket in this scenario and therefore you have much more chance of holding them to zero runs.
The last thing I want to mention in this section is how useful cross-seam deliveries are for combatting this. Bowlers who swing the ball naturally may use a cross-seam ball so that they don’t have to take swing into account when bowling yorkers. Holding the ball cross-seam removes the chances of the ball moving side to side in the air. It effectively turns them into a seam bowler, who can just run up and bowl in a straight line. It can also be used to surprise the batsman. If they are used to seeing you swinging the ball and then you bowl one that doesn’t swing at all, this can cause them to misjudge the line of the ball.
To bowl a cross-seam ball, simply hold the ball in the grip shown below and bowl as normal. Additionally, if you’d like to know more about the advantages of cross-seam bowling, click here to read my post covering it.

Watch The Batsman & React To Their Movements
All bowlers should be alert to how the batsmen are moving during a game. I like to focus on two aspects of their movement:
- Pre-delivery – As you’re running in to bowl, even if you’re not directly looking at the batsman (you should be looking at the pitch like we discussed above), you should be aware enough to notice any movements they may make prior to you delivering the ball. Some batsmen try to move around the crease to put you off. If you see this happening when you’re planning to bowl a yorker you have a few options:
- Hold your nerve and continue with the ball you intended on bowling – The batsman may move so much that it makes it impossible to play the yorker, and you have a very good chance of getting them out as a result.
- Follow the batsman – If they move far to the left, then try to still bowl the yorker so that it hits their feet. Batsmen move around the crease to try to create width for themselves so they can free their arms. Following them with the ball doesn’t allow them to do this.
- Bowl a different ball altogether – Many professionals will choose to drop it short and bowl a bouncer when they see a batsman move around like this.
- Post-Delivery – This refers to watching a batsman’s technique and how they like to try to play the ball. There are certain things you should look out for in a batsman that may make them particularly vulnerable to yorkers:
- A high back lift – A back lift refers to how high the batsman will lift up the bat behind him just before he strikes the ball. If he has an unusually high back lift, then he is probably a batsman that will struggle with a fast and straight yorker. This is because it takes longer to bring the bat down from that high position to block a full and straight ball. I remember reading about how Andrew Flintoff would target Brian Lara in this way because of the height of his back lift. Even though Lara was one of the best batsman of all time, Flintoff highlighted a weakness and looked to exploit it.
- Early planting of the front foot – Some batsmen tend to bring their front foot forwards and across their stumps just prior to the ball being bowled. I remember using this to my advantage in the past by firing a fast paced yorker into the front pad. As the batsman has just planted that foot, he either has to shift it very quickly, or use his bat to play around the front pad. I saw it as a very easy opportunity to get him out LBW, and in the end that’s exactly what I ended up doing!
If you can learn to understand the technique of the batsmen you bowl to and use this to your advantage then this can make you a far better bowler. Professional bowlers always research their opponents prior to playing against them. Obviously it’s not realistic to expect amateur level players to be able to do research on opposing teams, but identifying weaknesses during the game is definitely the next best thing!

Use Specific Yorker Drills During Practice
As mentioned earlier, I have 2 drills that will help you practice your yorkers. One of them involves bowling at stationary targets to improve your yorker accuracy at different points on the crease. The other one gives you a really great way of working on your ability to improvise and react to movements made by the batsman.
The Three Cone Drill
For this drill you will need:
- 3 Cones (preferably different colours but this isn’t 100% necessary)
- A cricket ball (or a wind ball depending on the surface you’re bowling on)
- A set of wickets
You can do this drill anywhere if you have the three things mentioned above. In my opinion the best place to perform the drill is in the nets or on an actual cricket pitch, but it can also be done on your driveway or in your garden if you have the space needed!
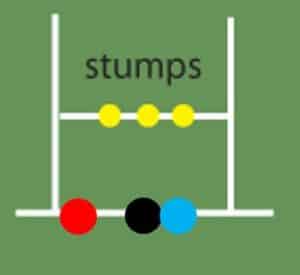
Look at the photo above to see how you should set up the drill. The red, black and blue circles each represent a different cone. Each cone is placed on a yorker length but on different lines. The black cone represents a typical yorker fired in at the base of the stumps, whereas the blue cone represents a leg stump yorker, which is useful if a batsman begins to back away to the leg-side. The red cone is in the place where a bowler should looking to bowl wide of off-stump yorkers. This type of ball is being used more and more in cricket these days as batsmen find it very hard to put away for runs.
Note: The cones in the diagram are laid out for a right-handed batsman. For left-handed batsmen simply reverse the cones the other way.
After you have the cones set up, the drill is quite simple. Nominate which type of yorker you’re going to bowl, and try to hit the corresponding cone. The more consistent you become with this and the more you ingrain it into your muscle memory the more confident you will be about trying the same thing in a real game situation.
The Moving Target Drill
For this drill you will need:
- A partner
- A moveable target. I have used a football or a beach ball in the past
- A cricket ball (or a wind ball depending on the surface you’re bowling on)
- A set of wickets
Again, this drill can be performed anywhere if you have the items listed above, however I would recommend trying it out in the nets or on a cricket field.
The drill itself is very simple:
- Mark out your run-up and approach the crease with the intention of bowling a middle stump yorker.
- As you’re about to enter your delivery stride, get your partner to roll the moveable target across the pitch on a yorker length.
- Your task is to anticipate the movement of the target and adjust the line of your yorker accordingly to hit it.
This drill simulates a batsman changing his position on the crease at the last possible moment. During cricket matches, it may be necessary for the bowler to react to this change in position by following the batsman with the ball.
Get your partner to roll the target across the wicket at different speeds so that you can better train yourself to react to different movements.
Conclusion
Thanks for reading this post, I hope it helps! As for the drills, I feel like it’s important to remember that they are being performed without a batsman present. The true test of a bowler’s nerve is trying to bowl these deliveries when there is an aggressive batsman at the other end of the wicket! So whenever you get the opportunity to practice with friends or members of your team, make sure you do so!
Recent Posts
Where Should You Place Your Best Fielder In A Cricket Match?
When a limited overs cricket match reaches a critical point, you’ll often hear coaches, players and commentators talking about how important it is to ‘have your best fielders in important...
The sport of cricket has successfully rebranded itself in the last half century in order to appeal to wider audiences. Now, instead of just having test cricket as the sole international format of the...