
Many inexperienced players will purchase a cricket bat and think it’s perfectly fine to be used in a real match straight away. But hold on! Before you do head out to the middle, it may be wise to give your bat some tender loving care first. There is always a risk that new bats can crack and suffer irreversible damage if used when brand new. To protect against this cricketers should first think about oiling and knocking in their bat. And if you’re sat here wondering ‘what on earth does that mean?’ like I was when I bought my first bat, then this is the post for you!
To oil and knock in your bat you will need the following items:
- A bottle of Linseed oil or specialist cricket bat oil – Both of these can be found easily online! I’ve always used Linseed oil in the past, so if you want to check out the current price for a bottle of that click here!
- A cloth
- Sandpaper (optional)
- A cricket bat mallet – click here to check out a great one on Amazon.
All of those items are relatively inexpensive, and can be picked up for a total of around £15-£20. Some retailers even sell a bat conditioning kit which contains all of the above items.
Once you have those, you’re ready to begin!
How To Oil Your Bat
This is a hugely important part of the bat preparation process. It is vital that the bat receives enough oil so that it is protected against cracking and splitting. However, it is also equally as vital that you don’t use too much oil. This can often be more damaging, and can ruin the weight balance of the bat due to the extra moisture. It can also cause the bat to rot, which would make it totally unusable!
To oil a bat in the correct way, follow these steps:
- You may wish to lightly sand the surface of the bat using a small piece of sandpaper before you begin, although this isn’t totally necessary.
- Pour a very small amount of oil on to the face of the bat. I like to use Linseed oil as this aids water repellence and is the most commonly used oil for this process.
- Use the cloth to spread this oil across the entire surface area. Ensure that all uncovered areas of the bat receive a thin layer of oil. This includes the face, edges, the toe (if there is no toe guard) and even the back of the bat if you choose to. Although oiling the back isn’t compulsory.
- Avoid oiling the splice of the bat or the handle. This is vital to ensure the glue that holds the bat together is not compromised.
- Check that you haven’t used too much oil by standing the bat upright. If you can see the oil trickling down the face of the bat then too much has been applied. Use the cloth to wipe this excess away.
- Once you’re happy that the oil has been distributed evenly, allow the bat to dry in a horizontal face up position for approximately 12 hours or as long as it takes to dry fully.
- When dry, repeat step 1 and leave the bat in a horizontal face up position to dry once more.
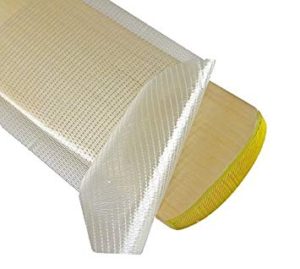
Note: Some cricket bats come installed with protective covers often called scuff sheets on their face, which can be seen in the photo below. If your bat has one of these, then it is not necessary to apply oil to that area. Instead, just apply the oil to all the other exposed areas that are mentioned in the steps above.
In my opinion, it is not necessary to use more than two coats of oil. Whenever I’ve bought new bats, two coats has worked fine for me. Also, as I’ve already mentioned, too much oil definitely has the potential to be more damaging than too little.
How To Knock In Your Bat
Knocking in is the second part of the preparation process, and it helps to make your bat stronger by using impact to knit and compress the wood grains together. As with the oiling process, this helps protect the bat against cracking, and it also prepares the wood for the impact of a cricket ball. This process is equally as important as the oiling of the bat in my view! Especially if you buy a bat that does not come pre-knocked in.
‘Pre-knocked in’ means that some work has been done on preparation during manufacture. You’ll usually be able to find out if the type of bat you have is pre-knocked in by consulting the packaging, the bat itself, or contacting the manufacturer or place that you purchased it. These bats will have been pressed, potentially oiled and will also have been lightly knocked in by hand. This means that they will still require 3-4 hours knocking in that is carried out by the end user before they are used in a competitive game.
As for bats that don’t come pre-knocked in, these will require you to do all the work. This process doesn’t really have a set of steps that you can follow, instead it just requires a bit of concentration and dedication.
So how do we do it? Using a bat mallet (seen in the photo below), hit the front face of the bat repeatedly. When beginning, you should be hitting the bat quite softly, and gradually build up the force of the hits as time goes on. It is also necessary to strike the edges and toe of the bat with the mallet, as these too can be contacted by the cricket ball. Again, start off soft, and build up the force over time. The back of the bat does not need to be knocked in. Make sure that the mallet only makes contact with the flat faces of the bat rather than the corners, as this could cause unwanted damage.

The reason I said that this process requires concentration and dedication is that you have to continue the knocking in process for quite a while, ideally in the region of 5-6 hours. This may seem incredibly lengthy but it’s definitely worth it to have a bat that doesn’t break! I bought a bat when I was 16 that I only knocked in for around an hour. When it came to playing with it in the nets, the bottom right part of the bat ended up cracking completely and breaking off. I managed to get the bat replaced but perhaps this wouldn’t have happened if I’d have knocked it in more thoroughly!
Also, remember you can obviously take breaks during the 6 hours it takes to knock in your bat, it doesn’t all have to be done at once! So whenever you have a bit of free time, make sure you carry out this step fully and properly!
How To ‘Play In’ Your Bat
After knocking in with the mallet, you should take your new cricket bat into a practice net session in order to ‘play in’ the bat. For this, and old but good quality cricket ball should be used, as these are much softer than newer balls and you don’t want the bat taking unnecessary damage at this stage. You should also try to have someone bowl medium pace/spin bowling at you rather than fast, as this will also reduce the chance of damage.
The whole idea of this process is to get the bat to a point where the seam of the cricket ball wont scuff and damage the face of the bat when the impact occurs. If you’re playing in the nets with an old ball and notice that this is happening, then stop using the bat and continue to knock it in using the bat mallet.
After you’ve hit an hours’ worth of balls in the nets your bat should be ready to be used in a full cricket match.
How To Remove Scuffs From The Face Of Your Bat
After using your bat in competitive games, you may find that the surface will get marked and scuffed due to repeated contact with hard cricket balls. There is quite a simple way to get rid of some of these imperfections and all you will need to do this is some cotton wool/cotton balls and a bottle of methylated spirits.
Once you have these, simply apply a small amount of the spirit to the cotton wool and then rub it on to the bat face where you can see a mark caused by the ball. This may take a little while but the more you rub the cotton wool across the marked area, you should see the wood begin to appear a lot cleaner and shinier.
Some players choose to leave their bat face as it is, and don’t look to remove these marks when they occur. Obviously that is your choice, but I thought I would include this bit of advice in here anyway! Again, just remember to not use too much of the spirit, as you don’t want the bat becoming saturated with too much liquid.
Things to Remember
So there you have it! If you follow the advice above I am confident that your new cricket bat is ready to use and in a good enough condition to avoid splitting and cracking. The last things that I would like you to take away from this post are as follows:
- Do not over oil the bat! Too little is better than too much
- Don’t for any reason stand the bat in a tub of oil.
- The bat has several faces you should knock in with the mallet. These are: the front face, the edges, and the toe. Do not knock in the corners or the back of the bat.
- Try to knock in the bat for around 6 hours, with gradually increasing intensity.
- When ‘playing in’ your bat, use high quality old cricket balls and don’t face bowling that is too fast.
- Regularly check the condition of your bat. If you notice several dry areas developing throughout the cricket season then it may need another coat of oil.
Recent Posts
Where Should You Place Your Best Fielder In A Cricket Match?
When a limited overs cricket match reaches a critical point, you’ll often hear coaches, players and commentators talking about how important it is to ‘have your best fielders in important...
The sport of cricket has successfully rebranded itself in the last half century in order to appeal to wider audiences. Now, instead of just having test cricket as the sole international format of the...