
If you want to become a truly great cricketer, then you will need to make sure your fielding skills are up to scratch. Fielding is one of the less glamorous parts of Cricket, but the reality is – great fielding can produce many game changing opportunities! As coaches have begun to realise this, fielding standards have risen dramatically. You’re now much less likely to get picked by a team if you’re totally useless in the field! This means there’s pressure on all of us to get the basics of fielding right.
There are many different aspects of fielding. Standing in the slip cordon requires us to have incredibly quick reactions and good decision-making processes, whereas standing on the square leg boundary requires us to be able to cover ground quickly and take high catches. In this post I’m going to share 10 tips you can add to your game that will allow you to improve the basics of your fielding techniques. These will ensure that you have a good foundation to build on in the future!
My 10 tips for improving your fielding skills are as follows:
- Stay Balanced As The Ball Is Bowled
- Make Sure Your Hand Position Is Correct When Taking Catches
- Choose Whether To Watch The Ball Or The Batsman
- Learn To Back Up Your Teammates’ Throws
- Buy Yourself Some Specialist Practice Equipment
- Start Using The ‘Long Barrier’ Technique
- Get The Basics Of Long Throwing Right
- Be Aggressive & Set Yourself A High Standard In The Field
- Be Aware Of Angles & How You Can Cover Ground Most Effectively
- Watch Out For The Spin On The Ball
Stay Balanced As The Ball Is Bowled
No matter where you are fielding, you should always try to be in a nicely balanced position as the ball is delivered by the bowler! Getting your body into this position will allow you to react and set off quickly to field the ball if needed.
To get into the balanced position you should take two small steps forward just before the bowler delivers the ball. As you take these small steps, move your feet so that they are just a bit wider than shoulder width apart. Your weight should be evenly distributed between both feet! You should also bend your knees slightly and push up on to the balls of your feet. You don’t want to be on your heels when the batsman hits the ball because this makes it much harder for you to react explosively! Your arms should be slightly bent too, ready to move quickly if a catch comes your way. A lot of players have a tendency to rest their hands on their knees in between deliveries. This is fine as long as you remove them before the ball is bowled!
It is especially important to get into the balanced position that I just described when you’re fielding close to the wicket or anywhere inside the ring. If you’re fielding out on the boundary then you don’t really have to stand with your feet spread wide and your knees bent. You can stand more upright, just ensure you are alert and on the balls of your feet ready to set off towards the ball if it comes in your direction. Always be prepared for the ball to come to you!
Make Sure Your Hand Position Is Correct While Taking Catches
I really like this tip because it made me so much more confident when taking catches. It’s amazingly simple, but a lot of younger and inexperienced players don’t get taught to do it! Basically, this is a rule for how you should be catching the ball. If the ball comes towards you above the height of your stomach, then you should position your hands together with your fingers pointing upwards and take the catch like that. This is often referred to as the ‘reverse cup’ method. If the ball comes towards you below the level of your stomach you should be attempting to take the catch with your hands together and your fingers pointing down towards the ground. This is often referred to as the ‘orthodox cup’ method. For both methods, try to make sure that you’re not leaving a gap between your hands that might allow the ball to sneak through! The pictures below demonstrate how each of these approaches should look!
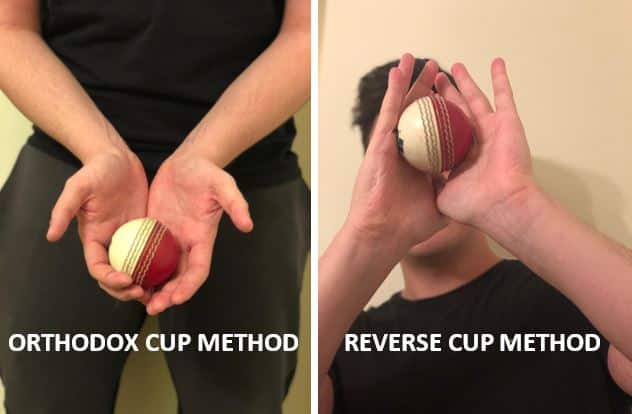
You can easily see how effective this tip is if you try to do this the other way around. If you try to take a catch in the slips that is around shoulder height, it is almost impossible to do so with your fingers pointing downwards! It gets the hands in a bad position and causes them to come apart. It’s a much riskier attempt at a catch. The correct approach should be bending the knees and sinking down towards the ground slightly, with your hands up and fingers pointing upwards.
Learning to catch like this can take a little bit of getting used to at first but after a few practice sessions dedicated to it, it’ll become second nature to you. Get a coach to throw you some balls from close range at different heights to simulate a catch close to the wicket. Adjust the position of your hands depending on the height of the ball! Ideally you want to get to that stage where you don’t even have to think about whether your fingers are pointing up or down, it just feels natural!
Choose Whether To Watch The Ball Or The Batsman
Most of us will already know that one of the keys to being a good batsman is being able to watch the ball very closely. The same is true if you want to become a better fielder! Keeping a close eye on what is happening during every delivery allows us to react quicker and more precisely to whatever shot the batsman plays. This tip is especially important If you regularly field close to the wicket instead of on the boundary due to how quickly the ball can be hit towards you!
In my opinion, there are two options you can use:
- Watch The Ball All The Way From The Bowlers Hand – Some fielders prefer to watch the ball all the way through its journey down the pitch. This means watching the bowler as they approach the wicket! Some players who field in positions that are squarer of the wicket (e.g. Square leg or point) prefer not to do this as it involves a lot of movement of the head.
- Watch The Bat – Your other option is to focus on the batsman and how they flourish the bat. By doing this, you can easily see the angle at which the ball leaves the bat, and if it is travelling in your direction or not! This option also allows you to keep your head still no matter what position you are in on the field. You will be able to tell roughly where the batsman is looking to hit the ball from the position they get their body into when the ball is delivered. The more experience you have doing this then the quicker you will be able to diagnose a batsman’s movements.
See what you’re most comfortable doing. If you try both of these approaches during matches then you will usually be able to find one that works better for you!
Learn To ‘Back Up’ Your Teammates’ Throws
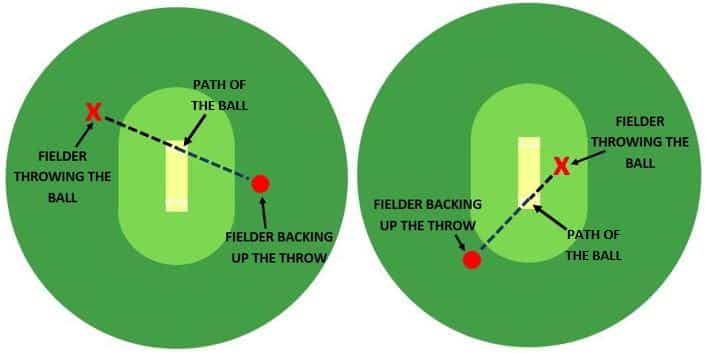
This is one of the most important principles of fielding, and it’s something you’ll have to get used to doing if you want to be a reliable team mate in the field! Basically, whenever a ball is thrown towards the stumps to try to run someone out, a fielder must ‘back up’ the throw. To back up another fielder’s throw, you should try to position yourself 10-20 yards behind the set of stumps that the ball is being thrown at. You should also try to align yourself with the fielder who is throwing the ball and the stumps. I’ve included a couple of example diagrams below to show you what sort of positions you should try to get yourself in! The main reason we do this is to put ourselves in a good position to stop the ball if it misses the stumps. You will also be in a good position to throw the ball back towards the stumps if the batsmen choose to run again! If the ball misses the stumps and no one is backing up the throw, then the batting side will be able to take an extra run without the risk of being run out!
You won’t be able to back up every throw, but it’s important to know when you’re the person who should be doing it! This knowledge comes with experience and practice. You must assess the field quickly to determine where your teammates are, and if you’re the closest person to the backing up position, you must move to that spot as quickly as possible and get ready to field the ball.
If you’re just starting out on your cricket journey then backing up is something you’ll definitely hear your coaches preaching about in the near future! Get ahead of the curve by thinking about and practicing this skill before they include it in a training session!
Buy Yourself Some Specialist Practice Equipment
There are a few bits of equipment that can be incredibly helpful when practicing your fielding skills! As many of you will know, it can be hard to come up with new and exciting ways to practice fielding! Therefore, using some brand-new equipment to simulate specific aspects of a cricket match can be a great way to do this. I’ll share a few great ones that I’ve used in the past here:
- Katchet Training Aids – These things are brilliant, and are used by professional cricketers all the time during training sessions to practice their catching. They look like small ramps and are placed on the floor a few feet in front of the person who is going to take the catches. To use them properly you will need to use them with a partner! When your partner hits or throws the ball on to the surface of the training aid it will bounce off towards you at interesting angles. They are great for simulating catches that happen close to the wicket, such as in the slips or in the covers, and really help prepare you to react quickly to the ball. You can use a variety of different balls on them, including tennis balls, wind balls and cricket balls. If you’re interested in buying one of these, then they’re usually very easy to find on Amazon! Click the link here if you’d like to check the current price!
- Rebound Nets – These are my personal favourite out of all my recommendations! You can have a lot of fun with them even when you’re not using them in a strict cricket practice. Rebound nets will help you improve your catching ability, and they can be used to practice your ball gathering skills too. The product consists of a net that is tightly wound around a metal frame, so that when a ball is thrown into the net, it will bounce off at an accelerated speed! The angle of the metal frame can also be adjusted so that the ball will bounce off the net at specific angles to test you in different ways. Again, these are excellent if you want to practice quick reaction catches that are travelling towards you at head height or lower! Hunts County have an excellent version of the rebound net, so if you want to see the current price of that then click here! If you regularly practice with multiple people, or if you’re a parent looking to provide some entertainment for multiple children, then you may decide that a double sided rebound net will suit your needs a lot better! These are usually a bit more expensive, but can be used a lot more flexibly! A couple of the clubs I played for when I was younger would use these during our weekly fielding drills, and I always found them to be good fun and challenging to use! Click here if you want to check out a top of the range double sided rebound net on Amazon!
- Plastic Stumps – Most cricketers should own some of these if you want to practice at home as well as with your team! Plastic stumps are mounted onto a plastic base so they don’t have to be inserted into the ground, and this makes them portable! You can take them on your travels with you and practice anywhere! They can be used in many fielding drills, specifically ones where players are looking to practice throwing the ball at the stumps to run a batsman out! You can pick up a good quality set of plastic stumps from Amazon for a relatively cheap price! If you’re interested then click here to have a look at a set of stumps that I think are great value! You can also buy wooden versions of these that are mounted onto metal bases and have springs attached so the stumps can be knocked back before returning to their original position! These are more expensive due to the materials used to create them and represent a higher quality option than the plastic version! Which ones you choose to buy depends on your budget!
- Fielding Net (Ball Stop) – The purpose of a fielding net (also known as a ball stop) is to help cricketers during their fielding drills. They are usually placed behind a set of stumps that the fielder is throwing towards. This means that if they throw and miss the stumps, the ball ends up in the fielding net rather than rolling all the way to the other side of the field! Basically, they give you a little bit of security so that you aren’t chasing the ball around the field all day! For me, that was one of the worst things about fielding practice! Having to go collect the ball if you missed the stumps takes a lot of effort, and can make you lose motivation. When you use a fielding net you can throw multiple balls at the stumps, and if you’re pretty accurate they will all collect inside the net, making them easy to gather. If you want to save yourself some time collecting cricket balls then click here to check the current price of a good quality fielding net! (Also, please note, this product does not include the set of stumps that are featured in the product image.)
Start Using The ‘Long Barrier’ Technique
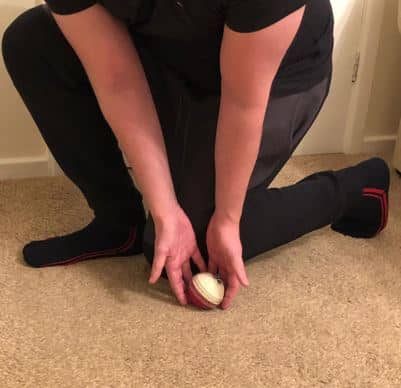
This really is one of the most basic fielding tips but you will be amazed how many players still fail to use it! The long barrier is a technique that is used for gathering the ball when it is travelling along the ground directly towards you at high speed. It involves you crouching down and picking the ball up whilst also creating a barrier with your legs at the same time. Using the legs to create this barrier makes sure that if we miss the ball with our hands for any reason, the ball will hit our legs and stop anyway! I’ve lost count of the number of times I’ve seen fielders reach down with their hands to field the ball, miss it completely, and then turn around and watch as the ball runs away for a boundary! This is what the long barrier helps to prevent! Have a look at the photo below to see me demonstrating the long barrier position!
Obviously, there are times when you don’t need to use the long barrier! As I said, it is primarily only used when the ball is coming directly towards you. If you are chasing after the ball then you will more than likely not have enough time to get down into the long barrier position. It also may not be useful if you have to pick the ball up very quickly in order to throw at the stumps! If you sense that there may be a chance of a run out, you may wish to take a slightly riskier approach and attempt to pick the ball up from the ground with one hand whilst simultaneously moving forwards towards the stumps!
I tend to use the long barrier more when I’m fielding on the boundary. This is an area of the field where mistakes can be very costly! Failure to gather the ball cleanly when fielding in this area will almost certainly cost you a boundary! So when the ball is heading towards me in an area like this, I always prefer to take the safer option and use the long barrier to avoid getting shouted at by the coaches!
Get The Basics Of Long Throwing Right
It’s important that cricketers work on their ability to throw the ball over long distances. When fielding out on the boundary, it is vital that you have enough power behind your throw to get the ball to the wicketkeeper quickly and accurately! This increases the chances that you could run one of the batsmen out! A fielder who cannot throw the ball far will not be much use if their captain chooses to position them out on the boundary, making them a much less valuable piece of the fielding side. Some cricketers can naturally throw the ball further than others without practicing much, but there are always ways to improve how far you can throw the ball.
Most of the improvements you can make simply come down to practice. Try to include long throwing in your practice sessions! This helps you to get used to the throwing motion and helps to train the muscles involved in the throwing process. If you feel that this is a particularly weak area of your game and you really want to try to improve it, set aside 30 minutes of your practice time per week to throw a cricket ball to a partner. Once you feel that you have mastered the throw over a certain distance, tell your partner to move back 5 metres, and try to throw the ball that distance instead.
As a starting point, make sure you have the following basics right when you’re throwing the ball to the wicketkeeper from the boundary:
- Before you do anything else, make sure you focus your eyes on where you want the ball to go.
- When you’re about to throw the ball, take a stride forwards towards in the direction of your target. If you throw with your right hand, you should be striding forwards with your left foot. For left handed throwers, stride forwards with your right foot.
- As you take the stride forward, your non-throwing hand should also be extended in the direction of your target. This ensures that all your momentum is in line with where you are aiming to throw the ball.
- Once you have released the ball, make sure to follow through in the desired direction of the throw. This helps to add power to the throw as well as aiding your accuracy.
- If you’re throwing the ball to the wicketkeeper on the bounce, try to ensure that the bounce occurs a few metres before it reaches the keeper. If you throw the ball so it bounces near their feet that can be an incredibly hard throw to gather cleanly, and it could lead to the keeper letting the ball go past them.
Once you are consistently doing all of the above things correctly, you can begin to work on the power of your throws!
Be Aggressive & Set Yourself A High Standard In The Field
This is a mentality tip! I know from my own experience how important mentality and attitude is when it comes to fielding! When I first started playing cricket I dropped a few catches in my first 5 or 6 games and my confidence dropped massively as a result. I’d be fine in practice, but when it came to proper matches the pressure would get to me. I remember playing one weekend and I was fielding quite close to the wicket. A catch popped up off the bat that was easily within my reach if I committed quickly and decided to run forwards and dive for it. Because I was so low on confidence, I moved slowly and didn’t reach the ball in time on purpose. I told my teammates that I couldn’t have reached the ball, even though deep down I knew I could have.
I’m telling you this story because having an attacking mentality while fielding is so important. Attack the ball. Have confidence in your abilities and do your best to turn the tide of the game. The feeling you get when you run a batsman out, or take a great catch is amazing. Dismissals caused by the fielders can also lead to huge momentum shifts in the game!
You should want the ball to come to you in the field! It’s much better to be involved in the game than to not have any impact at all. Every time the ball comes your way, see it as your opportunity to put some pressure on the batting side and have your say in the game! Take some pride in your fielding performance.
Be Aware Of Angles & How You Can Cover Ground Most Effectively
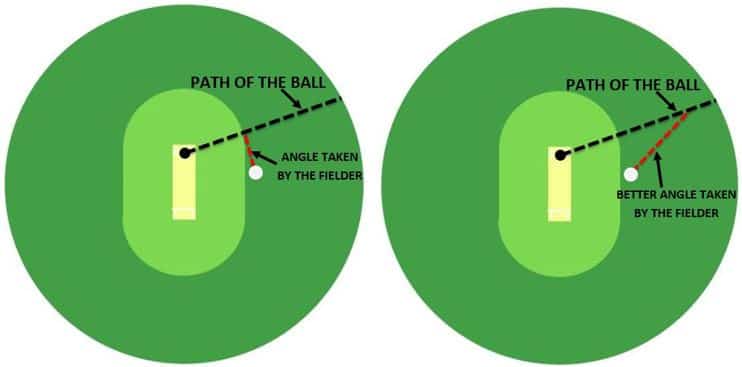
One thing that is really frustrates me when I watch cricketers in the field is when they don’t take smart angles towards the ball. When a ball is hit in your general direction, requiring you to chase it down, you must immediately try to judge the pace on the ball. The speed at which the ball is moving dictates the angle at which you need to run in order to catch it. If you run at the wrong angle towards the ball, this can lead to the ball going past you and you never being able to catch up! Sometimes, the ball will be moving too fast for you to run directly towards it. If you sense the ball is going to pass you, then you should set off at a ‘smarter’ angle. I’ve drawn up a couple of diagrams below to show you an example of this!
Again, you will learn how to do this by exposing yourself to fielding and practicing a lot. The more you field, the better you will get at judging the speed on the ball as it leaves the bat and determining the angles you need to run at in order to stop the ball successfully.
Watch Out For Spin On The Ball
Many players who field behind square on either side of the wicket will get caught out due to the spin that is applied to the ball when it is struck by the batsman! If you’re fielding in these positions, always be aware that the ball may suddenly change direction when it bounces! If you run directly towards the ball, then you can end up looking pretty foolish when it deviates and flies past you. To avoid this, don’t commit to the ball too early. If you can, wait for the ball to bounce so that you can judge the spin better before you try to gather it.
Conclusion
Like I said at the beginning of this post, these are the things you’re going to have to do if you want to become an effective fielder! They are incredibly simple tips, and you don’t have to be an amazing athlete to add any of these to your game. Getting these basics right will provide you with the solid foundation you need, and allow you to work on your athleticism and explosiveness in order to make yourself an even better fielder in the future! Practice the skills I laid out in this post for a few months and I promise you you’ll be a better fielder as a result!
Recent Posts
Where Should You Place Your Best Fielder In A Cricket Match?
When a limited overs cricket match reaches a critical point, you’ll often hear coaches, players and commentators talking about how important it is to ‘have your best fielders in important...
The sport of cricket has successfully rebranded itself in the last half century in order to appeal to wider audiences. Now, instead of just having test cricket as the sole international format of the...