
The pull shot is one of the most impressive cricket strokes that a batsman can play. Certain batsmen are able to play it a lot better than others, and one of my favourite guys to watch play the pull shot was ex-Australia captain Ricky Ponting.
Ponting was the perfect number 3 batsman, and although I’m English, he was always one of my favourites to watch. He was an aggressive player who loved to take the attack to fast bowlers, and he was always looking for an excuse to unfurl the pull shot and smack the ball to the boundary. He scored thousands of runs with this shot over the course of his career, and did it in such a stylish way that the shot became one of the defining features of his game. If the bowler dragged the ball down and missed their length by a slight amount, Ponting always seemed to pick this up immediately and would make the bowler pay. This made him an incredibly hard person to bowl at and allowed him to demoralise the opposition fast bowlers. If you want to watch a little compilation of Ricky playing the shot, then check out the video below – it’s batting at its absolute best!
A batsman who is able to play the pull shot effectively will need to do all of the following things: watch the ball intently, pick up the length of the ball early, display positive foot movement, maintain a good head position and bring the bat through in a nice and controlled fashion. They will also need to know how to play the pull shot in a way that allows them to pick the gaps in the field!
In this post, I will be giving you guidance on how to do all of those things! We’ll also discuss what deliveries you should be using the pull shot against, as well as the different areas of the field that it targets! Let’s begin…
What Is The Pull Shot?
The pull shot is a cross-batted, attacking cricket shot that is played off the back foot. This means that the batsman will usually withdraw slightly towards their stumps in order to play the shot.
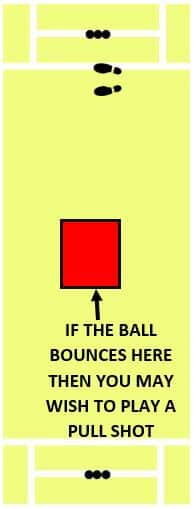
The shot is most effective when it is played against deliveries that are between hip and shoulder height as they reach the batsman. This length of delivery is often referred to as ‘back of a length’ or simply as ‘short’. As for the line of the delivery, the pull shot is more effective if it is played against deliveries that are targeting the batsman’s body, or ones that are travelling slightly down the leg side. The pull shot can also be used against balls that are just outside the line of the off stump, but this shot is a little bit more challenging to play! The pull shot should probably not be played if you receive a delivery that is wider than a 5th stump line!
The diagram below shows where we would expect the ball to bounce if we are hoping to play a pull shot. It’s important to note that this zone is applicable when we have a right arm fast bowler bowling to a right handed batsman! If a left handed batsman is at the crease, or we have a left arm fast bowler that is bowling, the zone for the pull shot will shift across to the right slightly. The required length would remain the same, but the line would change a little!
What Areas Of The Field Does The Pull Shot Target?
The pull shot is such a profitable shot because we can use it to target such a wide range of the cricket field. The pull shot is always hit into the leg side, but it can target anywhere from just in front of square all the way around to fine leg, which is behind square on the leg side. If you don’t understand where those positions are, then check my diagram below! The red zone indicates where the pull shot can be hit!
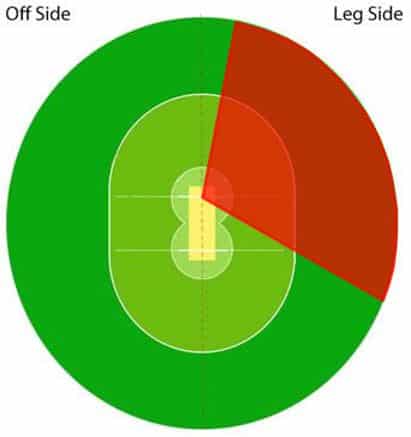
Note: The diagram above shows where a right handed batsman should be trying to hit the shot. A left handed batsman would be aiming for the same region on the other side of the field.
Captains are not as likely to pack the leg side with fielders as they are with the off-side, so there’s plenty of opportunity to score boundaries when you’re using the pull shot! You just have to be skilled enough to pick the gaps between the deep fielders! This is a skill we will explore more later in this post.
How To Play The Pull Shot – The Technical Details
The aim of this section of the post is to describe what you need to do with each part of your body in order to play the perfect pull shot. Let’s start with your foot position…
Foot & Leg Position
The foot/leg position required for back foot shots is not as important as it is for front foot shots, however, there are still a number of important things that we need to do.
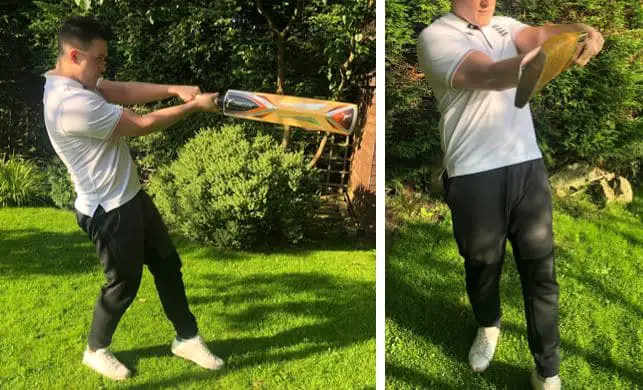
Ideally, before we play the pull shot, we will have gotten ourselves into a position from which we are fully ready to receive the ball. This position usually looks something like the picture below! But, regardless of whether your position looks exactly like this, the most important thing you must do is make sure that the majority of your weight is on/over your front foot as the bowler is about to deliver the ball.
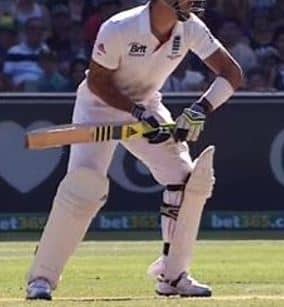
Having our weight forward like this makes it easier for us to move our feet in the right way to play the pull shot. Once you notice that the ball you receive is a short delivery, you must push backwards off your front foot, moving your body back towards your stumps. Your feet should come closer together, and depending on the height of the delivery, you may need to stand tall on the tip of your toes to ensure you can get your hands above the ball. When watching Ricky Ponting play the pull shot, it’s always very obvious that his initial movement before the ball is bowled will be to come forwards, get in to a semi-crouched position, and then once he notices the ball is short, he will explode backwards off the front foot to play pull. Everything is so smooth and rhythmical, and I think it’s something we should all look to copy.
As you move backwards, your weight will transition from your front foot to your back foot. Your back foot is your anchor point during the pull shot, and the rest of your body will rotate around that point. With your body weight over your back foot, you can either choose to keep your front foot planted on the floor as you play the shot, or allow it to lift up and swing around to the leg side in an arc as your body turns to hit the ball. Both of these can be used in different situations!
The key to the pull shot is being able to pick up the length of the ball nice and early, and then quickly being able to rock back on to your back foot. The quicker you can push yourself back into this position and get ready to bring your bat through, the more effectively you will be able to play the pull shot. That was a huge strength of Ricky Ponting’s game! Commentators would often say that it seemed like he had so much time to play the shot, and this shows you how early he was able to get himself in position. If you pick up the ball late and don’t shift on to your back foot as quickly, you will have to rush your shot, which can lead to mistakes!
Head Position
The main thing to remember about the position of your head as you play the pull shot is to keep your eye on the ball at all times. Many batsmen will take their eye off the ball when a fast bowler bowls a short delivery as they are afraid of the ball hitting them, but doing this harms your ability to make a good connection with the ball.
If watching the ball is something that you feel like you struggle with, I’d recommend reading one of my other posts by clicking here. In that post I’ve put together plenty of my favourite tips that will help batsmen to focus more closely on the ball.
The Motion Of The Arms & The Bat
The position of your arms and the motion of your bat is where the real action of the pull shot happens!
Once your weight is on your back foot, your bat should be beginning its journey towards the ball. Ideally, we should be aiming to make contact with the ball about a metre in front of our body. This gives us the room that we need to extend our arms in front of us and hit the ball with the middle of the bat.
To bring the bat around to meet the ball, start the process by collapsing your front shoulder towards the leg side. As you do this, bring your back shoulder around to take its place. This rotation of the shoulders creates the ‘swivel’ motion in our torso that you’re going to need to play the shot. The power of your pull shot is largely going to be dictated by how you perform this rotation.
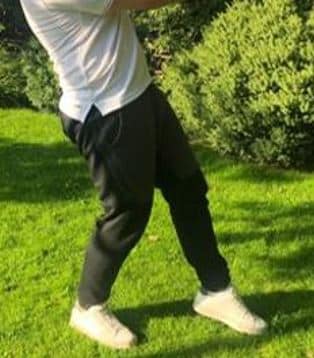
As your shoulders rotate, you should have brought your hands up high started the process of bringing the bat to meet the ball in a cross-batted fashion. The face of the bat should be pointing towards the leg side, and your arms should be in the position shown in the photo below. Both your top hand and your bottom hand on your bat will now be at the same height, with your bottom hand providing the power and helping to drive the bat through the ball, and the top hand providing stability. As your body rotates and you make contact with the ball, you should pivot on your back foot as mentioned in the section earlier.
If you want to hit the ball square of the wicket, then you will need to strike it more forcefully with a larger follow through. If you want the ball to go fine down in the direction of fine leg, then a lighter contact will be required. Here, the aim should be to ‘glance’ the ball off the face of the bat, therefore a large follow through is not necessary.
Sometimes when playing the pull shot you will be aiming to hit the ball in the air to clear some close fielders, but there will be some situations that require you to keep the ball on the floor. Thankfully there is a slight adjustment you can make to your arm/hand position that will help you do this. This adjustment is referred to as ‘rolling the wrists’. Rolling your wrists as you play a cross-batted shot like the pull shot makes it more likely that we will hit the ball towards the ground instead of aerially.
Basically, as you make contact with the ball, you should be turning your wrists over so that the face of your bat ends up angled slightly towards the ground. When playing the pull shot normally, both our wrists should be at the same height – roughly level with each other. However, when rolling the wrists, the wrist on your bottom hand will end up slightly higher than your top hand wrist. They key to doing this properly is rolling your wrists at the correct time. Doing it too early can lead to you hitting the ball with the side of your bat and getting a top edge, and doing it too late may mean that the ball still travels up in the air. I’d recommend practicing this quite a bit in the nets so you can get a good feel for it!
Other Tips That Will Help You Play The Pull Shot
There are many more tips that will help you play the pull shot in an effective way, and I’ll go through some of my favourites in this next section!
Use The Line Of The Delivery To Determine Your Hit Zones
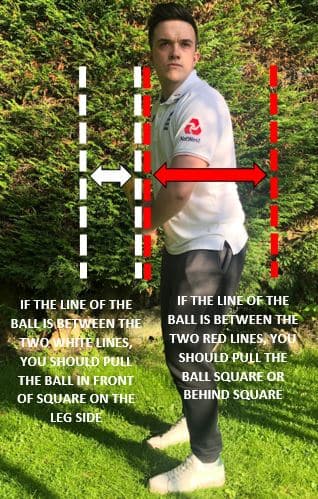
One thing I’ve heard Ricky Ponting talk about quite a few times when it comes to playing the pull shot is that he would try to hit the ball in different areas depending on the line of the ball he received.
If the line of the delivery was on Ricky’s off stump, or just outside his off stump, he knew that this kind of ball was perfect for hitting in front of square or square of the wicket. Due to the angle of these deliveries, they are very hard to hit behind square! Therefore, Ricky would try to hit the ball earlier and more forcefully to target the deep mid-wicket area of the field.
If the short ball that Ricky received was aimed towards his body, or if it was going slightly down the leg side, he wouldn’t try to hit the ball as forcefully. Instead, he would use the angle of the delivery and simply try to help the ball on its way by glancing it off the face of the bat. A contact like this naturally makes the ball travel a lot finer rather than square of the wicket, ending up somewhere close to the fine leg region.
The diagram below emphasises what I’m talking about, and I’d recommend thinking about this as you’re batting in the nets. If you get used to changing your pull shot hitting zones like this during practice sessions, you’ll be more likely to succeed doing so during a real game situation!
Batting is all about making things easier for yourself, and these simple little rules helped Ricky Ponting to play more effective pull shots against short deliveries. If he received a short ball just outside the off stump, he knew that trying to hit it down towards the fine leg region would be a lot more difficult than hitting the ball in front of square, and therefore he would tend to avoid this option. This helped to limit the number of mistakes he made when playing pull shots.
Learn How To Manipulate The Field
Fast bowlers will often try to target you with a spell of short pitched bowling to really test your technique. As they do this, they may choose to set their leg side field in a way that will take advantage of any mistakes you make. For example, they may have three leg side fielders on the boundary – 2 behind square and one in front of square – in the hope that you will hit the ball up in the air to one of these fielders. To avoid falling into traps like these, you will need to learn how to manipulate the field.
If the opposing captain puts 3 fielders on the boundary like I just mentioned, then you should be rolling your wrists as you play the pull shot and hitting the ball along the ground. In other scenarios, the opposing captains may have their fielders aligned more square of the wicket, in positions like square leg and deep midwicket. If you see this, you should try to play the ball a little later, and glance the ball off the face of the bat in order to direct it down towards the fine leg area. If the captain just has two fielders behind square on the leg side, you should try to hit the ball earlier and more forcefully to guide it in front of square and pick the gap. Before you receive a delivery, make sure you have a look around the field to see how the opposing team are trying to target you, then you can adjust your shots accordingly.
When practicing in the nets, set yourself some scenarios in your head. Imagine where the leg side fielders would be, and try to play shots that will take advantage of their positions. Doing these kinds of simulations in practice will help you get comfortable with using the pull shot to achieve different things. To truly master the pull shot, you will need to be able to play it in a more conservative fashion by hitting the ball along the ground, but you’ll also need to be able to hit the ball over the top for 4 or 6 if the leg side fielders are closer to the bat! Being able to use the shot in different ways can make it a lot harder for the opposing captain to set a field to you, which is what you should be aiming to achieve!
Use Specific Short Ball Drills
There are a number of drills I would recommend using during practice if you want to get comfortable playing the pull shot and facing short pitched bowling. Follow these steps if you want a simple drill that’ll help you out:
- Get a partner to kneel down a few metres in front of you. Your partner should be armed with a bag or a bucket of balls. For newcomers to this kind of practice, I’d recommend using tennis balls, but if you’re more experienced you can use real cricket balls.
- You should get in to your normal batting stance, and prepare to face the ball. If you’re using real cricket balls, you should be wearing all of the appropriate protective equipment.
- Ask your partner to throw the ball underarm towards your upper body. When the ball reaches you, it should be between hip height and shoulder height – the perfect height for a pull shot.
- Your task is to play the pull shot and get comfortable with striking balls that get this high on your body. This practice will give you a good feel of the movement required to play the shot. I’d recommend hitting at least 20 – 30 balls in this way before you increase the difficulty of the drill or move on to something else.
- Once you’re comfortable with underarm throws, you can move on to receiving throw downs from your partner. These throw downs will be overarm throws, and should bounce before reaching you. The aim of this progression from underarm throws to overarm throws is to replicate the action of a fast bowler a little better. The more closely we can replicate the bowling you will face in a cricket match, the better prepared you will be to deal with it.
If you want to progress this kind of practice even further, you can use a bowling machine and set it to bowl a short length, or ask net bowlers to bowl short at you.
Conclusion
If you want to become a true master of the pull shot, then you will have to spend hours working on it in practice. The more times you have practiced something, the easier you will be able to recall those skills and those movements in a real cricket match scenario. This is why practice is truly the most important thing! Many batsmen, especially younger ones, just don’t have the confidence to play the shot when there is a fast bowler that is aiming for their ribs, but over time and through using drills like the one I mentioned above, you can conquer this fear.
I hope this post has given you the information that you were wanting about the shot, and I hope I have expressed what a useful shot it is for a batsman to be able to play! If you would like to know more about batting against short pitched bowling, then I’ve written an incredibly detailed guide that you can read by clicking here! That post will give you plenty of info on the different attacking and defensive strategies you can use to combat the short ball!
Recent Posts
Where Should You Place Your Best Fielder In A Cricket Match?
When a limited overs cricket match reaches a critical point, you’ll often hear coaches, players and commentators talking about how important it is to ‘have your best fielders in important...
The sport of cricket has successfully rebranded itself in the last half century in order to appeal to wider audiences. Now, instead of just having test cricket as the sole international format of the...