
As beginners we are constantly asking ourselves ‘how can I improve my batting skills?’ I know from my own experience that the first stride out to the middle to bat can be a daunting experience, especially if we don’t feel like we have the tools to take on opposing bowlers. All the net sessions and practice in your back garden can never quite prepare you for that first innings!
So if you’re a player who’s still yet to have your first knock for a team, or even if you have played a few games already, I’ve put together 9 tips that I think are great to focus on at the start of your career. Here they are:
- Choose the correct bat
- Find a technique that works for you
- Grip the bat correctly
- Adopt a comfortable stance
- Start ‘Taking a guard’
- Learn to play the ball straight
- Practice, practice & more practice
- Focus on fitness
- Get your bat over the line
I’ll now run through each of these one by one and now try to give a bit of simple background as to why they’re all important things for a beginner to be thinking about…
Choose the Correct Bat
There is an absolutely massive range of cricket bats available to us. As younger players, the choice of bat is incredibly important as you may not have the strength to be able to use an adult bat properly due to the increase in weight.
Having the right cricket bat will help to increase the speed at which you can play a shot, and therefore also help to increase your power. No one wants to be using a bat that is far too heavy whilst a fast bowler is bowling at you! Even when facing a spinner, we want to be able to quickly manoeuvre the bat to play the correct shots. Thankfully there are handy size guides that you can look at to help you make your choice, and I’ve also written a post on how to choose a cricket bat which you can find here!
Find a Technique That Works For You
We can all take inspiration from our favourite players but the reality is that no two players’ techniques are exactly the same!
If you’re a batsman at the early stages of your career, you should put less emphasis on the advanced technical aspects such as trigger movements and focus more on the basics such as having a solid stance and grip from which to build your game. As long as you don’t develop any amazingly bad habits, minor technical issues can be ironed out through practice as you become more experienced. Your coaches should help you stay away from these bad habits at the start of your career. Filling your mind with technical details straight away can cause you to over complicate the game and think about it too much. As an inexperienced batsman, I think your main focus should be on spending time at the crease and getting bat on ball.
The main thing to always remember is to keep your eyes on the ball and no matter where the bowler bowls, try to move your head towards the line of the ball. Where your head goes, the rest of your body will follow, so it’s much easier to develop good footwork if you keep your eyes trained on the ball and move your head towards it.
Grip the Bat Correctly
Believe it or not the way that you hold the bat can massively impact what sort of a batsman you are. When watching cricket you might hear commentators say something like ‘this player has a very dominant bottom hand’, and this usually refers to how they grip the bat.
A good way to start your career is with a neutral grip, often referred to as the V-grip. The V-grip allows us to easily play shots on all sides of the wicket! A player who has a naturally more dominant bottom hand may struggle to play certain shots like a cover drive. When we bat, we want to present the full face of the bat to the ball if possible, and in my opinion the V-grip allows us to do this much more reliably.
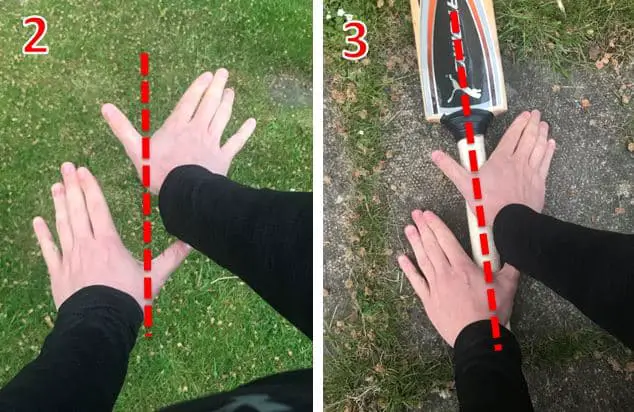
To use the V-grip for yourself, simply follow these steps:
- Place the bat face down on the floor with the handle pointing towards you.
- Put your hands together like you can see in photo 2 below. This photo is for right handed batsmen, if you are a left hander then your left hand should be above your right hand instead.
- Place your hands on the bat handle around halfway up as I’ve shown in picture 3 and pick the bat up.
This is not to say that holding the bat in this way is the only way that you can be successful. Many successful batsmen have had dominant bottom hands. This means that the bottom hand grips the bat a lot more strongly! Graeme Smith and Paul Collingwood are two batsmen that immediately spring to mind when I think of this. Both of these batsmen were excellent at playing the ball through the leg-side as the strong bottom hand grip caused them to naturally close the bat face when they played shots.
As this is just a guide I would strongly recommend using the neutral grip, as it gives you the most flexibility, but everyone is different! At the end of the day you’ve got to do what feels the most comfortable for you. If you want to read a more in depth post about the different types of grip that batsmen can choose to use, then I’ve written a post covering 4 different methods! Click here if you’d like to read that!
Adopt a Comfortable Stance
The stance is the position we are in whilst we wait for the bowler to run in and deliver the ball. Putting yourself in a good position at this stage allows you to set yourself up well to play a variety of shots whilst avoiding putting too much stress on certain parts of the body.
Here are 5 tips to follow to ensure you’re stood in a comfortable position at the crease:
- Place your feet around shoulder width apart, and distribute your weight evenly between both. As you become more experienced you may see that it can be beneficial to place more of your weight over your front leg to help with foot movement against spinners and quick bowlers, but I will cover that in other posts!
- Make sure your knees are slightly bent. This gives you the best platform from which to launch into an appropriate shot. Straight legs will make you more rigid and slower to move backwards/forwards to the ball.
- Most players have their top hand and the top of the bat resting on the inside of their front leg. In my opinion this is something that new batsmen should try to adopt, as it keeps things simple. The toe of the bat usually rests somewhere in between the feet or behind the back foot. The difference between these is minimal and it is my view that any player should just settle on what feels the most natural to them.
- The back should not be bent over too far, as this is where niggling back injuries can begin to occur. This is also why it’s vital to buy the correct size bat! A bat that is too small may cause us to lean over more than is appropriate, putting extra stress on the back muscles.
- Ensure that your front shoulder and head are pointing towards the bowler as he is about to deliver the ball. These two things are vital for allowing us to firstly judge where the ball is going to land, and secondly move quickly and accurately to play the ball once it pitches.
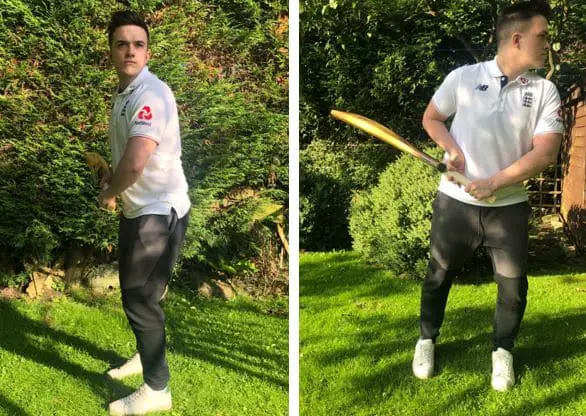
The pictures above show what I would call a conventional/comfortable stance with a front-on and side-on view. All new players should consider emulating these photos. Obviously it is not necessary to copy all aspects of them because as I’ve previously explained, cricket is all about individuality! But I think they serve as a good reference point anyway!
Start ‘Taking a Guard’
One thing that not many players who are new to the game know about is the concept of ‘taking guard’ when you walk out to bat. When I started playing I had absolutely no idea what this was and the reason why players chose to do it. Thankfully I can now explain it to you guys!
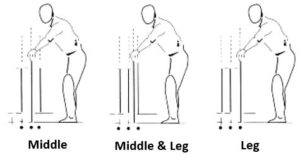
Taking a guard is what you’ll often see professional players do as soon as they get out to the middle. This process involves lining up their bat with the wickets and asking the umpire if their bat is in line with one of the stumps. Let’s say a batsman asks for ‘middle stump’. He will then place his bat on what he believes to be the line of middle stump, and then the umpire will direct him left or right until he has the bat right on the perfect line. The batsman will then mark this line on the pitch with the spikes on his boots. A batsman can ask for the line of any stump he chooses, and examples of this can be seen in the photo below.
So now I guess you’re asking the same thing I used to ask…’what is the point of doing this?’ Well, there’s a fairly simple answer. We do this to make sure that whenever we bat during practice or real games, we are always standing in the same place. All the batsman has to do is place his feet just behind the line he has made with his spikes and this will ensure that whenever he bats his head is in the same position.
Having your head and eyes in the same position for every ball allows you to learn to judge a bowler’s delivery better. The more balls you face whilst having your body in this consistent position the quicker you will be able to determine which balls you need to play at or attack and which balls you can potentially leave or choose to defend.
Many batsmen choose a middle stump guard because it means when they get into their batting stance, their eyes are almost directly over the line of the off stump. This means that any ball outside of their eye line will be missing the off stump, which rules out the possibilities of being out bowled or LBW.
If you want a more detailed explanation of how to take a guard, or why certain guards may suit you better than other ones, click here to read my post on the topic! It contains all the information you need and should help you make a good decision on what guard you should be taking, and what you should be saying to the umpire!
If you’re really desperate for help on this one, feel free to ask your coaches and they’ll be able to give you even more advice and help you to work on it during practise sessions. Batting is all about discovering your own game and being confident in your way of doing things, and your coaches are there to help you achieve this.
Learn to Play The Ball Straight
With very young players who are just starting to play the game, you will often see that the majority of strokes they play are cross-batted shots, rather than focusing on being technically correct and trying to play the ball back down the ground past the bowler.
There is a time and a place for cross-batted shots to be used. They are extremely effective against balls that are short pitched, or on anything that is above waist height.
For balls that are pitched fuller, meaning that they don’t bounce as high, ideally the full straight face of the bat should be used to hit them. The lower bounce of these deliveries allows us to get on top of the ball and strike through the line.
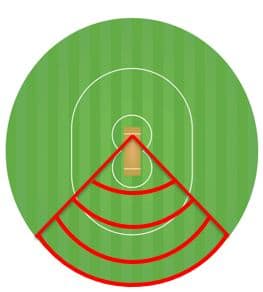
To really progress in the game of cricket you will have to become comfortable with what is often referred to as ‘scoring in the V’ and playing a shot called ‘the drive’. I created a simple diagram that you can see below to illustrate what ‘scoring in the V’ means. The batsman should be aiming to hit straight balls somewhere in to the red zone I have drawn on the cricket field. It is much easier to hit straight balls into these areas rather than square of the wicket.
As for the drive shot; it can usually be hit in three main places; straight, through the covers or towards mid-on. The basic coaching points to focus on when learning to play the drive are as follows:
- Move your front foot towards the pitch of the ball
- Bend your front knee and position your body weight over the top of it
- Try to get your head into the line of the ball as much as physically possible and watch the ball right on to the bat
- When striking the ball, ensure that the elbow of your front arm is in a high position. This helps to ensure that the bat face follows through as straight as possible.
- Follow through and finish the shot with a pose like the one shown in the picture below. During a textbook straight drive the bowler should always be able to see the sticker on your bat!

A good way to learn how to play this shot is to watch the professionals at work. They’re pros for a reason after all! The drive is definitely my favourite shot to watch as in my opinion it is by far the most elegant, and there are certain players that I always enjoyed playing the shot more than others. Guys like Ian Bell, Mike Hussey & Sachin Tendulkar were a few of my favourites and if you’re looking to see great examples of this shot then that would be a great place to start!
Playing straight is one of the most important parts of batting and the quicker you can get used to doing this, the faster you will become a much better player. The steps detailed in this section are just the basic ones you should be following in order to play the drive, but for a more in depth look at how and when to play the drive shot why not take a look at one of my other posts here.
Practice, Practice & More Practice
This one might seem obvious but the importance of practice really cannot be preached enough. And this isn’t just referring to practicing in the nets or in your back garden…this also means that you have to get as much in-game practise as you can!
Looking back at my time spent in junior cricket, it’s clear to me that I didn’t make the most of my talent. Most weeks I would have one practise session with my club, and then play one junior game at the weekend. This simply wasn’t enough practice for me to become a top level batsman, and as a result, I suffered a bit in that area. I could practice my bowling at home in the driveway, but I had no effective ways to work on my batting.
If you really want to excel as a batsman, try to take a three-fold approach to developing your game:
- Register for your local club in your appropriate age group and attend all the training sessions, as well as taking part in all the games they play during the cricket season. In addition to this, if you feel like you can handle the extra workload, why not try to join another club on top of the first one? Providing the two teams play in different leagues and play games and train on different days this can be an excellent way to get more practise. When I was younger I played for one team on Wednesday evenings and another team on Sundays. This allowed me to get a lot more experience and it was something that gave me a lot more confidence in my own game. I’d recommend this hugely.
- Take any opportunity you can to play a game with people from a higher age group than yourself. I think something that really did help me with my batting was having an opportunity to play for the under 17’s when I was 13/14 years old. The increased level of competition can help significantly. You can also put yourself forward to play for the senior teams if a space ever opens up. This exposure to playing against better players will help you when return to play for your own age group.
- Try to get family or friends to help you practise at home. You can do this by having them bowl at you or simply just giving you throw-downs. There are also little games you can play by yourself to help improve your hand eye co-ordination. One of which is famous because it was used by the legendary Donald Bradman, perhaps the greatest batsman to ever play the game. You can find information on that here. Basically, just try to immerse yourself in the game as this is key to becoming a very good batsman and cricketer as a whole!
Focus on Fitness
Batting may not look like a hugely tiring activity, but if you’ve never played cricket before I think you’d be surprised how much it actually takes out of you! This is the reason that I think it’s vital for batsmen of all ages to work on their fitness and maintain a good level of cardiovascular health.
Obviously I am not going to go into minute detail over cricket fitness in this post as it is not hugely necessary for beginners, but if you are able to add simple workout routines to your training at an early stage you will get into good habits and this is vital as you get older.
Put in some time running outdoors, or use the treadmill or exercise bike if you have access to a gym in order to improve your cardiovascular capability. In addition to this why not try to add in some core exercises to work your mid-section such as planks and hip twists? Having a strong core allows us to have better posture at the crease and helps us to avoid back injuries. Many great batsmen have suffered from severe back injuries during their careers and anything that can help to alleviate this is always useful.
As I said, beginners don’t have to follow a workout plan, but it may help you if you do!
When Running Between the Wickets, Get Your Bat Over the Line
This may sound extremely obvious but I had a few embarrassing moments when I first started playing involving this!
Sometimes when we are concentrating so hard on moving fast between the wickets and coming back for that extra run, we can lose focus and forget to make sure that part of our body or our bat touches the ground behind the line of the crease. Aggressive running will commonly lead to batsmen using a technique like the one that can be seen in the picture below, as this allows us to both get the bat over the line of the crease and turn to come back for another run simultaneously. If a batsman misjudges the turn then it can cause him to fall short of the crease, which would lead to the run not being counted.

The first time this happened to me I was playing a 20 over match back in my junior cricket days. Because we were trying to chase a decent total that had been scored by the other team things got rather frantic! I remember hitting a shot deep into the outfield and thinking immediately that the shot was worth 3 runs….and it would have been too, if I had actually run between the wickets properly. The umpires at both ends judged that I had failed to get my bat across the line, and cancelled two of the runs. This also happened to me at a couple of other points during that season!
In critical situations, this could potentially cost your team the match and it shows a lack of discipline to your coaches! So trust me, avoid the embarrassment and make sure you get that bat over the line!
Conclusion
I hope you found these tips useful. Getting these right early in your cricket career can give you a big advantage over other players on your team, and therefore gives you a great chance to score runs.
Recent Posts
Where Should You Place Your Best Fielder In A Cricket Match?
When a limited overs cricket match reaches a critical point, you’ll often hear coaches, players and commentators talking about how important it is to ‘have your best fielders in important...
The sport of cricket has successfully rebranded itself in the last half century in order to appeal to wider audiences. Now, instead of just having test cricket as the sole international format of the...